All posts by donn

Fix: “Transaction/output: unknown output script type, there is a chance that input is unspendable. Pass allowUnknownOutputs=true, if you sure” error

This was a tough one.  Encountered with Xverse wallet Chrome extension and MagicEden.io and Magisat.io

Here’s the fix:

https://github.com/paulmillr/scure-btc-signer/issues/66

Transaction/output: unknown output script type, there is a chance that input is unspendable. Pass allowUnknownOutputs=true, if you sure

Another version of this error is:

“Transaction/output: unknown output script type, there is a chance that input is unspendable. Pass allowUnknownScript=true, if you sure”


Error matching this listing: Must match target. Please contact the maker or try again later!

Error matching this listing: Must match target. Please contact the maker or try again later!
const provider = new HDWalletProvider({
  mnemonic: {
    phrase: MNEMONIC
  },
  providerOrUrl: `https://mainnet.infura.io/v3/${INFURA_API_KEY}`
});

const seaport = new opensea.OpenSeaPort(
    provider, {
        networkName: opensea.Network.Main,
        apiKey: API_KEY
    },
    (arg) => {
        console.log("From OpenSeaPort CB:");
        console.log(arg);
    }
);
const buyItem = async (contractAddress, tokenId) => {
    const accountAddress = BUYER_ADDRESS;
    const order = await seaport.api.getOrder({
        side: types.OrderSide.Sell,
        asset_contract_address: contractAddress,
        token_id: tokenId
    });

    try {
        const transactionHash = await seaport.fulfillOrder({ order, accountAddress });
        return transactionHash;
    } catch (error) {
        console.log(error);
    }
}

Fix: Update opensea-js node module from 1.x to 2.0.0

#

Saving your WD hard drive: Setting the idle3 timer

I recently learned of the hidden idle3 setting in WD Blue and WD Green drives. Shucked usb enclosures are often of these type.
When this timer expires, the heads park. Default is 8s and means your poor drive will be parking heads a lot, causing unnecessary wear in a linux environment.
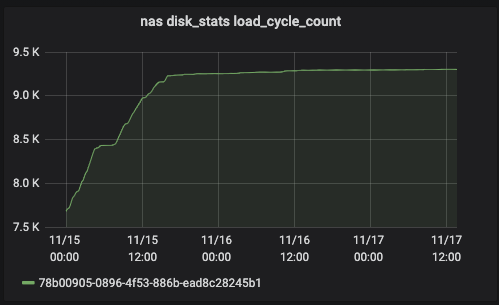
smartctl stores a running counter: Load_Cycle_Count
In this graph, you can see when i used the idle3-tools ubuntu pkg to adjust the idle3 timer.

View the disk’s current setting:

$ sudo idle3ctl -g /dev/sdb
Idle3 timer set to 80 (0x50)

Set idle3 to 30s:

sudo idle3ctl -s 129 /dev/sdb
The number on newer drives is not just divided by 10 but is staggered scale so 1-128 is divided by 10 but 129-255 is in 30 seconds increments (129 = 30sec, 130 = 60sec and so on) for newer drives but it is just divided by 10 for older drives. I do not know what is deemed new or old manufacturing date for WD drives.

ref: https://www.openmutual.org/2018/02/fixing-the-western-digital-excessive-load-unload-problem-with-idle3-tools/

#

Basic Alexa speak with Node Red palette ‘node-red-contrib-alexa-remote2’

Simple example of how to make Alexa talk (TTS, Text To Speech) in Node Red with the ‘node-red-contrib-alexa-remote2’ palette.

You’ll have to change the account and cookie file to work with your setup. But this shows which nodes and fields to populate.

To send to all Echo devices, I use the device “Everywhere” (see the debug output of “Get Echo Devices”).

If you don’t hear anything, try “Refresh alexa remote2 cookie”. I have a flow that auto-refreshes the cookie every 2 hours.

How-to import node red code: https://www.youtube.com/watch?v=_uN–N7YE24

Import this code:

[
    {
        "id": "d327c2c8.b617a",
        "type": "tab",
        "label": "Alexa TTS example",
        "disabled": false,
        "info": ""
    },
    {
        "id": "185e5c5.ca37da4",
        "type": "alexa-remote-init",
        "z": "d327c2c8.b617a",
        "name": "Refresh alexa remote2 cookie",
        "account": "204c43f9.0e87dc",
        "option": "refresh",
        "x": 350,
        "y": 120,
        "wires": [
            [
                "ca0268c3.6a75b8"
            ]
        ]
    },
    {
        "id": "aa1de4f1.d53768",
        "type": "inject",
        "z": "d327c2c8.b617a",
        "name": "Go",
        "topic": "",
        "payload": "",
        "payloadType": "date",
        "repeat": "",
        "crontab": "",
        "once": false,
        "onceDelay": 0.1,
        "x": 130,
        "y": 120,
        "wires": [
            [
                "185e5c5.ca37da4"
            ]
        ]
    },
    {
        "id": "ca0268c3.6a75b8",
        "type": "debug",
        "z": "d327c2c8.b617a",
        "name": "",
        "active": true,
        "tosidebar": true,
        "console": false,
        "tostatus": false,
        "complete": "true",
        "targetType": "full",
        "x": 550,
        "y": 120,
        "wires": []
    },
    {
        "id": "573b246e.f1f59c",
        "type": "inject",
        "z": "d327c2c8.b617a",
        "name": "Go",
        "topic": "",
        "payload": "",
        "payloadType": "date",
        "repeat": "",
        "crontab": "",
        "once": false,
        "onceDelay": 0.1,
        "x": 130,
        "y": 180,
        "wires": [
            [
                "772e0bd4.b6e5d4"
            ]
        ]
    },
    {
        "id": "772e0bd4.b6e5d4",
        "type": "alexa-remote-routine",
        "z": "d327c2c8.b617a",
        "name": "\"Hello\", office Dot",
        "account": "204c43f9.0e87dc",
        "routineNode": {
            "type": "speak",
            "payload": {
                "type": "regular",
                "text": {
                    "type": "str",
                    "value": "Hello"
                },
                "devices": {
                    "type": "str",
                    "value": "DONN's Echo Dot"
                }
            }
        },
        "x": 330,
        "y": 180,
        "wires": [
            []
        ]
    },
    {
        "id": "7b5e0b7b.f95e24",
        "type": "inject",
        "z": "d327c2c8.b617a",
        "name": "Go",
        "topic": "",
        "payload": "",
        "payloadType": "date",
        "repeat": "",
        "crontab": "",
        "once": false,
        "onceDelay": 0.1,
        "x": 130,
        "y": 60,
        "wires": [
            [
                "f9cb8443.8252d8"
            ]
        ]
    },
    {
        "id": "f9cb8443.8252d8",
        "type": "alexa-remote-echo",
        "z": "d327c2c8.b617a",
        "name": "",
        "account": "204c43f9.0e87dc",
        "config": {
            "option": "get",
            "value": {
                "what": "device",
                "device": {
                    "type": "str",
                    "value": "ALEXA_ALL_DSN"
                }
            }
        },
        "x": 290,
        "y": 60,
        "wires": [
            [
                "e48dfccc.4bd7"
            ]
        ]
    },
    {
        "id": "e48dfccc.4bd7",
        "type": "debug",
        "z": "d327c2c8.b617a",
        "name": "",
        "active": true,
        "tosidebar": true,
        "console": false,
        "tostatus": false,
        "complete": "true",
        "targetType": "full",
        "x": 450,
        "y": 60,
        "wires": []
    },
    {
        "id": "204c43f9.0e87dc",
        "type": "alexa-remote-account",
        "z": "",
        "name": "D acct",
        "authMethod": "proxy",
        "proxyOwnIp": "172.16.0.203",
        "proxyPort": "3457",
        "cookieFile": "/config/alexa_cookies2.txt",
        "refreshInterval": "3",
        "alexaServiceHost": "pitangui.amazon.com",
        "amazonPage": "amazon.com",
        "acceptLanguage": "en-US",
        "userAgent": "",
        "useWsMqtt": "on",
        "autoInit": "on"
    }
]

For SSML examples, see: https://github.com/586837r/node-red-contrib-alexa-remote2/blob/master/examples.md

Detailed video howto: https://www.youtube.com/watch?v=vj9K0O_3zxI

#
DIY Indoor air quality monitoring with ESPhome

ESPhome makes integrating sensors with Home Assistant really easy.  I was quite impressed that it took less than 10 minutes for the software + config, and no code at all.

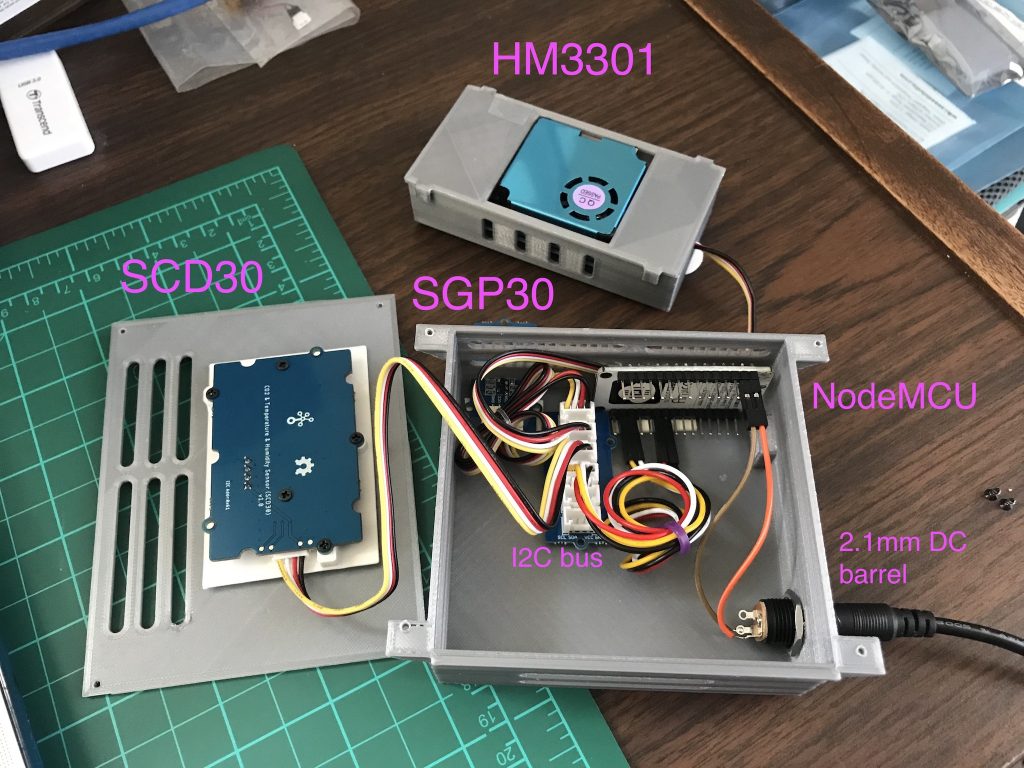
Here’s some info on my DIY indoor air quality monitor:

Data from these sensors:

HM3301:  PM1, PM2.5, PM10, AQI (US), CAQI(Europe).

SGP30:  TVOC (Total Volatile Organic Compounds), eCO2 (equivalent calculated CO2 from TVOC).

SCD30:  CO2 (using Non-Dispersive Infrared, NDIR), humidity, temperature. Better CO2 measurement than SGP30.

I bought the Grove version of these sensors, which made wiring super-easy. Suppliers were Mouser and Digikey.

NodeMCU was $4. Pack of 3 for $12 (Amazon, overseas suppliers, etc)

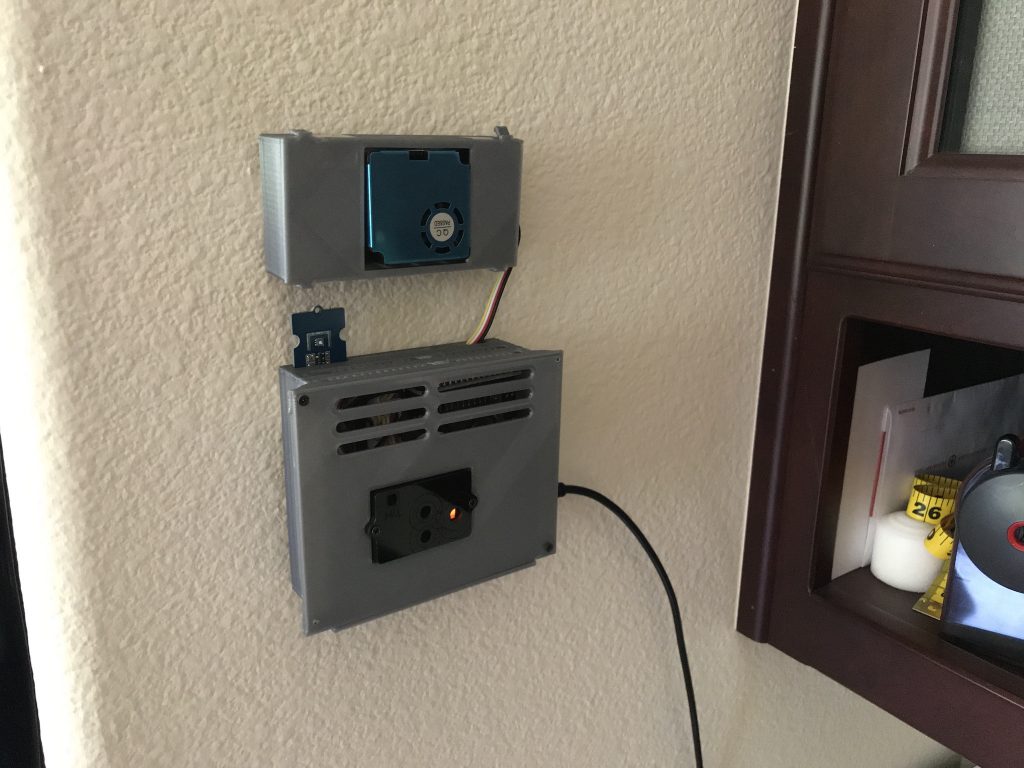
Mounted with 3M Command “Picture Hanging Strips”, megapack from Costco.

Research suggests mounting the sensors at the same level as people and away from doors/windows, similar to a thermostat. ie. not on the ceiling. CO2 is heavy. For example, when businesses store compressed CO2, they place their leak sensors close to the floor where CO2 settles. Mounting away from doors/windows helps to avoid drastic swings in measurements when those are opened.

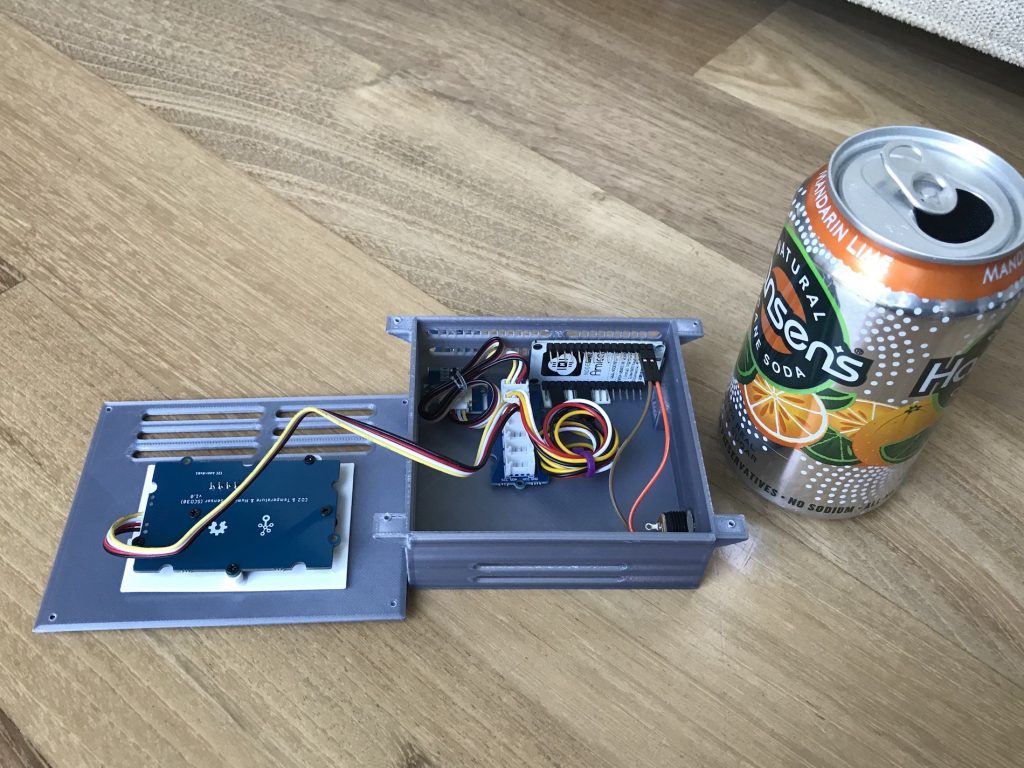
Scale vs a soda can

USB Powered

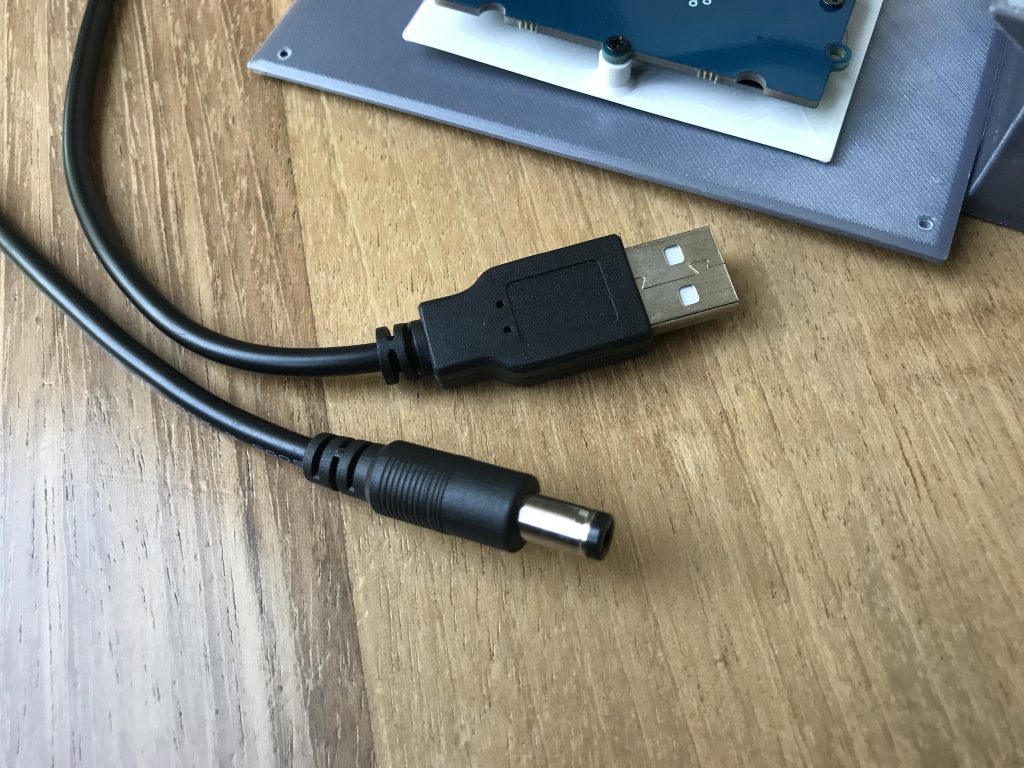
Power cable: 2.1mm DC barrel to USB-A (Adafruit, Amazon, other vendors). Center pin is DC positive (+)

Monitoring Dashboard

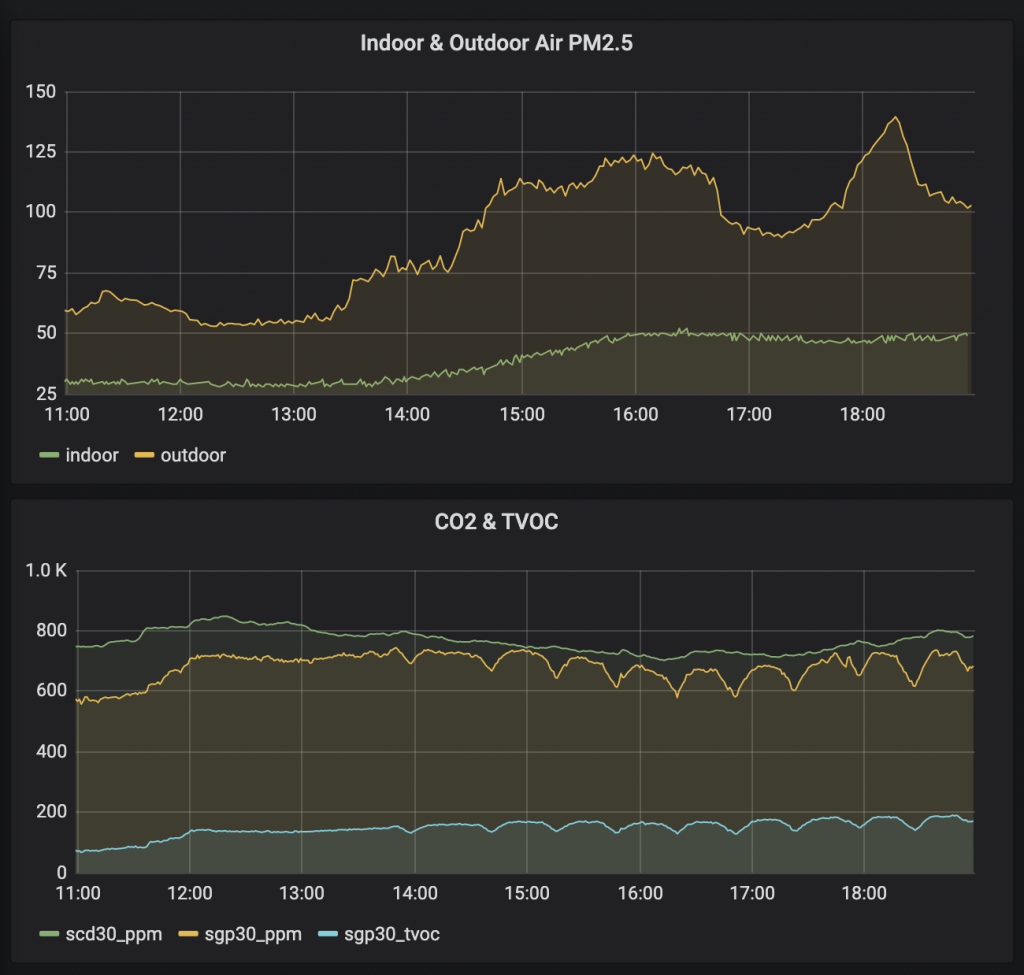
InfluxDB integration for Home Assistant provides data for rendering in Grafana. Graph on a bad air day (smoke from wildfires):

Air quality data from HA stored in influxdb and rendered in grafana

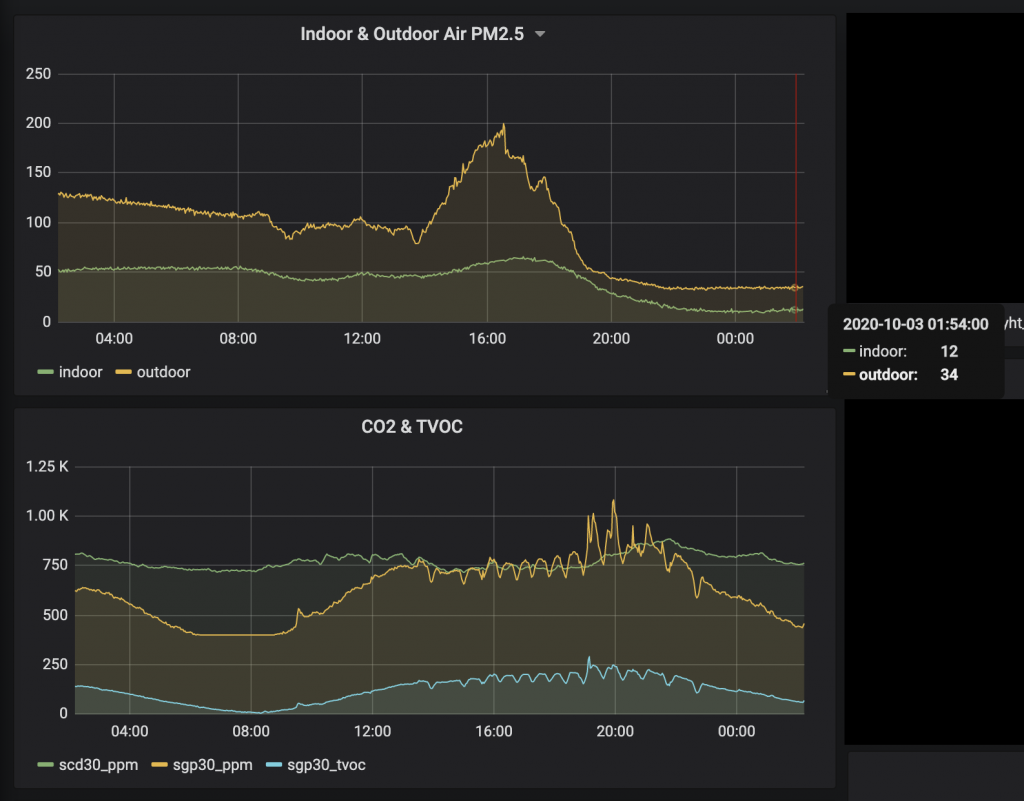
The next day, indoor PM2.5 resumed ~50, then there was a spike of bad air quality in the afternoon, and then dropping to 12 (indoor) after midnight. “12” is on the border of green and yellow:

Bad air day: indoor PM2.5 mostly >50, then drops to 12 after outdoor PM2.5 drops and I increased indoor air filtering

Alexa Integration using Node Red

Using Home Assistant’s emulated Hue integration, I create a new virtual device called “smoke” and the approach in this thread.

This allows me to toggle the “smoke” device, which triggers a Node Red flow to get the current indoor and outdoor PM2.5 and say the results on all Echos in the house.

After parsing the command to toggle the “smoke” virtual device, this Node Red flow is executed. Alexa says, “Indoor air quality is X. Outdoor air quality is Y.”

Outdoor air quality is fetched using the approach in this thread (does not require a PurpleAir device, just one shared near you).

I also have a Node Red flow that watches the HM3301 PM2.5 state, and sends notifications via Alexa and iOS if the air quality exceeds a threshold or changes more than 5, but only if a notification hasn’t been sent in the last 30m.

Carbon Monoxide (CO)

For CO (carbon monoxide), I use normal detectors that look and act like a smoke alarm.

#

Guardline outdoor motion sensors with Home Assistant (via MQTT)

The Guardline (GL) receiver (aka hub, aka RX) has only one NC/NO contact. You can assign all four zones to the NC/NO contact, but you will not be able to distinguish among the zones. That sucks. So…

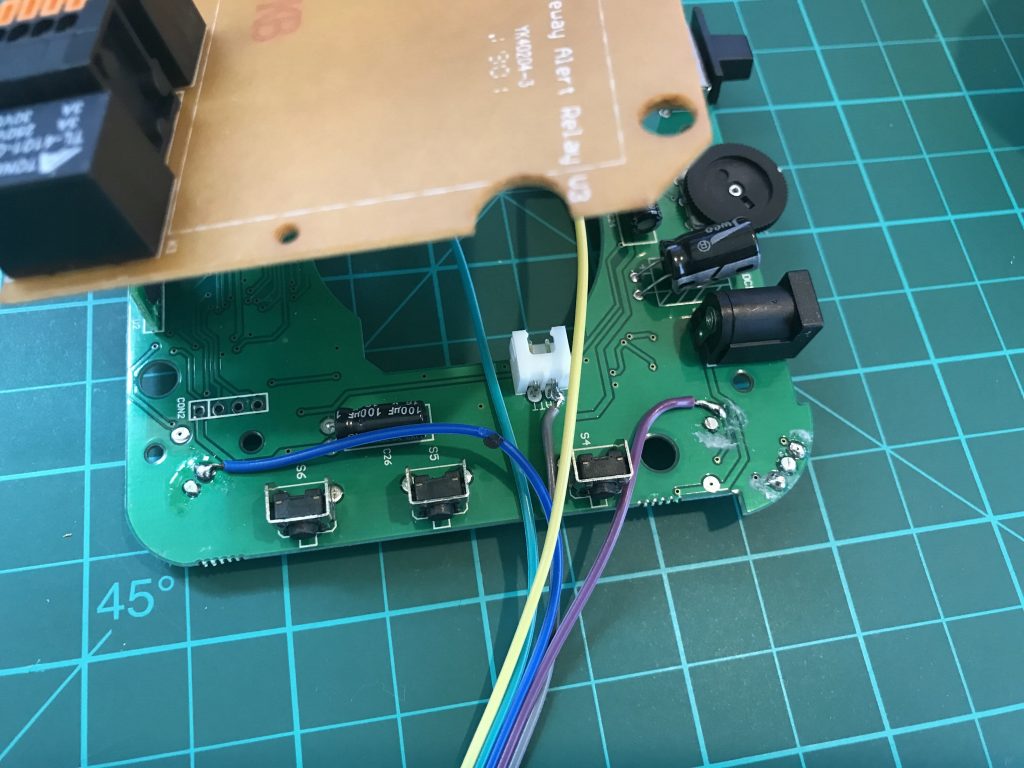
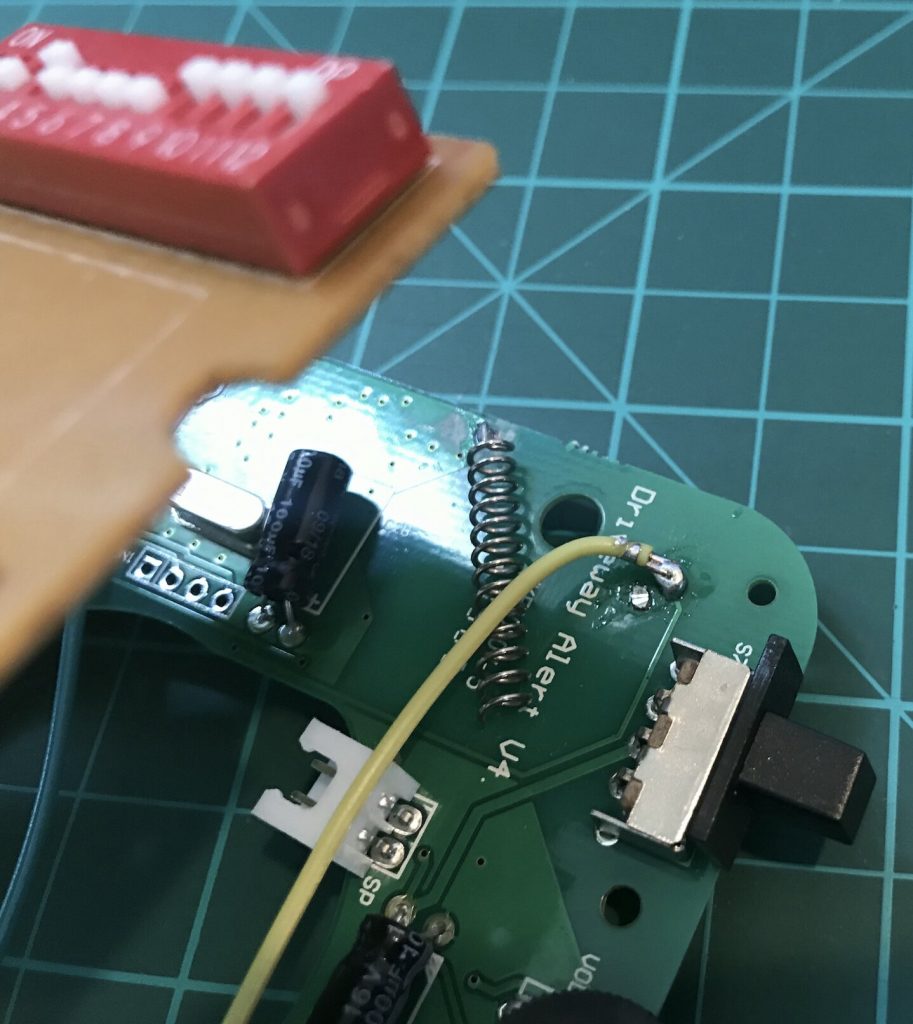
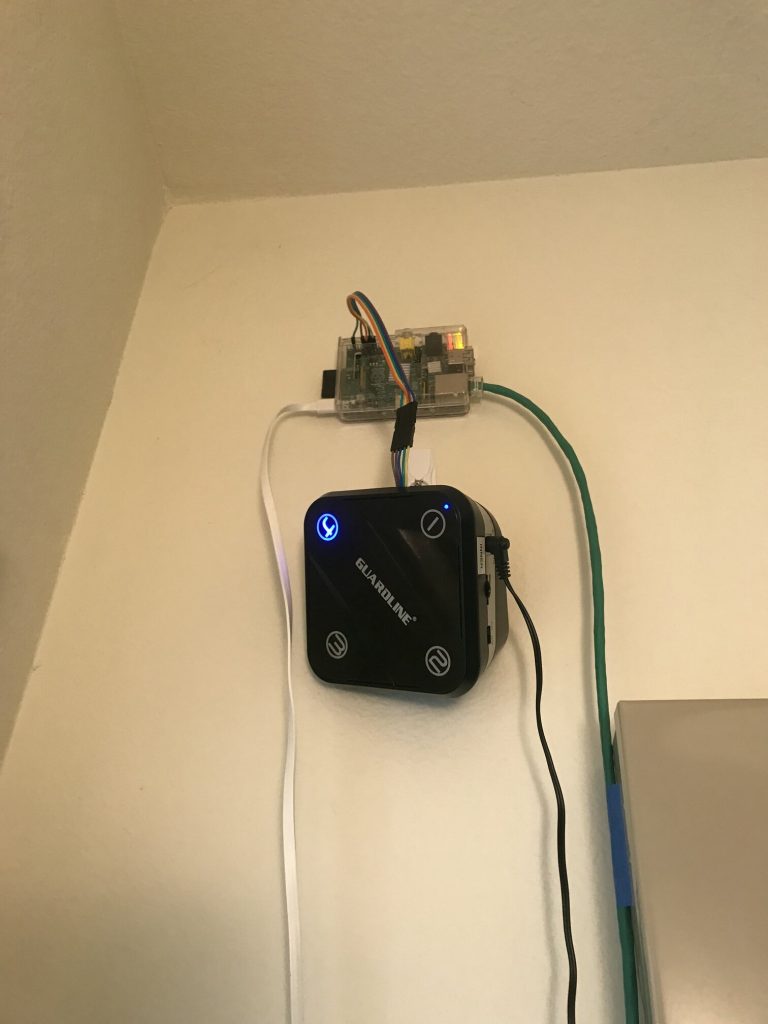
Taking an idea from @specsix in the HA community forums, I wired the four LEDs in the GL RX, plus Ground, to GPIO pins on a Raspberry Pi. The Pi reads the high/low state of each led (approx. 2.6V) and my python code fires MQTT messages to communicate those events to Home Assistant.

Disassembly/opening the GL RX: Three small phillips screws are easy to find on the bottom. The 4th screw is behind a label. On the label is a cartoon of DIP switches 5,6,7,8. The screwhole is near “8 SELECT”.

Here are the solder points for each of the four LEDs, plus Ground.

NOTE: this VOIDS your warranty and support, and you can end up with a destroyed GL RX.

NOTE: I have the 500-foot-range version. If you have the 1/4-mile version, your device will be completely different.

Zone4 (blue), Zone1 (purple), Ground (grey) soldered to BATT negative
Zone2 (yellow)
Zone3 (teal)

Above are the “hard” parts of the project, so I documented it first. Feel free to contact me or comment below if I should add more details.

Guardline connected to Raspberry Pi GPIO pins. Mounted with 3M “Command” hooks and picture frame hangers
3M picture frame hanging strips


Shelly Flood sensor doesn’t alarm with water (SOLVED)

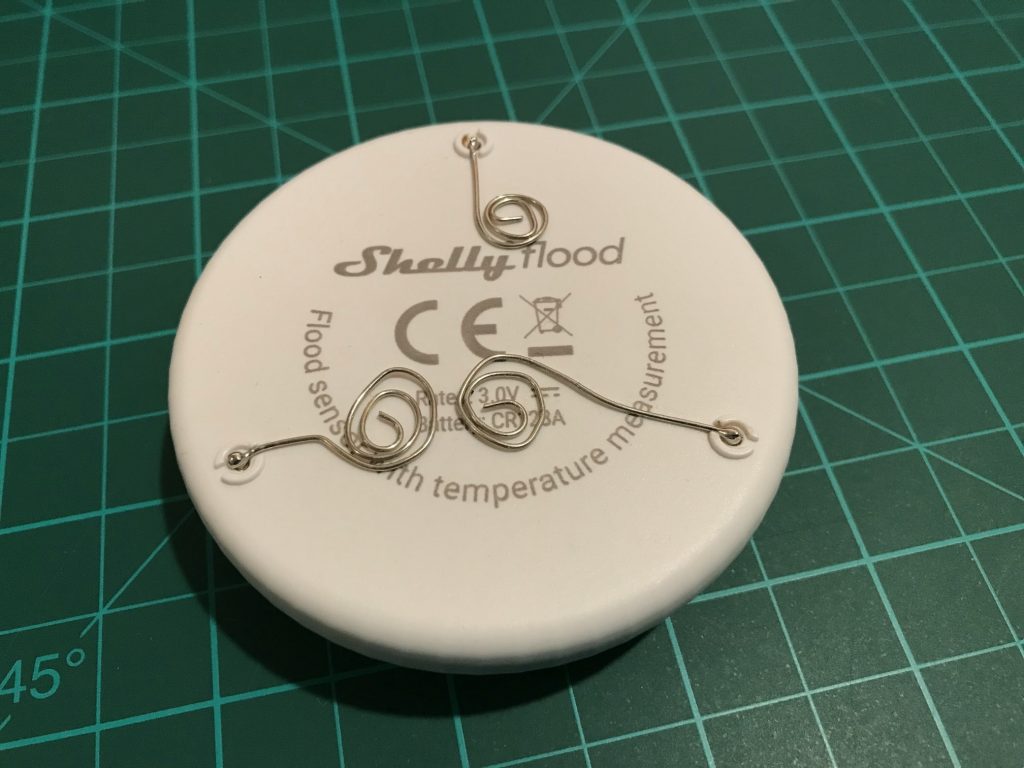
tl;dr The fix is to increase the surface area of the contacts on the Shelly Flood sensor. See photo of fix, below.

Simple test: Put sensor contacts on a metal ruler (or other sheet metal) and it should definitely alarm.

Simple test 2: Put 3 coins (eg. US quarters = 25 cents) on a plate: One coin underneath each of the 3 metal contact points on the sensor. Place sensor on the 3 coins. Pour water on the plate. When water is touching all 3 coins (or perhaps 2 coins), sensor should alarm.

My tap water is pretty soft. It measures about 20 with a TDS (Total Dissolved Solids) meter.  As such, the Shelly Flood sensor does NOT trigger/alarm when it gets wet.  This means if there was a water leak, like a busted hose on the washing machine, the sensor would not fire and I would not get a notification. Very bad.

After some conversation on the Shelly support group on Facebook, I learned: If there aren’t enough minerals in the water, then there won’t be enough conductivity for the sensor to trigger. This is a known issue with the Shelly Flood.

Workaround is to increase the surface / contact area of the sensor’s contacts. Shelly said they are working on an add-on part that would solve this problem. But why wait? And their future mod may not be so great.

My fix: After soldering on some coiled bare wire (each about 7cm long), sensor alarms immediately with just 10ml (1 tablespoon) of water.


RTSP: Flashing Wyze Cam V2 with Dafang-Hacks firmware, Blue Iris

Purpose: Better RTSP on the wyze cam (confirmed after 2 months of use!) and more features. Plus, “Dafang Hacks” firmware is open source.

Follow the official docs to flash the wyze cam v2 with dafang-hacks firmware.

Couple of tips not found in the docs:

  • I used a 32GB micro-SD flash card, fat32 formatted and had no problems
  • Chrome browser would not allow me to ignore the HTTPS SSL certificate warning (no “proceed to site” option). So I used Safari browser on Mac. UPDATE: On Chrome, you can type “thisisunsafe” to bypass the cert warning page (thanks to reader PSv).
  • Default login/password is: root/ismart12

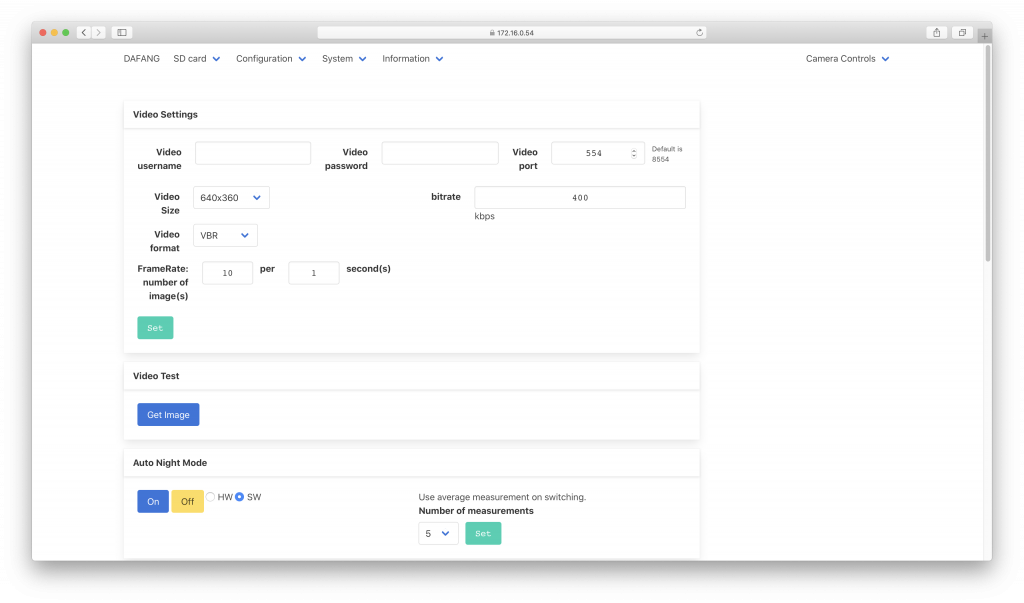
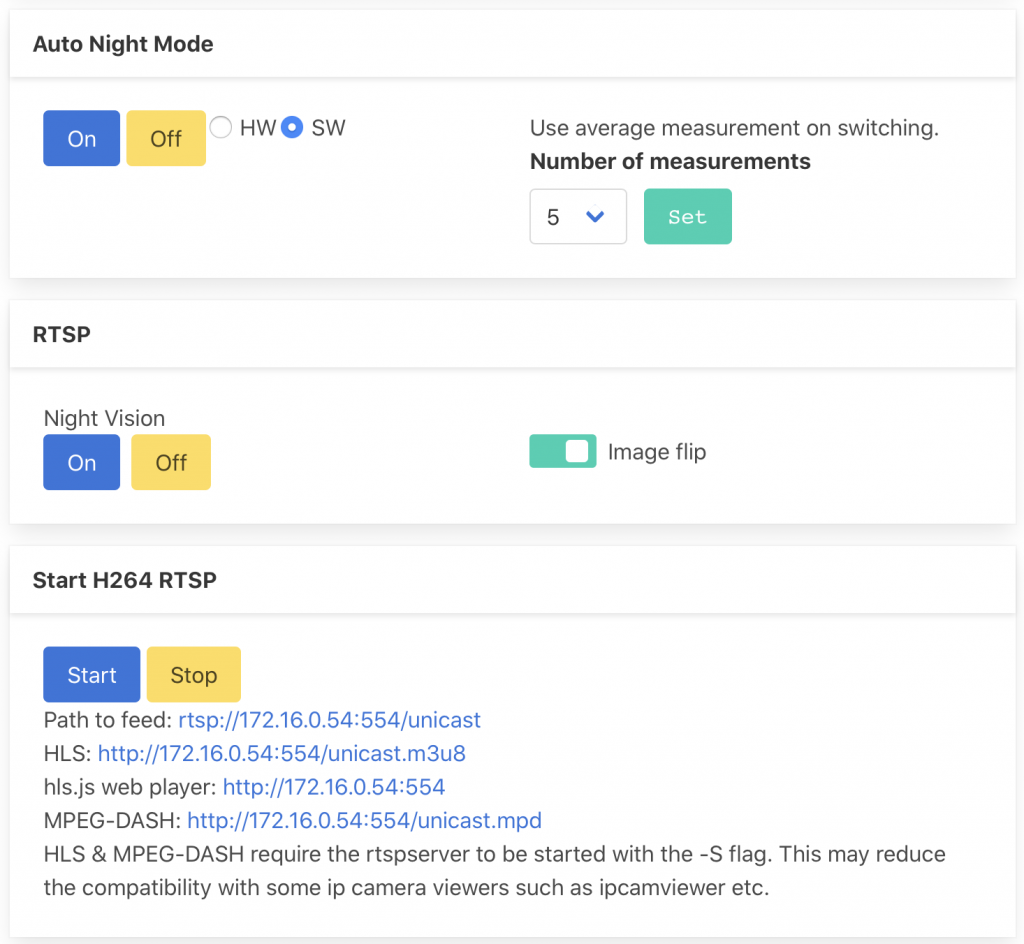
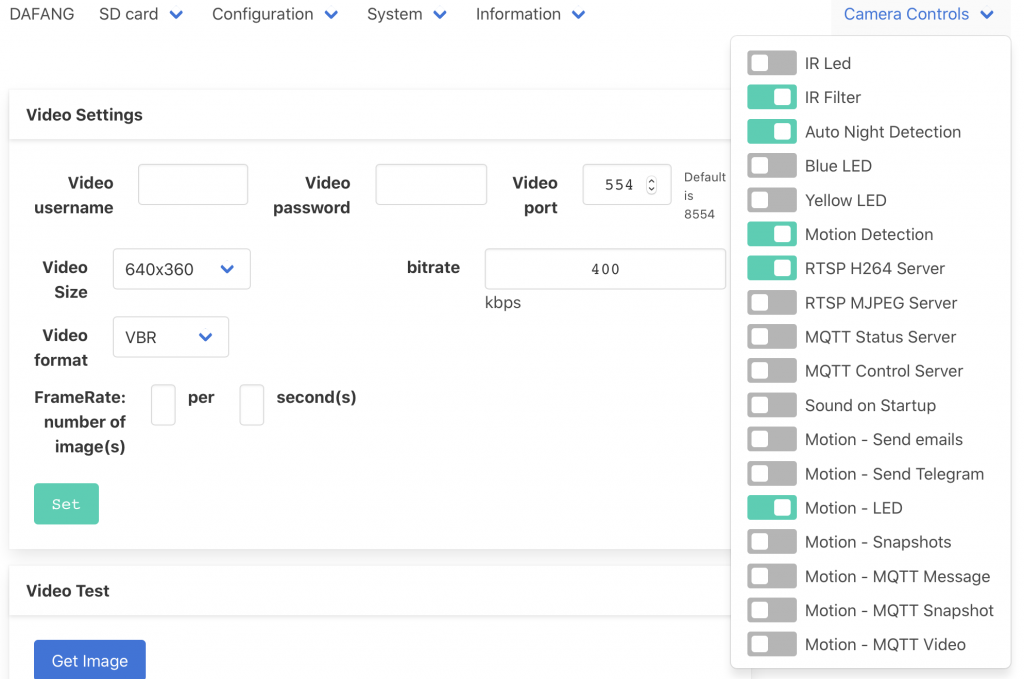
Video options: I changed port to 554, to match Blue Iris. I set low-resolution, low-bitrate, and low-fps because my 2.4GHz wifi has a lot of other traffic:

RTSP (I had to flip video 180-degrees because my wyze cam is mounted upside-down). Note the URLs, which you’ll use with Blue Iris:

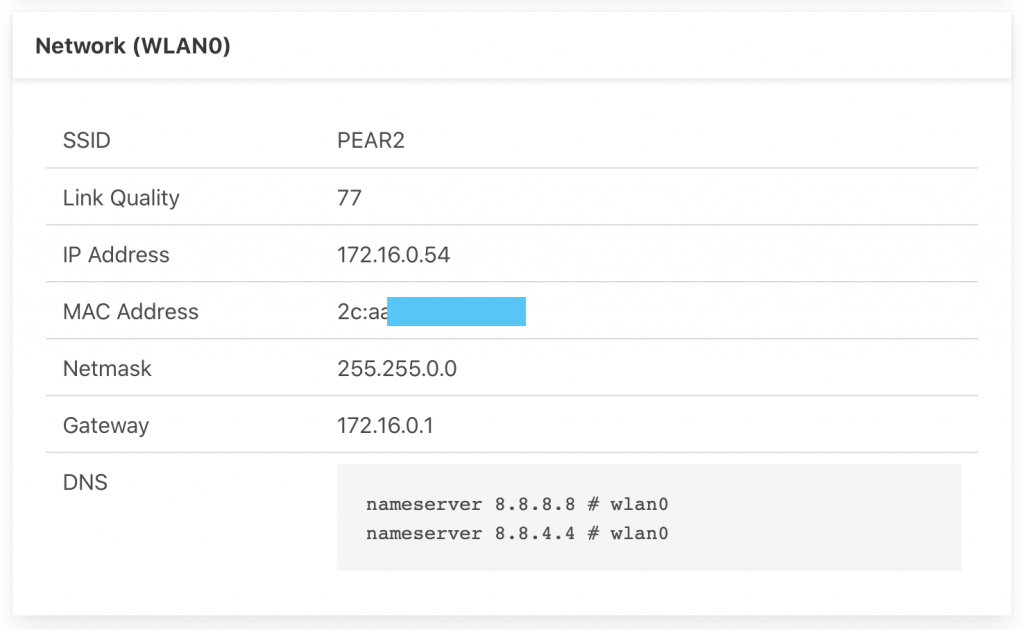
Wifi/wlan signal strength (link quality) info is great for tuning/troubleshooting the wifi link:

Camera controls (MQTT!):

Blue Iris camera settings:

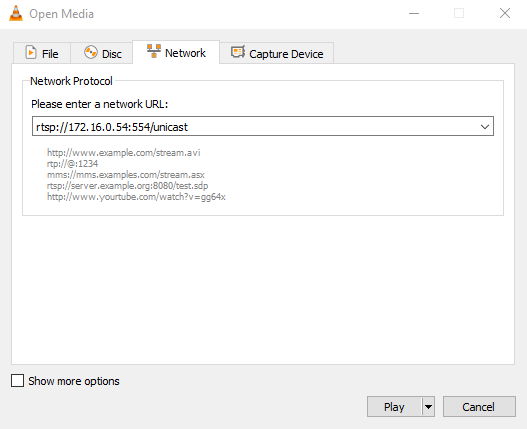
If video doesn’t appear in Blue Iris, test with VLC by opening a Network Stream:

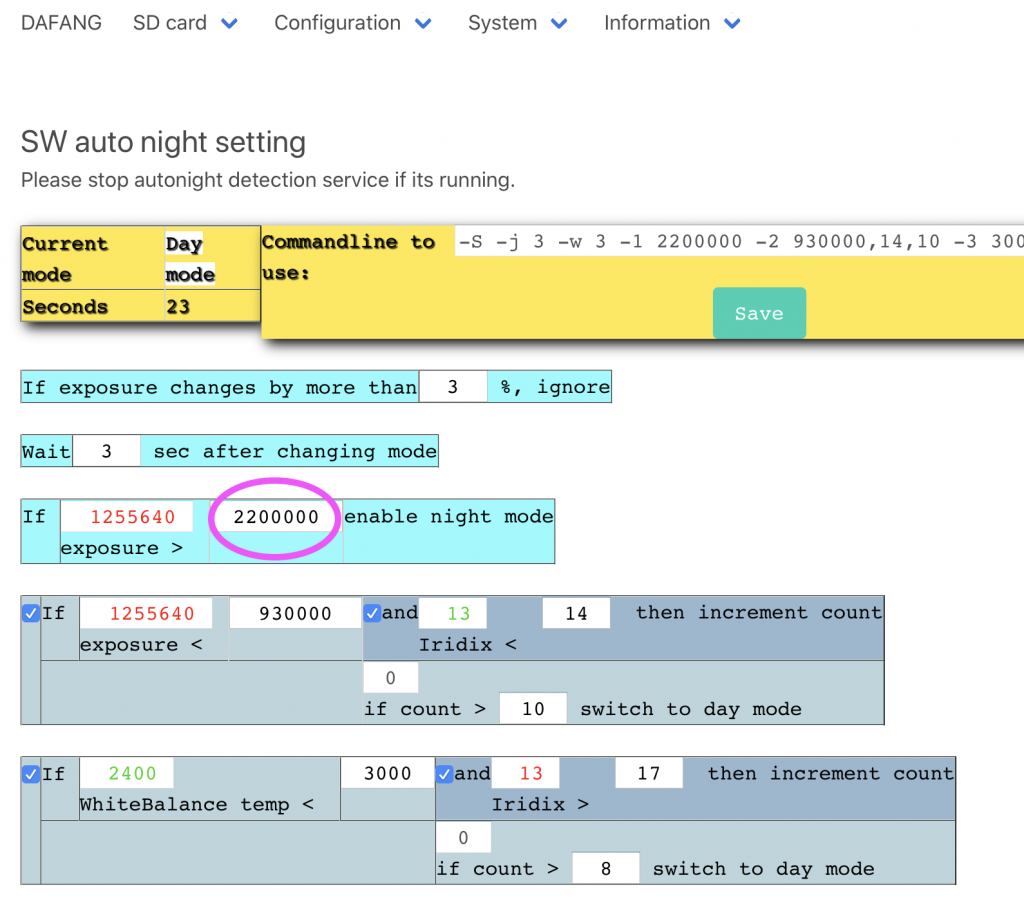
Disable switching to night mode by increasing exposure threshold from 1.2M to 2.2M:


So far so good.  I’ll know more after a week or two.

UPDATE 2020/08/07: Open-source firmware is working great! Wyze cam V2 is functional and reliable. Low-bandwidth settings are appropriate for the area of the house where the wyze cam is installed.

UPDATE 2020/09/18: Dafang firmware has been rock-solid 🙂 I haven’t touched the wyzecam since the firmware change and everything is working well with Blue Iris.

#

tuya-convert: BN-LINK BNC-60/U133TJ Wifi Smart Plugs


ATTENTION: UPDATE 2020/11/17: Users are reporting that recently shipped BNC-60 smartplugs are no longer tuya-convert’able.

These are harder to flash OTA than other ESP8266 devices. This guide assumes you already know the normal tuya-convert process.

Final goal (July 2020): tasmota.bin 8.3.1

Run ./start_flash.sh

If prompted, answer ‘y’ (yes) as necessary to terminate dnsmasq, mosquitto, etc.

When prompted connect Android (not iOS) smartphone to vtrust-flash ssid; because iOS will disconnect from the ssid when it detects there’s no actual Internet access.

Script says: “Press ENTER to continue”

Connect BN-LINK smart plug to AC power.

WITHIN 2 SECONDS, press ENTER.

Wait 1 second (1s).

WITHIN 3 SECONDS, hold BNC-60 power button for about 7s, and release when led blinks red (blinks about 2 times). After about 2s you should see led flashing blue (fast blinking), and then after ~20s led will be steady blue.

Then script will output a row of dots that’s longer than previous row of dots:

Starting smart config pairing procedure

Waiting for the device to install the intermediate firmware

Put device in EZ config mode (blinking fast)

Sending SSID                  vtrust-flash

Sending wifiPassword

Sending token                 00000000

Sending secret                0101

................

SmartConfig complete.

Resending SmartConfig Packets

................

SmartConfig complete.

Resending SmartConfig Packets

.................................................................................

Then error (below) usually appears, and that’s OK. You may get lucky* and the error won’t appear (it’ll just proceed per normal tuya-convert process).

*It seems that doing those “WITHIN 3 SECONDS” steps (above) quickly enough is the best chance of getting lucky.

SmartConfig complete.

Resending SmartConfig Packets

.................................................................................

Device did not appear with the intermediate firmware

Check the *.log files in the scripts folder

Do you want to try flashing another device? [y/N]

After you see the error, say “n” (no) to return to shell.

Android smartphone will disconnect from vtrust-flash ssid because the tuya-convert AP was torn-down.

Disconnect BNC-60 from AC power.

You should see gwId lines in the log (this is progress):

pi@raspberrypi:~/tuya-convert $ cat scripts/smarthack-web.log | grep gwId

GET /gw.json?a=s.gw.token.get&et=1&gwId=12345678904f22bf16d3&other={"token":"00000000","region":"US","tlinkStat":{"configure":"smartconfig","time":1,"source":"ap","path":"broadcast"}}&t=7&v=3.0&sign=98765432157018e229a15811f3d99a7a

[I 200708 06:59:05 web:2250] 200 GET /gw.json?a=s.gw.token.get&et=1&gwId=12345678904f22bf16d3&other={"token":"00000000","region":"US","tlinkStat":{"configure":"smartconfig","time":1,"source":"ap","path":"broadcast"}}&t=7&v=3.0&sign=98765432157018e229a15811f3d99a7a (10.42.42.1) 46.31ms

[...]

Restart the script:

./start_flash.sh

Now, on the 2nd pass, when it prompts you to connect a smartphone to vtrust-flash ssid, DO NOT connect anything to the vtrust-flash ssid.

It says, “Press ENTER to continue”

Hit the ENTER key and then quickly plug-in the BNC-60 to AC power. Do not press any buttons on the BNC-60.

This time you’ll see:

Fetching firmware backup

with downloading progress.

and then:

Available options:
  0) return to stock
  1) flash espurna.bin
  2) flash tasmota.bin
  q) quit; do nothing
Please select 0-2:

At this point, you’re back to a normal tuya-convert flow.

Pick your choice “1” or “2”.  Eg. I’m using tasmota.bin so “2”.

and it’ll complete normally.

On the BNC-60, the red LED will blink super-fast when it is flashing tasmota.bin.

Enjoy!