Category Archives: Home Assistant

aka HASS, hassio, hass.io, homeassistant, HA

Basic Alexa speak with Node Red palette ‘node-red-contrib-alexa-remote2’

Simple example of how to make Alexa talk (TTS, Text To Speech) in Node Red with the ‘node-red-contrib-alexa-remote2’ palette.

You’ll have to change the account and cookie file to work with your setup. But this shows which nodes and fields to populate.

To send to all Echo devices, I use the device “Everywhere” (see the debug output of “Get Echo Devices”).

If you don’t hear anything, try “Refresh alexa remote2 cookie”. I have a flow that auto-refreshes the cookie every 2 hours.

How-to import node red code: https://www.youtube.com/watch?v=_uN–N7YE24

Import this code:

[
    {
        "id": "d327c2c8.b617a",
        "type": "tab",
        "label": "Alexa TTS example",
        "disabled": false,
        "info": ""
    },
    {
        "id": "185e5c5.ca37da4",
        "type": "alexa-remote-init",
        "z": "d327c2c8.b617a",
        "name": "Refresh alexa remote2 cookie",
        "account": "204c43f9.0e87dc",
        "option": "refresh",
        "x": 350,
        "y": 120,
        "wires": [
            [
                "ca0268c3.6a75b8"
            ]
        ]
    },
    {
        "id": "aa1de4f1.d53768",
        "type": "inject",
        "z": "d327c2c8.b617a",
        "name": "Go",
        "topic": "",
        "payload": "",
        "payloadType": "date",
        "repeat": "",
        "crontab": "",
        "once": false,
        "onceDelay": 0.1,
        "x": 130,
        "y": 120,
        "wires": [
            [
                "185e5c5.ca37da4"
            ]
        ]
    },
    {
        "id": "ca0268c3.6a75b8",
        "type": "debug",
        "z": "d327c2c8.b617a",
        "name": "",
        "active": true,
        "tosidebar": true,
        "console": false,
        "tostatus": false,
        "complete": "true",
        "targetType": "full",
        "x": 550,
        "y": 120,
        "wires": []
    },
    {
        "id": "573b246e.f1f59c",
        "type": "inject",
        "z": "d327c2c8.b617a",
        "name": "Go",
        "topic": "",
        "payload": "",
        "payloadType": "date",
        "repeat": "",
        "crontab": "",
        "once": false,
        "onceDelay": 0.1,
        "x": 130,
        "y": 180,
        "wires": [
            [
                "772e0bd4.b6e5d4"
            ]
        ]
    },
    {
        "id": "772e0bd4.b6e5d4",
        "type": "alexa-remote-routine",
        "z": "d327c2c8.b617a",
        "name": "\"Hello\", office Dot",
        "account": "204c43f9.0e87dc",
        "routineNode": {
            "type": "speak",
            "payload": {
                "type": "regular",
                "text": {
                    "type": "str",
                    "value": "Hello"
                },
                "devices": {
                    "type": "str",
                    "value": "DONN's Echo Dot"
                }
            }
        },
        "x": 330,
        "y": 180,
        "wires": [
            []
        ]
    },
    {
        "id": "7b5e0b7b.f95e24",
        "type": "inject",
        "z": "d327c2c8.b617a",
        "name": "Go",
        "topic": "",
        "payload": "",
        "payloadType": "date",
        "repeat": "",
        "crontab": "",
        "once": false,
        "onceDelay": 0.1,
        "x": 130,
        "y": 60,
        "wires": [
            [
                "f9cb8443.8252d8"
            ]
        ]
    },
    {
        "id": "f9cb8443.8252d8",
        "type": "alexa-remote-echo",
        "z": "d327c2c8.b617a",
        "name": "",
        "account": "204c43f9.0e87dc",
        "config": {
            "option": "get",
            "value": {
                "what": "device",
                "device": {
                    "type": "str",
                    "value": "ALEXA_ALL_DSN"
                }
            }
        },
        "x": 290,
        "y": 60,
        "wires": [
            [
                "e48dfccc.4bd7"
            ]
        ]
    },
    {
        "id": "e48dfccc.4bd7",
        "type": "debug",
        "z": "d327c2c8.b617a",
        "name": "",
        "active": true,
        "tosidebar": true,
        "console": false,
        "tostatus": false,
        "complete": "true",
        "targetType": "full",
        "x": 450,
        "y": 60,
        "wires": []
    },
    {
        "id": "204c43f9.0e87dc",
        "type": "alexa-remote-account",
        "z": "",
        "name": "D acct",
        "authMethod": "proxy",
        "proxyOwnIp": "172.16.0.203",
        "proxyPort": "3457",
        "cookieFile": "/config/alexa_cookies2.txt",
        "refreshInterval": "3",
        "alexaServiceHost": "pitangui.amazon.com",
        "amazonPage": "amazon.com",
        "acceptLanguage": "en-US",
        "userAgent": "",
        "useWsMqtt": "on",
        "autoInit": "on"
    }
]

For SSML examples, see: https://github.com/586837r/node-red-contrib-alexa-remote2/blob/master/examples.md

Detailed video howto: https://www.youtube.com/watch?v=vj9K0O_3zxI

#
DIY Indoor air quality monitoring with ESPhome

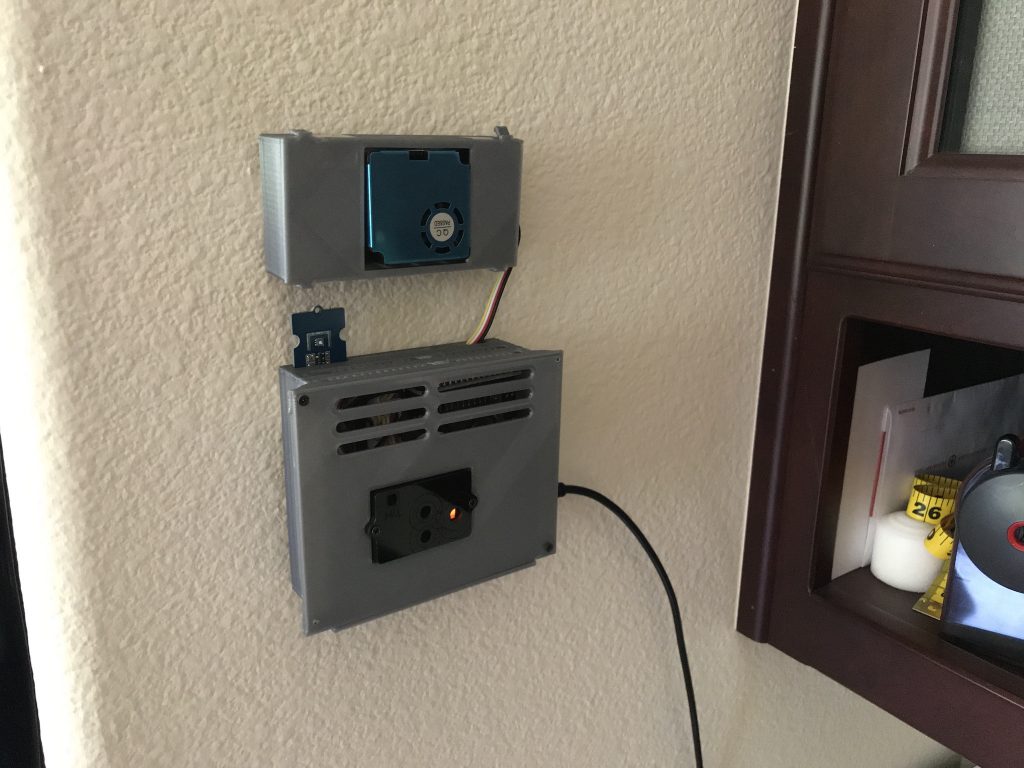
ESPhome makes integrating sensors with Home Assistant really easy.  I was quite impressed that it took less than 10 minutes for the software + config, and no code at all.

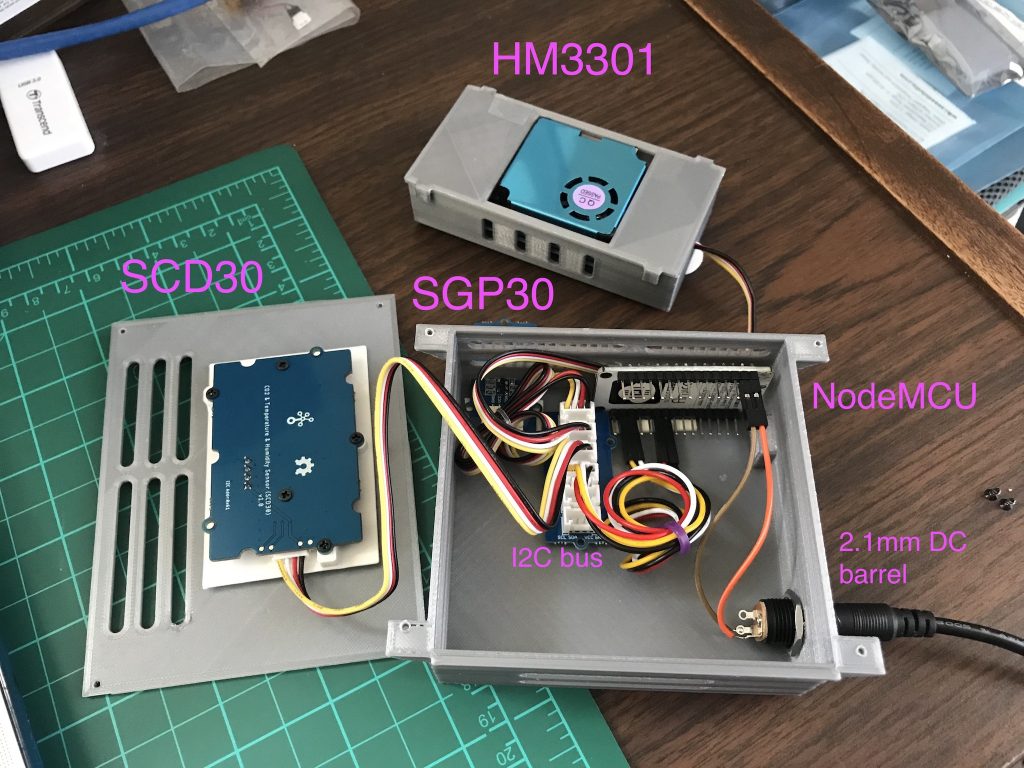
Here’s some info on my DIY indoor air quality monitor:

Data from these sensors:

HM3301:  PM1, PM2.5, PM10, AQI (US), CAQI(Europe).

SGP30:  TVOC (Total Volatile Organic Compounds), eCO2 (equivalent calculated CO2 from TVOC).

SCD30:  CO2 (using Non-Dispersive Infrared, NDIR), humidity, temperature. Better CO2 measurement than SGP30.

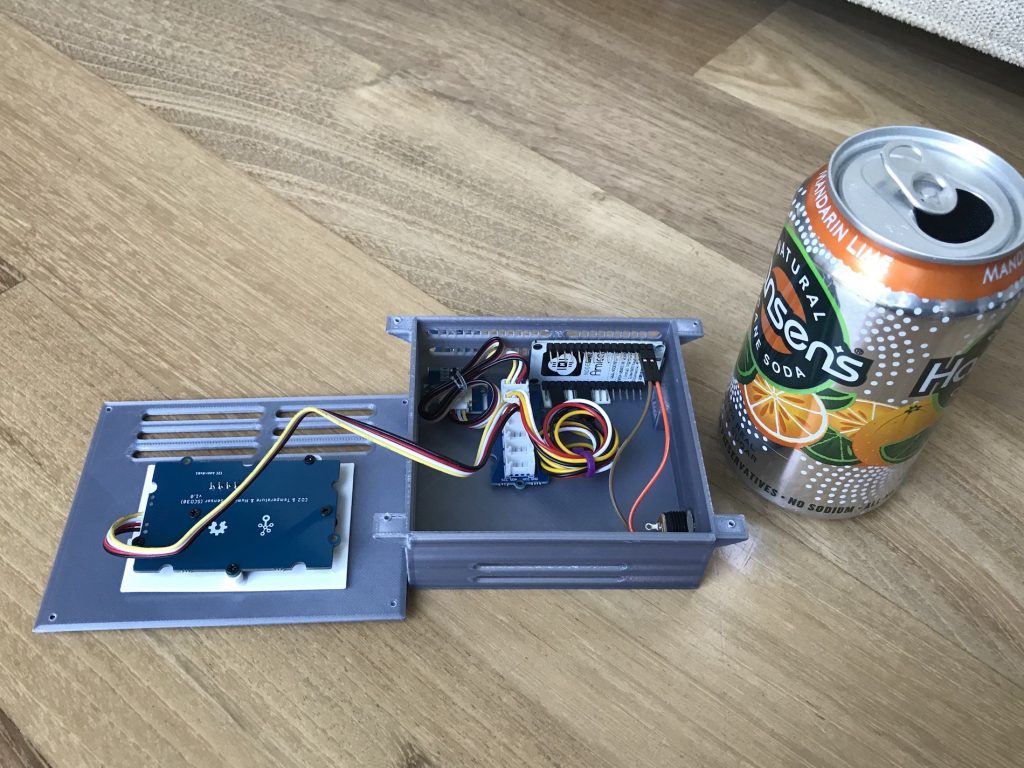
I bought the Grove version of these sensors, which made wiring super-easy. Suppliers were Mouser and Digikey.

NodeMCU was $4. Pack of 3 for $12 (Amazon, overseas suppliers, etc)

Mounted with 3M Command “Picture Hanging Strips”, megapack from Costco.

Research suggests mounting the sensors at the same level as people and away from doors/windows, similar to a thermostat. ie. not on the ceiling. CO2 is heavy. For example, when businesses store compressed CO2, they place their leak sensors close to the floor where CO2 settles. Mounting away from doors/windows helps to avoid drastic swings in measurements when those are opened.

Scale vs a soda can

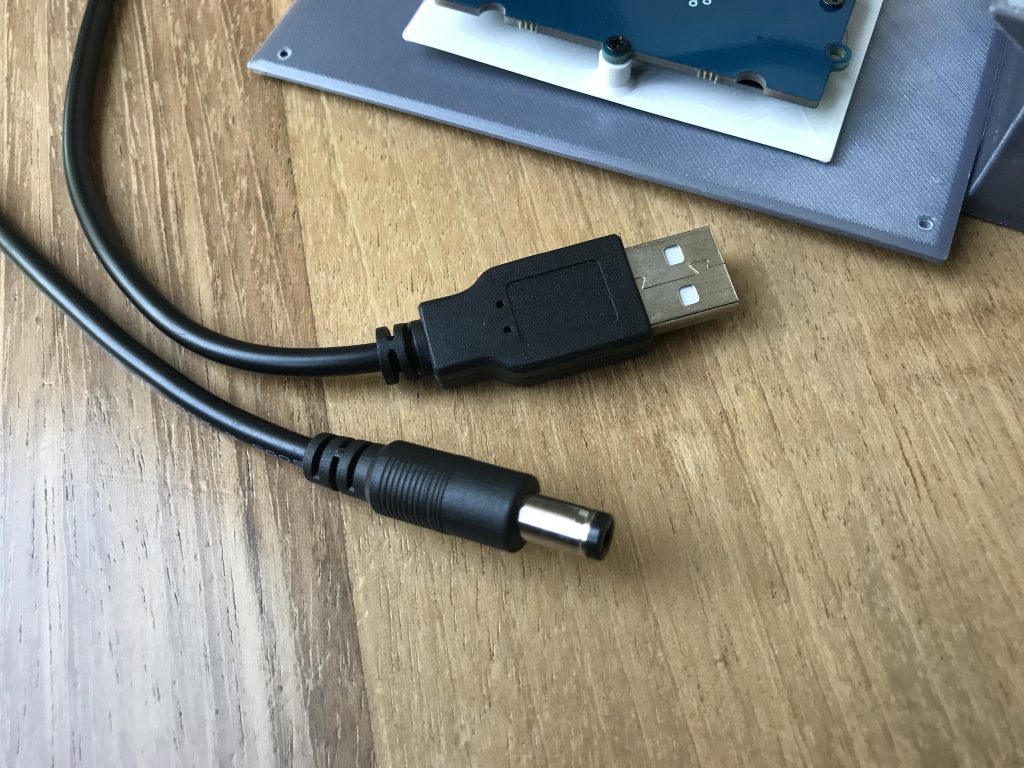
USB Powered

Power cable: 2.1mm DC barrel to USB-A (Adafruit, Amazon, other vendors). Center pin is DC positive (+)

Monitoring Dashboard

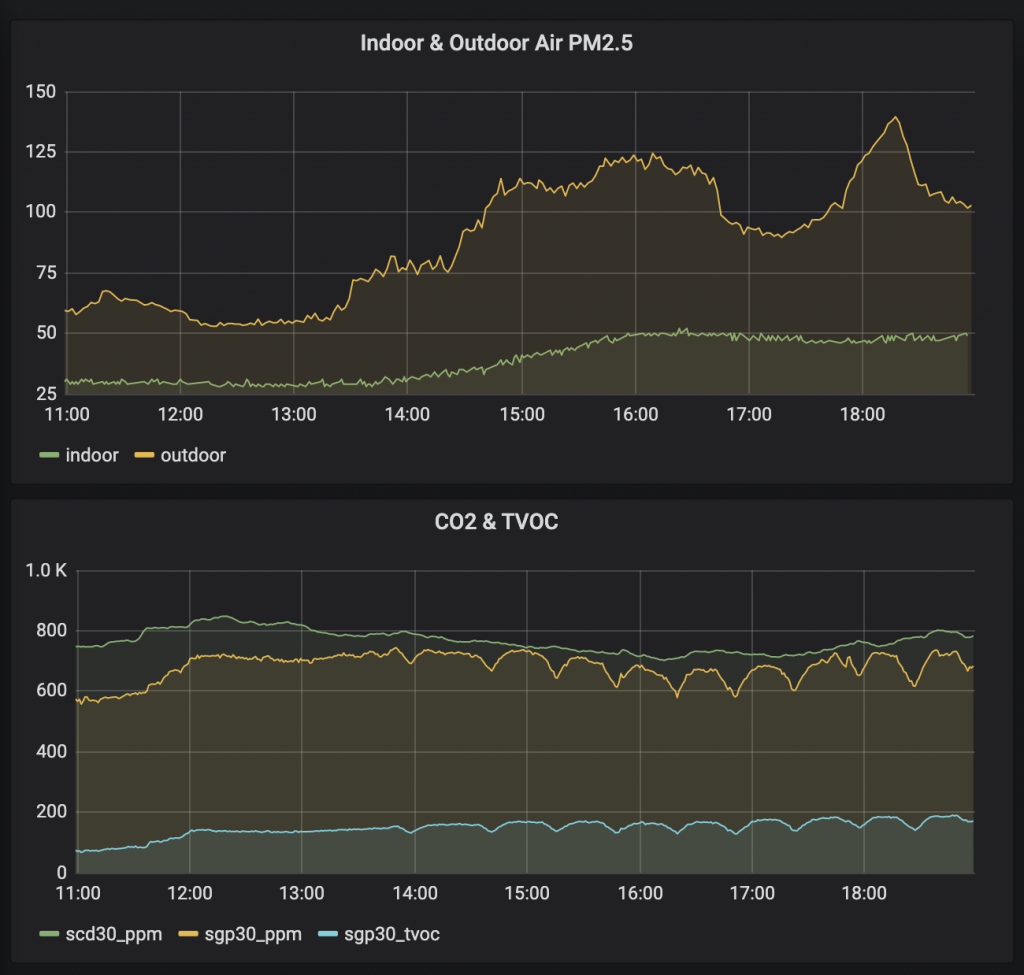
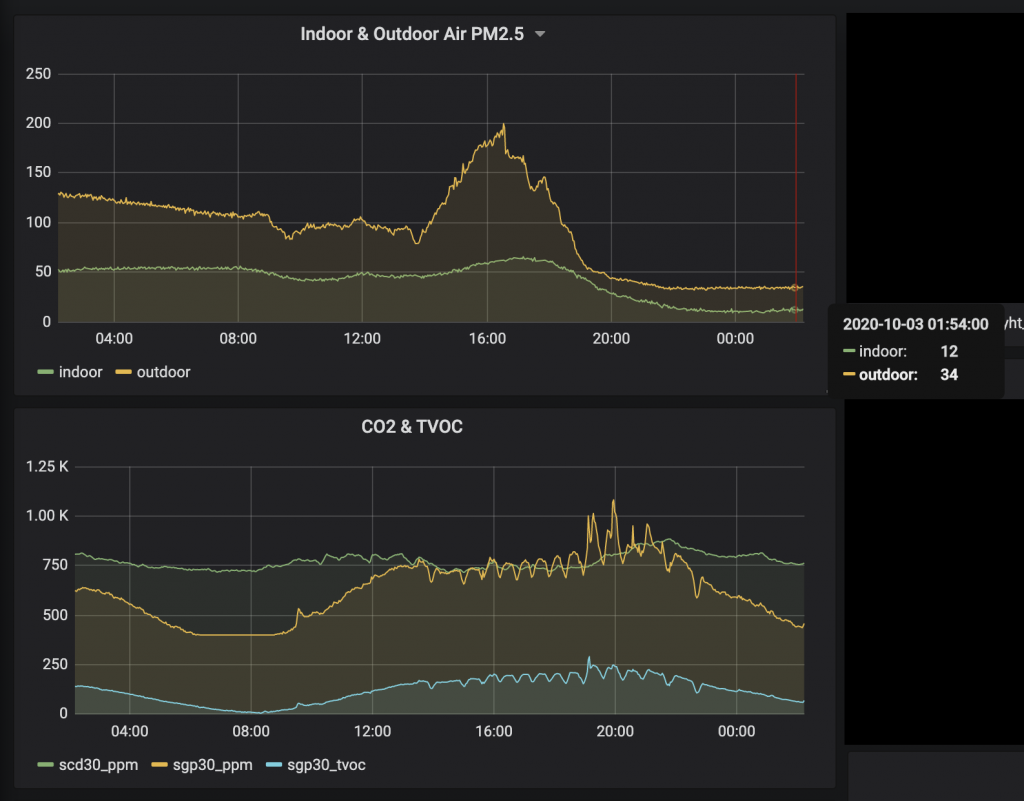
InfluxDB integration for Home Assistant provides data for rendering in Grafana. Graph on a bad air day (smoke from wildfires):

Air quality data from HA stored in influxdb and rendered in grafana

The next day, indoor PM2.5 resumed ~50, then there was a spike of bad air quality in the afternoon, and then dropping to 12 (indoor) after midnight. “12” is on the border of green and yellow:

Bad air day: indoor PM2.5 mostly >50, then drops to 12 after outdoor PM2.5 drops and I increased indoor air filtering

Alexa Integration using Node Red

Using Home Assistant’s emulated Hue integration, I create a new virtual device called “smoke” and the approach in this thread.

This allows me to toggle the “smoke” device, which triggers a Node Red flow to get the current indoor and outdoor PM2.5 and say the results on all Echos in the house.

After parsing the command to toggle the “smoke” virtual device, this Node Red flow is executed. Alexa says, “Indoor air quality is X. Outdoor air quality is Y.”

Outdoor air quality is fetched using the approach in this thread (does not require a PurpleAir device, just one shared near you).

I also have a Node Red flow that watches the HM3301 PM2.5 state, and sends notifications via Alexa and iOS if the air quality exceeds a threshold or changes more than 5, but only if a notification hasn’t been sent in the last 30m.

Carbon Monoxide (CO)

For CO (carbon monoxide), I use normal detectors that look and act like a smoke alarm.

#

Guardline outdoor motion sensors with Home Assistant (via MQTT)

The Guardline (GL) receiver (aka hub, aka RX) has only one NC/NO contact. You can assign all four zones to the NC/NO contact, but you will not be able to distinguish among the zones. That sucks. So…

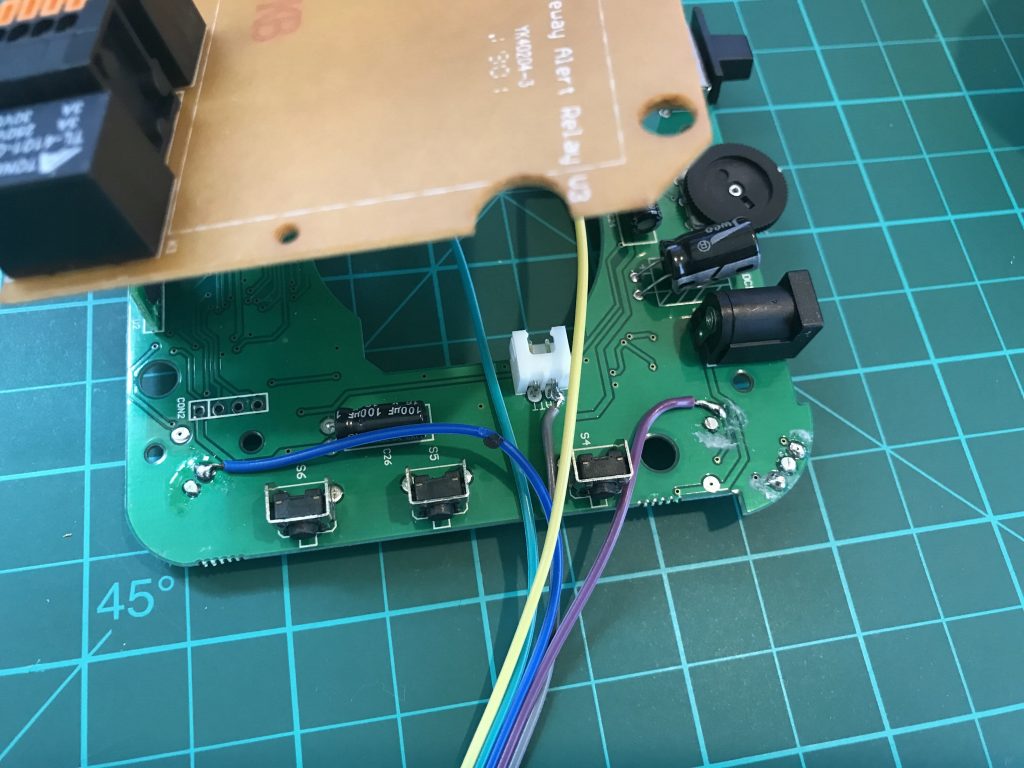
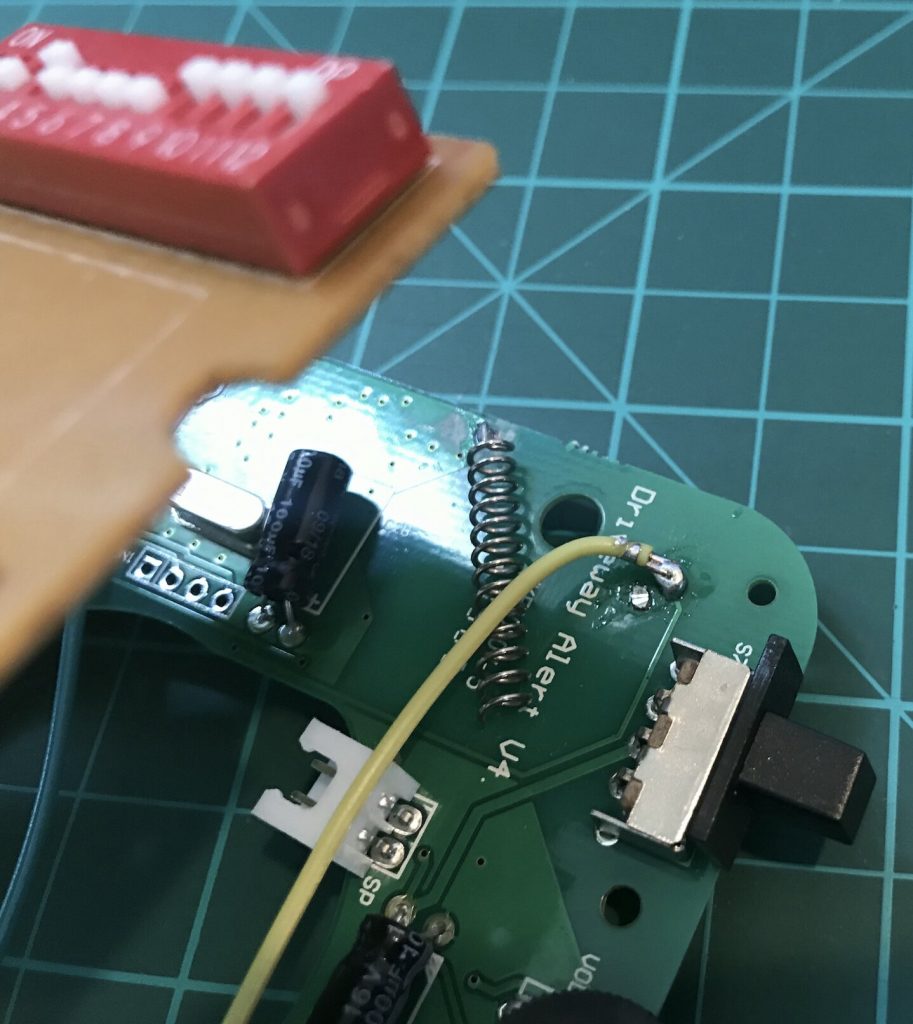
Taking an idea from @specsix in the HA community forums, I wired the four LEDs in the GL RX, plus Ground, to GPIO pins on a Raspberry Pi. The Pi reads the high/low state of each led (approx. 2.6V) and my python code fires MQTT messages to communicate those events to Home Assistant.

Disassembly/opening the GL RX: Three small phillips screws are easy to find on the bottom. The 4th screw is behind a label. On the label is a cartoon of DIP switches 5,6,7,8. The screwhole is near “8 SELECT”.

Here are the solder points for each of the four LEDs, plus Ground.

NOTE: this VOIDS your warranty and support, and you can end up with a destroyed GL RX.

NOTE: I have the 500-foot-range version. If you have the 1/4-mile version, your device will be completely different.

Zone4 (blue), Zone1 (purple), Ground (grey) soldered to BATT negative
Zone2 (yellow)
Zone3 (teal)

Above are the “hard” parts of the project, so I documented it first. Feel free to contact me or comment below if I should add more details.

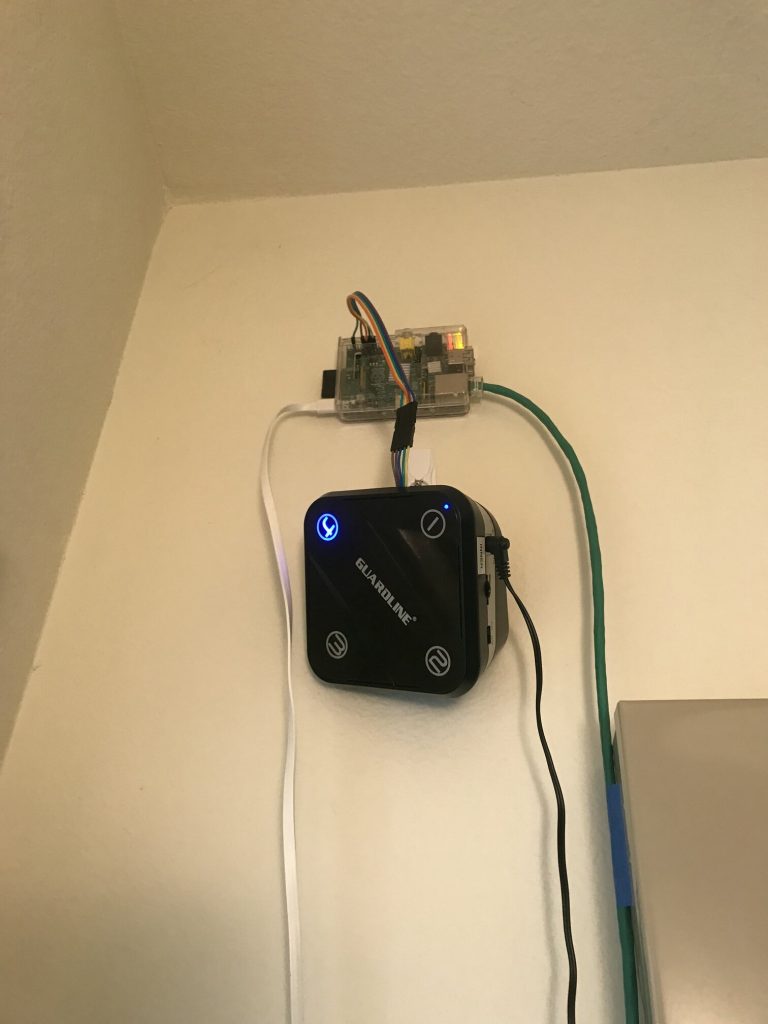
Guardline connected to Raspberry Pi GPIO pins. Mounted with 3M “Command” hooks and picture frame hangers
3M picture frame hanging strips


Shelly Flood sensor doesn’t alarm with water (SOLVED)

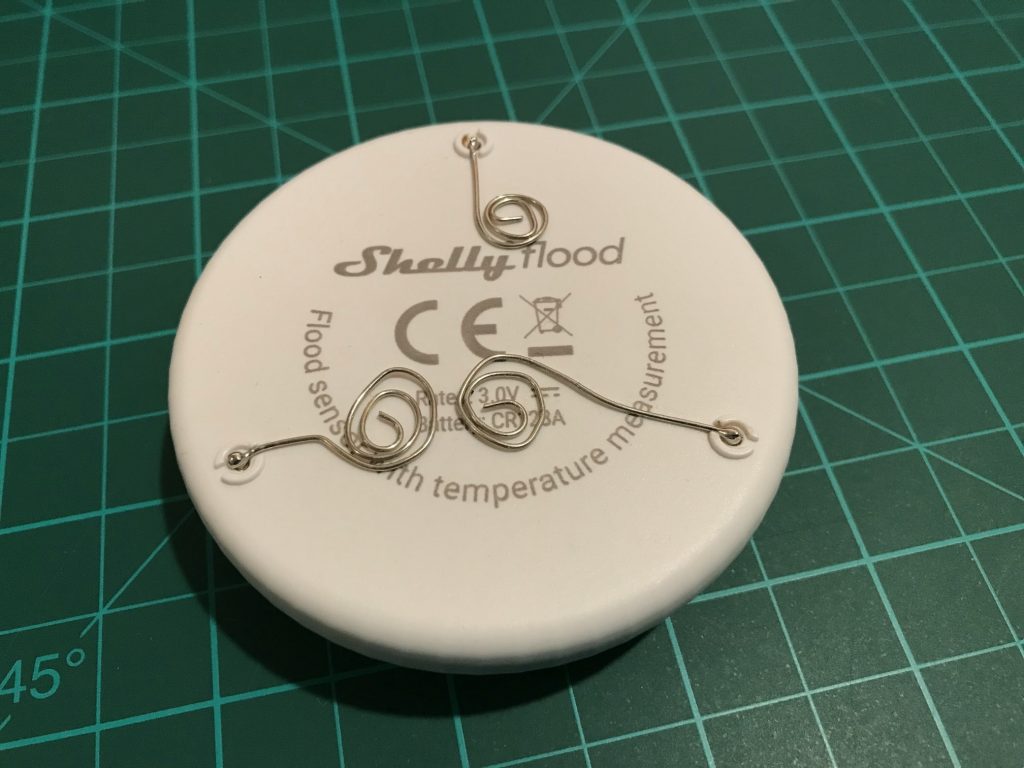
tl;dr The fix is to increase the surface area of the contacts on the Shelly Flood sensor. See photo of fix, below.

Simple test: Put sensor contacts on a metal ruler (or other sheet metal) and it should definitely alarm.

Simple test 2: Put 3 coins (eg. US quarters = 25 cents) on a plate: One coin underneath each of the 3 metal contact points on the sensor. Place sensor on the 3 coins. Pour water on the plate. When water is touching all 3 coins (or perhaps 2 coins), sensor should alarm.

My tap water is pretty soft. It measures about 20 with a TDS (Total Dissolved Solids) meter.  As such, the Shelly Flood sensor does NOT trigger/alarm when it gets wet.  This means if there was a water leak, like a busted hose on the washing machine, the sensor would not fire and I would not get a notification. Very bad.

After some conversation on the Shelly support group on Facebook, I learned: If there aren’t enough minerals in the water, then there won’t be enough conductivity for the sensor to trigger. This is a known issue with the Shelly Flood.

Workaround is to increase the surface / contact area of the sensor’s contacts. Shelly said they are working on an add-on part that would solve this problem. But why wait? And their future mod may not be so great.

My fix: After soldering on some coiled bare wire (each about 7cm long), sensor alarms immediately with just 10ml (1 tablespoon) of water.


RTSP: Flashing Wyze Cam V2 with Dafang-Hacks firmware, Blue Iris

Purpose: Better RTSP on the wyze cam (confirmed after 2 months of use!) and more features. Plus, “Dafang Hacks” firmware is open source.

Follow the official docs to flash the wyze cam v2 with dafang-hacks firmware.

Couple of tips not found in the docs:

  • I used a 32GB micro-SD flash card, fat32 formatted and had no problems
  • Chrome browser would not allow me to ignore the HTTPS SSL certificate warning (no “proceed to site” option). So I used Safari browser on Mac. UPDATE: On Chrome, you can type “thisisunsafe” to bypass the cert warning page (thanks to reader PSv).
  • Default login/password is: root/ismart12

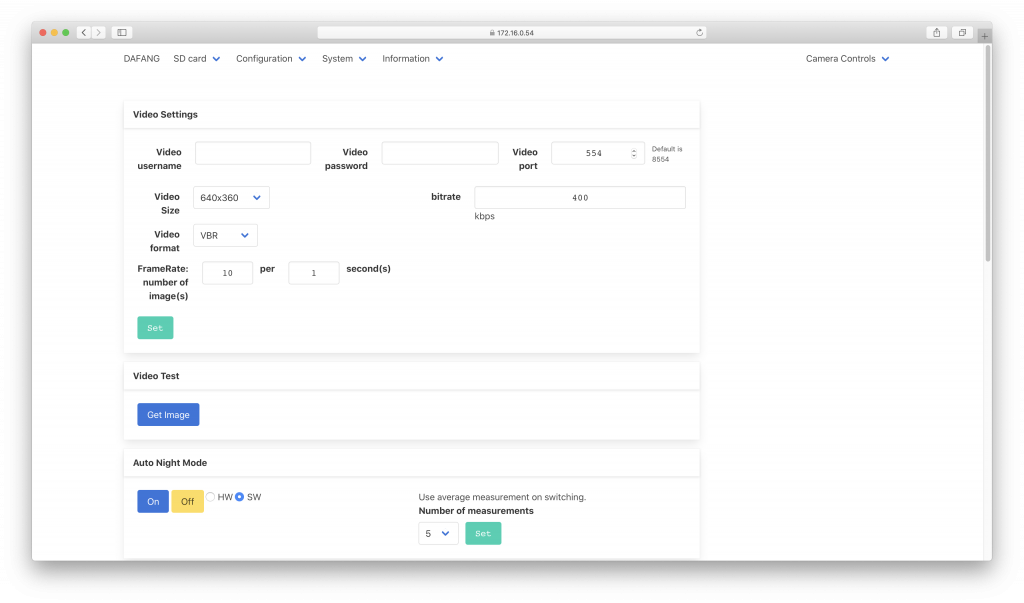
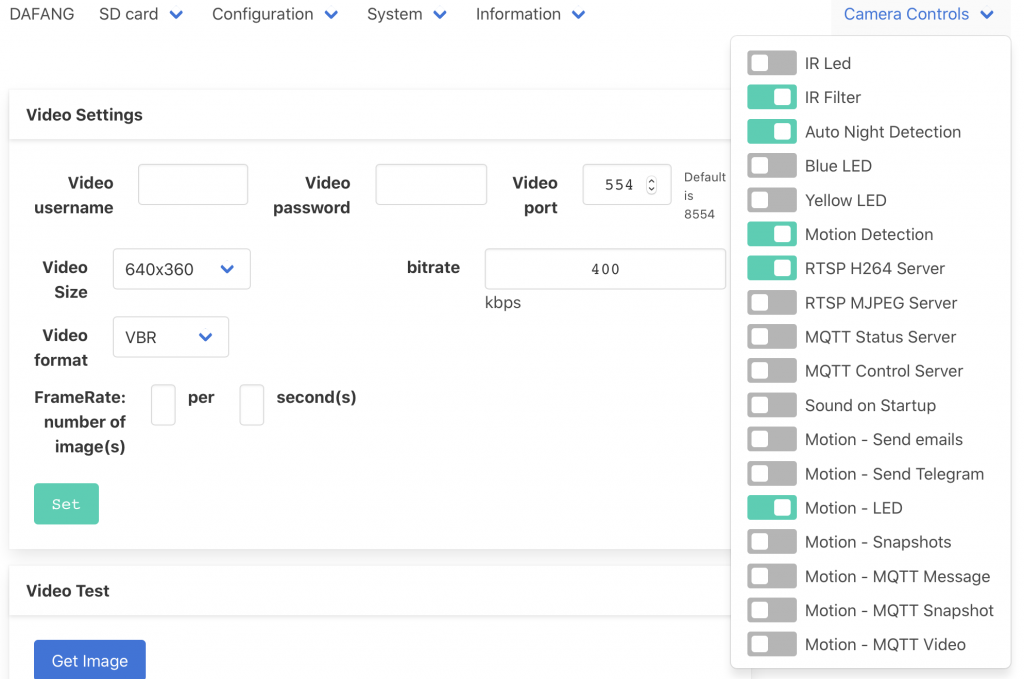
Video options: I changed port to 554, to match Blue Iris. I set low-resolution, low-bitrate, and low-fps because my 2.4GHz wifi has a lot of other traffic:

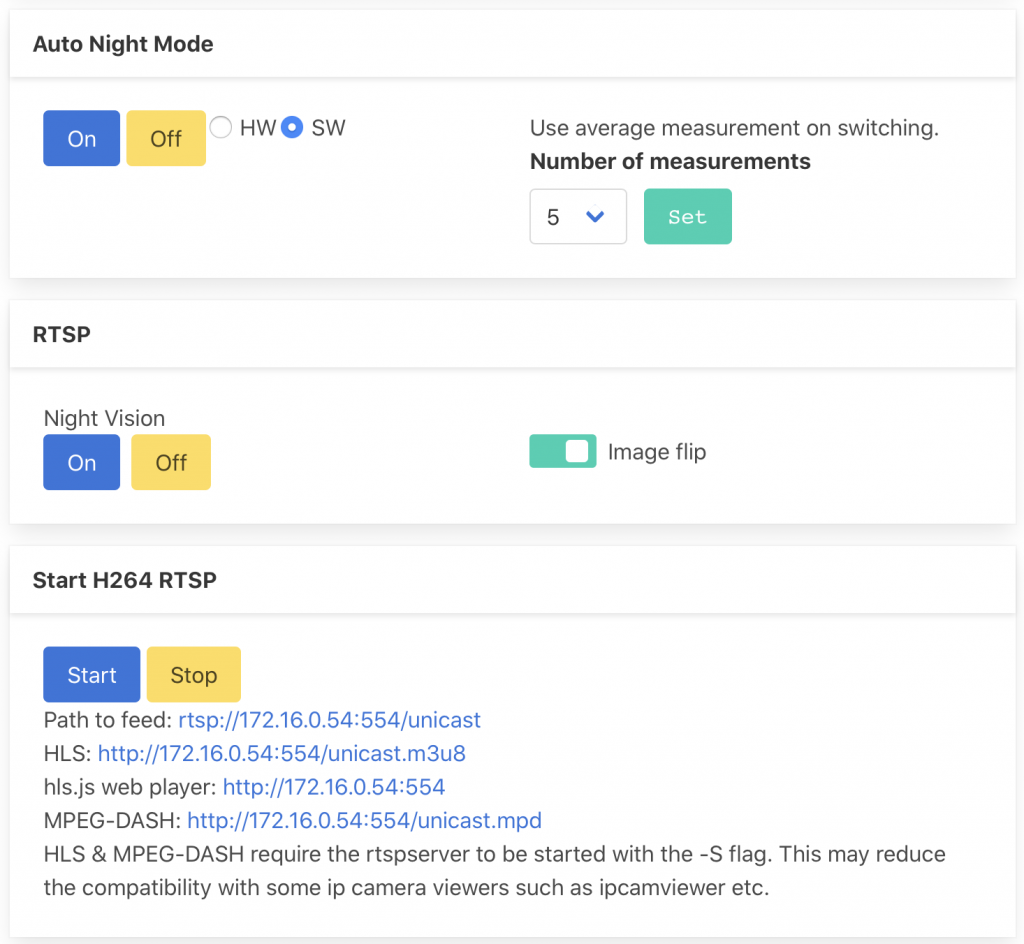
RTSP (I had to flip video 180-degrees because my wyze cam is mounted upside-down). Note the URLs, which you’ll use with Blue Iris:

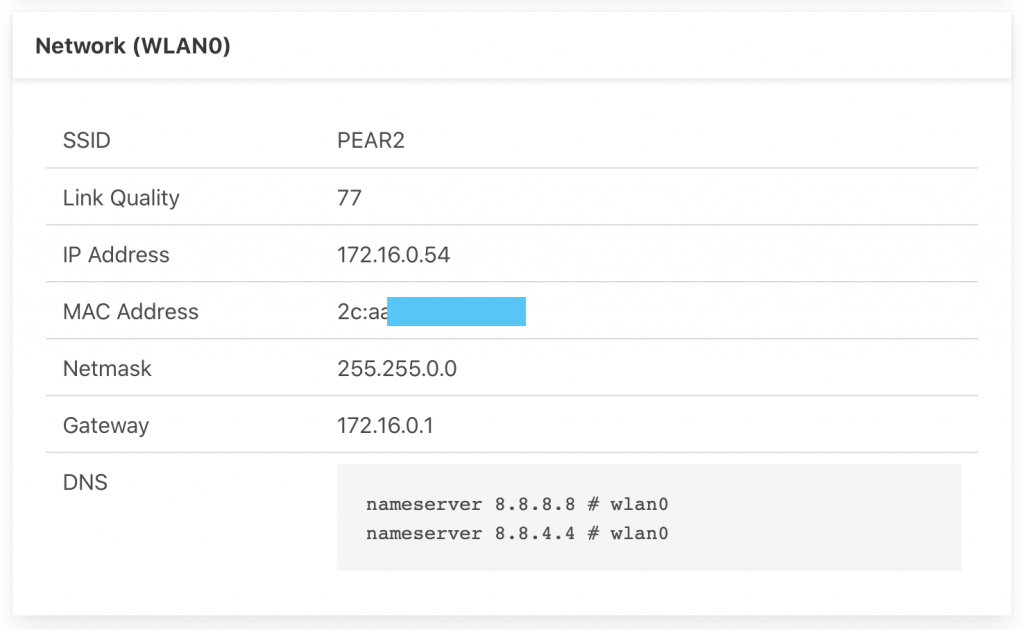
Wifi/wlan signal strength (link quality) info is great for tuning/troubleshooting the wifi link:

Camera controls (MQTT!):

Blue Iris camera settings:

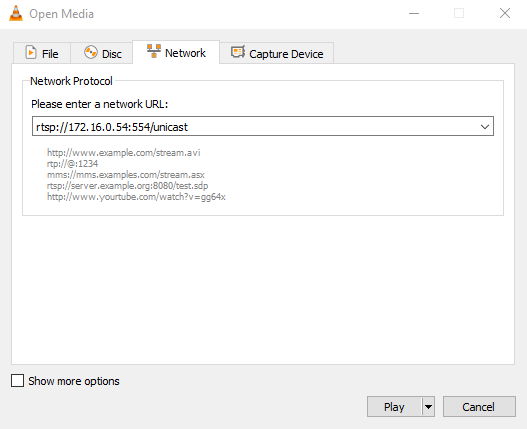
If video doesn’t appear in Blue Iris, test with VLC by opening a Network Stream:

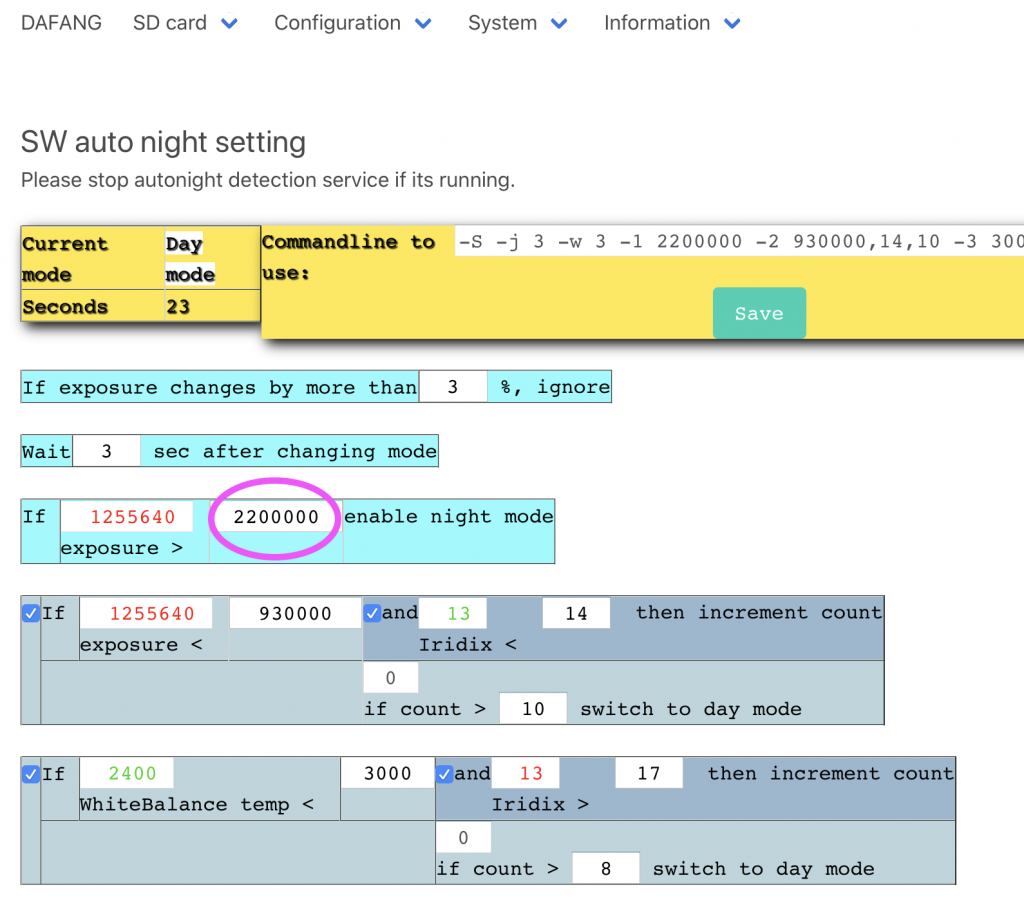
Disable switching to night mode by increasing exposure threshold from 1.2M to 2.2M:


So far so good.  I’ll know more after a week or two.

UPDATE 2020/08/07: Open-source firmware is working great! Wyze cam V2 is functional and reliable. Low-bandwidth settings are appropriate for the area of the house where the wyze cam is installed.

UPDATE 2020/09/18: Dafang firmware has been rock-solid 🙂 I haven’t touched the wyzecam since the firmware change and everything is working well with Blue Iris.

#
tuya-convert: BN-LINK BNC-60/U133TJ Wifi Smart Plugs


ATTENTION: UPDATE 2020/11/17: Users are reporting that recently shipped BNC-60 smartplugs are no longer tuya-convert’able.

These are harder to flash OTA than other ESP8266 devices. This guide assumes you already know the normal tuya-convert process.

Final goal (July 2020): tasmota.bin 8.3.1

Run ./start_flash.sh

If prompted, answer ‘y’ (yes) as necessary to terminate dnsmasq, mosquitto, etc.

When prompted connect Android (not iOS) smartphone to vtrust-flash ssid; because iOS will disconnect from the ssid when it detects there’s no actual Internet access.

Script says: “Press ENTER to continue”

Connect BN-LINK smart plug to AC power.

WITHIN 2 SECONDS, press ENTER.

Wait 1 second (1s).

WITHIN 3 SECONDS, hold BNC-60 power button for about 7s, and release when led blinks red (blinks about 2 times). After about 2s you should see led flashing blue (fast blinking), and then after ~20s led will be steady blue.

Then script will output a row of dots that’s longer than previous row of dots:

Starting smart config pairing procedure

Waiting for the device to install the intermediate firmware

Put device in EZ config mode (blinking fast)

Sending SSID                  vtrust-flash

Sending wifiPassword

Sending token                 00000000

Sending secret                0101

................

SmartConfig complete.

Resending SmartConfig Packets

................

SmartConfig complete.

Resending SmartConfig Packets

.................................................................................

Then error (below) usually appears, and that’s OK. You may get lucky* and the error won’t appear (it’ll just proceed per normal tuya-convert process).

*It seems that doing those “WITHIN 3 SECONDS” steps (above) quickly enough is the best chance of getting lucky.

SmartConfig complete.

Resending SmartConfig Packets

.................................................................................

Device did not appear with the intermediate firmware

Check the *.log files in the scripts folder

Do you want to try flashing another device? [y/N]

After you see the error, say “n” (no) to return to shell.

Android smartphone will disconnect from vtrust-flash ssid because the tuya-convert AP was torn-down.

Disconnect BNC-60 from AC power.

You should see gwId lines in the log (this is progress):

pi@raspberrypi:~/tuya-convert $ cat scripts/smarthack-web.log | grep gwId

GET /gw.json?a=s.gw.token.get&et=1&gwId=12345678904f22bf16d3&other={"token":"00000000","region":"US","tlinkStat":{"configure":"smartconfig","time":1,"source":"ap","path":"broadcast"}}&t=7&v=3.0&sign=98765432157018e229a15811f3d99a7a

[I 200708 06:59:05 web:2250] 200 GET /gw.json?a=s.gw.token.get&et=1&gwId=12345678904f22bf16d3&other={"token":"00000000","region":"US","tlinkStat":{"configure":"smartconfig","time":1,"source":"ap","path":"broadcast"}}&t=7&v=3.0&sign=98765432157018e229a15811f3d99a7a (10.42.42.1) 46.31ms

[...]

Restart the script:

./start_flash.sh

Now, on the 2nd pass, when it prompts you to connect a smartphone to vtrust-flash ssid, DO NOT connect anything to the vtrust-flash ssid.

It says, “Press ENTER to continue”

Hit the ENTER key and then quickly plug-in the BNC-60 to AC power. Do not press any buttons on the BNC-60.

This time you’ll see:

Fetching firmware backup

with downloading progress.

and then:

Available options:
  0) return to stock
  1) flash espurna.bin
  2) flash tasmota.bin
  q) quit; do nothing
Please select 0-2:

At this point, you’re back to a normal tuya-convert flow.

Pick your choice “1” or “2”.  Eg. I’m using tasmota.bin so “2”.

and it’ll complete normally.

On the BNC-60, the red LED will blink super-fast when it is flashing tasmota.bin.

Enjoy!

Pairing the Xiaomi/Aqara Vibration Sensor (zigbee)

Goal: To pair the sensor to the CC2531 zigbee router.

See also CC2531 Router Operations

Enable Permit (aka pairing) Mode

I am using ZHA included in Home Assistant.

In Home Assistant (HA, aka hass), enable pairing mode:

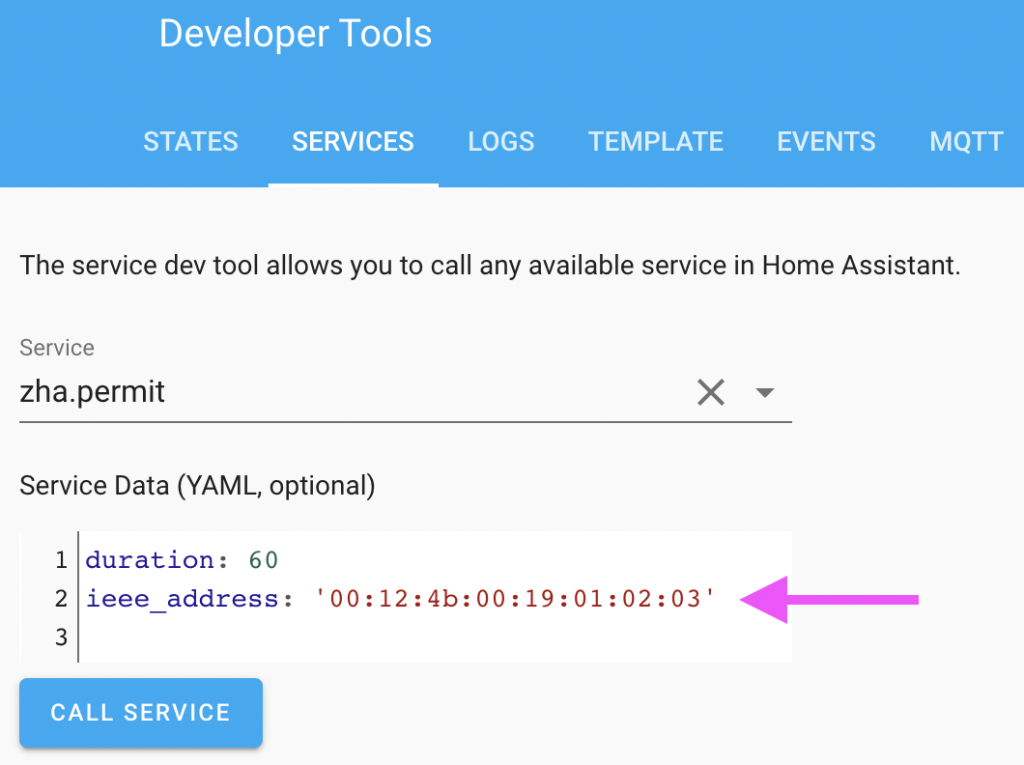
Developer Tools > Services

The service to call is “zha.permit”

Note, I change duration to 250 seconds to give me plenty of time to fuss with the sensors buttons.

“ieee_address” is the zigbee MAC address of the zigbee router (eg. CC2531 running router firmware) that is permitted to add end-devices (eg. sensors) during the “duration” period.

If “ieee_address” is not provided, then the coordinator and all routers are permitted to add end-devices during the permit period. For Xiaomi sensors, I found it’s best to “lock” the sensor to the desired router (ie. closest router), so I always use “ieee_address” to ensure the sensor pairs to the router I want.

How to find the router’s MAC address

In HA with ZHA:

Configuration > Zigbee Home Automation > LUMI router > IEEE

Or, I run zha_map and read the “neighbours” file:

donn@fox:/usr/share/hassio/homeassistant$ cat neighbours/neighbours_00124b0019010203.txt
...
    "device_type": "Router",
    "ieee": "00:12:4b:00:19:01:02:03",
    "lqi": 104,
    "manufacturer": "LUMI",
    "model": "lumi.router",

Push the button on the sensor (a lot)

Here’s what happened after I enabled permit-mode:

Saw in home-assistant.log:

2020-06-25 15:34:49 INFO (MainThread) [homeassistant.components.zha.api] Permitting joins for 60s on 00:12:4b:00:19:01:02:03 device

Press and hold sensor button for 5s. Saw blue led flash 3 times.

Press button every 1 to 2s. See blue led flash once, on most button presses.

10s go by. Nothing is happening in the HA log, so…

Press and hold button for 5s, again.

Press button every 1 to 2s, again.

This time I start seeing messages in HA log that sensor is discovered.

IMPORTANT: Keep pressing the button every 1 to 2s for another 1 minute until new zigbee log messages no longer appear.

HA log results

2020-06-25 15:34:49 INFO (MainThread) [homeassistant.components.zha.api] Permitting joins for 60s on 00:12:4b:00:19:01:02:03 device
2020-06-25 15:35:42 INFO (MainThread) [zigpy_deconz.zigbee.application] New device joined: 0xb1e2, 00:15:8d:00:02:11:22:33
2020-06-25 15:35:42 INFO (MainThread) [zigpy.application] Device 0xb1e2 (00:15:8d:00:02:11:22:33) joined the network
2020-06-25 15:35:42 INFO (MainThread) [zigpy.device] [0xb1e2] Requesting 'Node Descriptor'
2020-06-25 15:35:46 INFO (MainThread) [zigpy.device] [0xb1e2] Node Descriptor: <Optional byte1=2 byte2=64 mac_capability_flags=128 manufacturer_code=4151 maximum_buffer_size=127 maximum_incoming_transfer_size=100 server_mask=0 maximum_outgoing_transfer_size=100 descriptor_capability_field=0>
2020-06-25 15:35:46 INFO (MainThread) [zigpy.device] [0xb1e2] Discovering endpoints
2020-06-25 15:35:49 INFO (MainThread) [zigpy.device] [0xb1e2] Discovered endpoints: [1, 2]
2020-06-25 15:35:49 INFO (MainThread) [zigpy.endpoint] [0xb1e2:1] Discovering endpoint information
2020-06-25 15:35:52 INFO (MainThread) [zigpy.endpoint] [0xb1e2:1] Discovered endpoint information: <Optional endpoint=1 profile=260 device_type=10 device_version=1 input_clusters=[0, 3, 25, 257] output_clusters=[0, 4, 3, 5, 25, 257]>
2020-06-25 15:35:57 INFO (MainThread) [zigpy.endpoint] [0xb1e2:2] Discovering endpoint information
2020-06-25 15:36:02 INFO (MainThread) [zigpy.endpoint] [0xb1e2:2] Discovered endpoint information: <Optional endpoint=2 profile=260 device_type=24322 device_version=1 input_clusters=[3, 18] output_clusters=[4, 3, 5, 18]>
2020-06-25 15:36:13 INFO (MainThread) [homeassistant.helpers.entity_registry] Registered new binary_sensor.zha entity: binary_sensor.lumi_lumi_vibration_aq1_33221102_ias_zone
2020-06-25 15:36:13 INFO (MainThread) [homeassistant.helpers.entity_registry] Registered new sensor.zha entity: sensor.lumi_lumi_vibration_aq1_33221102_power

Verify the pairing

HA “Services” page: Call the service “zha_map.scan_now” to rebuild the zigbee network map data.

The router’s “neighbours” file confirms the Xiaomi sensor is a “Child” of the router, so pairing was successful:

        {
            "depth": 2,
            "device_type": "End_Device",
            "ieee": "00:15:8d:00:02:11:22:33",
            "lqi": 7,
            "manufacturer": "LUMI",
            "model": "lumi.vibration.aq1",
            "new_joins_accepted": "Unknown",
            "nwk": "0xb1e2",
            "offline": false,
            "pan_id": "00:21:2e:ff:ff:0a:0b:0c",
            "relation": "Child",
            "rx_on_when_idle": "Off",
            "supported": true
        }

Test the sensor

Tap the sensor to vibrate it.  Entity state changes from “off” to “on”:


Refs:

https://github.com/home-assistant/core/issues/28614


#

CC2531 Router Operations (zigbee)

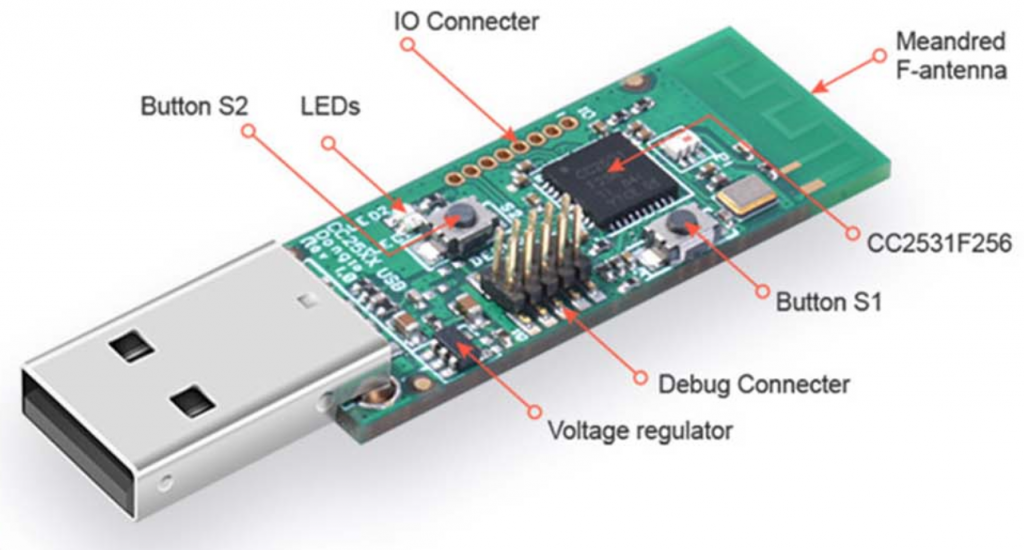
UPDATE 2020/07/25: I have upgraded to a CC2530+CC2591 router ($15 on eBay) with external antenna because I found the CC2531’s range to be too short/limiting. Operations are the same, but CC2530 does not have LEDs.

If you are having trouble with the CC2531 as a zigbee router (aka repeater), follow these steps.

The CC2531 router works well with Xiaomi sensors, which are notoriously picky about what zigbee routers/repeaters/hubs they work with.

When using the CC2531 as a router, you do NOT need to connect it to a Raspberry Pi (or other computer). You can simply plug the CC2531 into a USB-A charger like a smartphone charger.

This assumes you are running the CC2531 router firmware (router-cc2531-std.hex) that is part of the zigbee2mqtt project.

You do not have to run zigbee2mqtt. The CC2531 with router firmware is a totally standalone zigbee router.

This assumes you have already paired the CC2531 router with your zigbee coordinator (aka hub, aka gateway). To pair, enable “permit” mode on your coordinator, then power-on the CC2531 and it will join the network automatically. The CC2531’s red LED will slow-blink when it is joined to the network.

After pairing, ensure Home Assistant (HA, aka hass) has entity IDs for the CC2531 router. Search for “lumi_router”:

Ensure the CC2531 is in “normal operation” mode. If you see the LED flash/blink RED once every 4 seconds, then it is in normal operation mode.

Ensure the CC2531 has an active link to the zigbee coordinator. The S1 button on the CC2531 is valuable for testing this. I call S1 the “test button”.

When you press S1, the CC2531 LED toggles between flashing-red and green, and emits that state (green = on) like a sensor. That’s all it does. It’s only for testing. Green doesn’t mean the router is doing anything different. It’s just a “sensor” for you to test the link between the CC2531 router and your coordinator.

In HA, check Developer Tools > States and the state of the entity-id for your CC2531 similar to:

light.lumi_lumi_router_abcdef_on_off

The state of this entity will be “on” when the CC2531 LED is GREEN, and state will be “off” when the CC2531 LED is slow-flashing RED (every 4s).

NOTE: It may take 1 or 2 minutes for the state change to appear in the HA “States” page, so be patient.

If the entity state is “unavailable” or the state doesn’t change after 2 minutes of pressing the S1 button, then the CC2531 doesn’t have an active link with the coordinator.

  • If the CC2531 is far away, try moving it closer to the coordinator (or a known-good router) and testing again.
  • Try re-pairing the CC2531 with your coordinator. To re-pair: Power on, press and hold down the S2 button for 5 seconds.

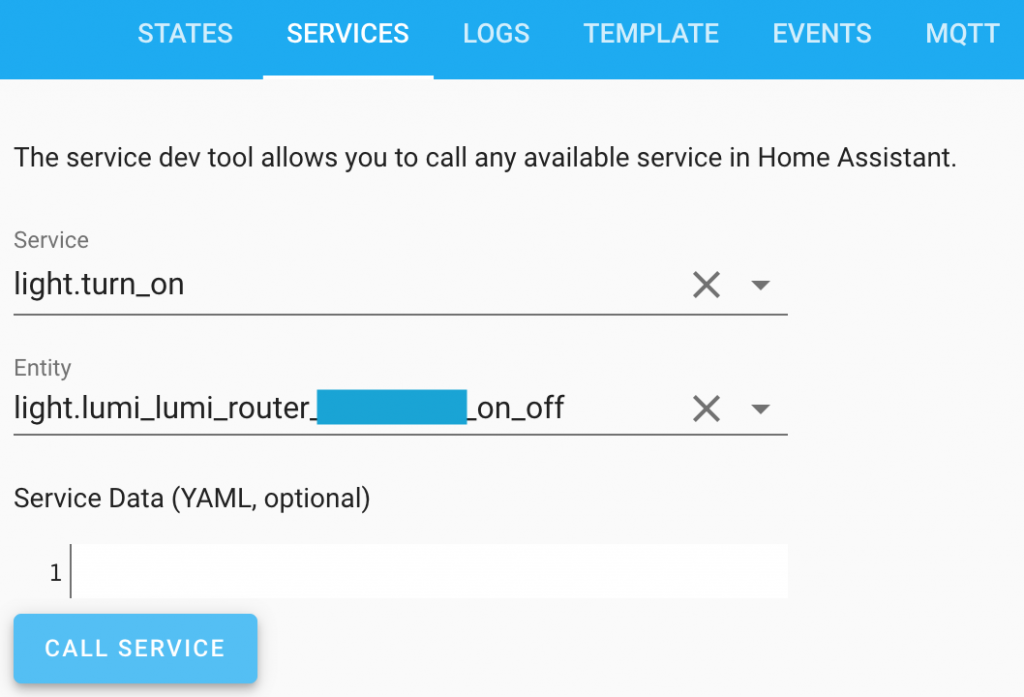
You can also control the green/red LED on the CC2531 with HA service calls (light.turn_on), which also tests the connectivity between the router and the coordinator:

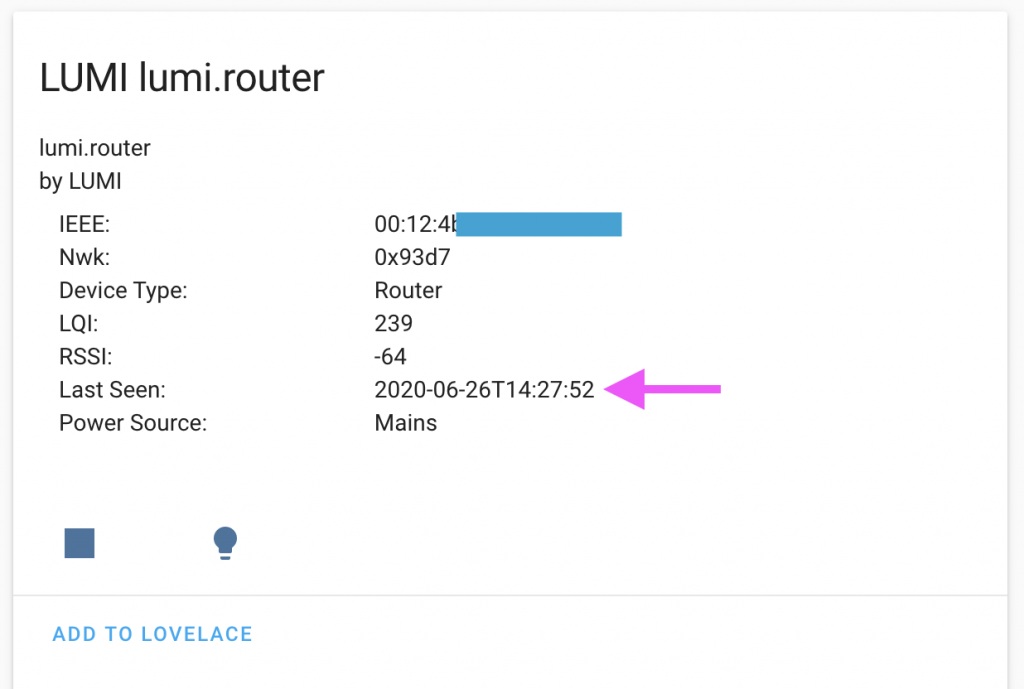
Also check the last time HA was in-contact with the CC2531:

HA 0.112 and higher: Configuration > Integrations > Zigbee Home Automation > Configure > Devices > lumi.router

HA 0.111 and lower: Configuration > Zigbee Home Automation > lumi.router


See also: Pairing Xiaomi sensor with CC2531 router

#

Wyze Sense bridge & sensors with Home Assistant (hass)

You do not have to connect the Wyze Sense “bridge” to a Wyze cam. You do not have to use the Wyze app. However, if you need to update the firmware of the bridge, you’ll need to connect it to a Wyze cam and use their app.

Home Assistant (HA) version: 0.110.7

Connect wyze sense bridge to HA server using a USB extension cable to keep bridge away from server hardware (better RF rx/tx).

lsusb:

Bus 001 Device 018: ID 1a86:e024 QinHeng Electronics

Device path for wyze bridge:

donn@fox:~$ ls -l /dev/hidraw0

crw------- 1 root root 238, 0 Jun 19 20:41 /dev/hidraw0

Map this into HA container with portainer like we did with Conbee II, except device path will be the same inside the container: /dev/hidraw0

Update: No need to add the github url as a Custom Repository in HACS.

Update to latest version of HACS. Restart HA.

Go to HACS tab in HA. Search integrations for “wyze” and install “Ha Wyzesense” integration. Restart HA.

Explore some more:

bash-5.0# ls -l /sys/class/hidraw/
total 0
lrwxrwxrwx 1 root root 0 Jun 19 20:47 hidraw0 -> ../../devices/pci0000:00/0000:00:1a.0/usb1/1-1/1-1.2/1-1.2.3/1-1.2.3:1.0/0003:1A86:E024.0001/hidraw/hidraw0

bash-5.0# lsusb | grep -i 1a86
Bus 001 Device 018: ID 1a86:e024 QinHeng Electronics

Add to configuration.yaml:

binary_sensor:
  - platform: wyzesense
    device: auto

And restart HA again.

Log:

bash-5.0# cat home-assistant.log | grep -i wyze
2020-06-19 21:03:58 WARNING (MainThread) [homeassistant.loader] You are using a custom integration for wyzesense which has not been tested by Home Assistant. This component might cause stability problems, be sure to disable it if you experience issues with Home Assistant.
2020-06-19 21:03:58 INFO (MainThread) [homeassistant.components.binary_sensor] Setting up binary_sensor.wyzesense
2020-06-19 21:03:59 INFO (Thread-7) [custom_components.wyzesense.wyzesense_custom] LOG: time=1969-12-31T16:00:00, data=b'14ff'

Wyze Sense bridge LED is steady blue (good).

Developer Tools > Services.  In the Service box, type “wyze” and see wyzesense.scan service.

Per docs, call the service and, within 30s, push the sensor’s reset button until LED flashes 3 times.

Bridge LED changed to flashing blue but pairing failed “with no sensor found”:

Enabled debug for the custom component. No interesting log messages.

2020-06-19 21:28:09 DEBUG (SyncWorker_4) [custom_components.wyzesense.binary_sensor] Scan completed with no sensor found.

Saw tip from BlindLemon comment on github issue, and found the following pairing procedure worked OK:

Press bridge’s button until its led goes solid yellow. Call wyzesense.scan using Developer Tools > Services (flashing led on bridge). Now hold-down reset button on door sensor for 3s. It pairs and bridge led goes solid blue.

HA log says:

2020-08-30 17:06:16 INFO (MainThread) [homeassistant.helpers.entity_registry] Registered new binary_sensor.wyzesense entity: binary_sensor.wyzesense_01234567

Now there’s a new entity in Developer Tools > States:

It is nice to have rssi and battery level information for setting up alerts/notifications.

Note: When pairing my 2nd sensor, I did not have to press the bridge’s button. Just call wyzesense.scan and hold down the reset button on the sensor for ~5s, release, and it was paired and appeared in HA States page.

Door sensor states in HA:

off = The two pieces are touching (or close enough, about 1 inch)

on = The two pieces are far apart

Create a sensor for the battery level

Here’s the native sensor:

Make a custom sensor using the battery_level attribute (configuration.yaml):

sensor:
  - platform: template
    # Custom sensors created from other ents' attributes.
    sensors:
      wyzesense_70123456_battery_level:
        friendly_name: "Door sensor 70123456 battery level"
        unit_of_measurement: '%'
        entity_id: binary_sensor.wyzesense_70123456
        value_template: "{{ state_attr('binary_sensor.wyzesense_70123456', 'battery_level') }}"
        device_class: battery

Restart HA and check States page again for the newly created sensor:

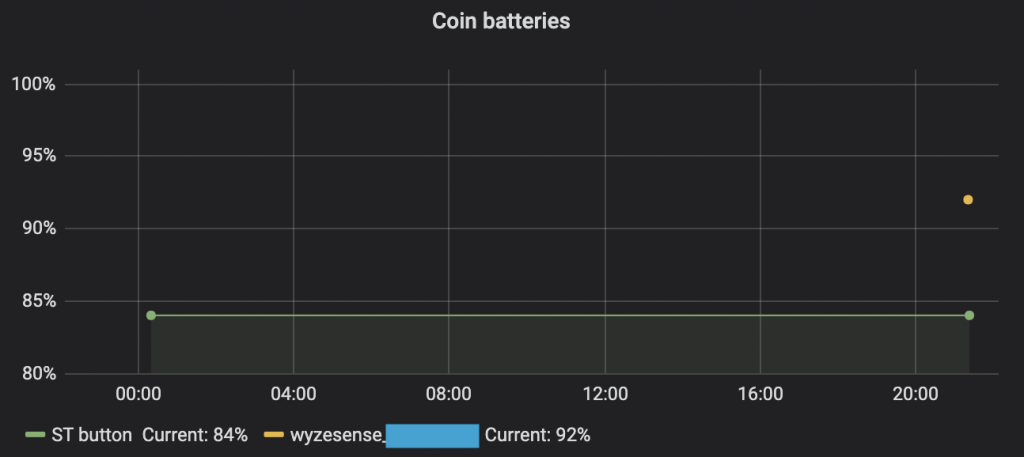
Add wyze battery level to grafana:


Ref:

Github repo for Ha Wyzesense

#

Zigbee: Conbee II installation, Home Assistant, ZHA, SmartThings button

Goal is to get SmartThings zigbee button working with Home Assistant first. Then, Wyze Sense sensors. Conbee II will be the zigbee coordinator (aka gateway, aka hub).

Use Windows PC to update firmware and set 2.4GHz channel. Download GCFFlasher and deConz.

GCFFlasher.exe install error:

The code execution cannot proceed because FTD2XX.dll was not found. Reinstalling the program may fix this problem.

So skip for now and install deConz for Win. Connect Conbee II. deConz app says frequency band is 2400 – 2483.5MHz.

Ensure status is “Not in Network”, else click “Leave”. Click icon for “Network Preferences”, top-center. Device type = Coordinator with Channel Mask 15.

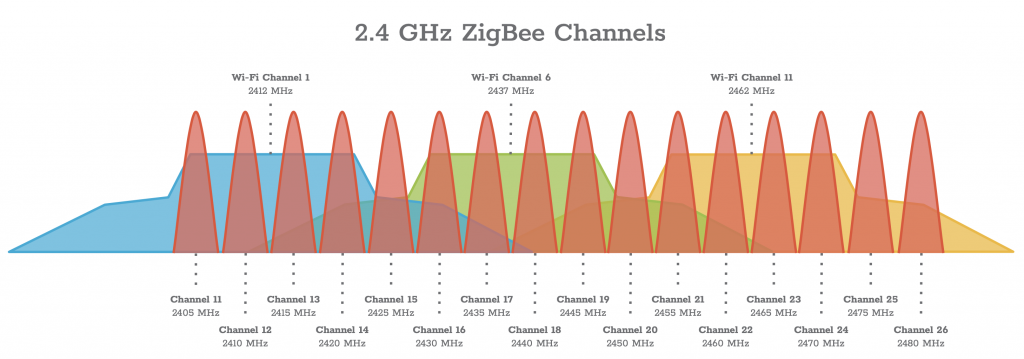
Metageek diagram:

Don’t untick current channel, but rather tick channel 20 checkbox then “Save”, “Done”. Close deConz. Restart deConz. Verify channel is 20.

Download firmware deCONZ_ConbeeII_0x26580700.bin.GCF

Download D2XX drivers 2.12.28 (x64). Copy ftd2xx.dll from “i386” folder of drivers to same folder as GCFFlasher.exe.

Open powershell shell, navigate to folder with  GCFFlasher.

List devices:

.\GCFFlasher.exe -l

Shows “path” is COM3, but no firmware version info. Firmware ver is displayed when flashing.

Copy firmware file to same folder as GCFFlasher.exe. Flash:

PS D:\snapraid_protected\cloudbu-d-drive\hass_home_assistant\zigbee\conbee ii\flashtool\unzipped\GCFFlasher_V3_10> .\GCFFlasher.exe -d COM3 -f .\deCONZ_ConBeeII_0x26580700.bin.GCF
GCFFlasher V3_10 (c) dresden elektronik ingenieurtechnik gmbh
Reboot device COM3 (ConBee II)
deCONZ firmware version 264A0700
action: update firmware after 6726 ms
flashing 160930 bytes: |==============================|
verify: .
SUCCESS
Wait 10 seconds until application starts
PS D:\snapraid_protected\cloudbu-d-drive\hass_home_assistant\zigbee\conbee ii\flashtool\unzipped\GCFFlasher_V3_10>

Ran same command again to see expected version:

deCONZ firmware version 26580700

ubuntu

Move conbee II from Windows pc to ubuntu Home Assistant server.

Dresden Elektronik:

donn@fox:~$ sudo lsusb
Bus 002 Device 002: ID 8087:0024 Intel Corp. Integrated Rate Matching Hub
Bus 002 Device 001: ID 1d6b:0002 Linux Foundation 2.0 root hub
Bus 001 Device 004: ID 0c45:643f Microdia Dell Integrated HD Webcam
Bus 001 Device 009: ID 1cf1:0030 Dresden Elektronik
Bus 001 Device 007: ID 058f:9254 Alcor Micro Corp. Hub
Bus 001 Device 002: ID 8087:0024 Intel Corp. Integrated Rate Matching Hub
Bus 001 Device 001: ID 1d6b:0002 Linux Foundation 2.0 root hub
Bus 004 Device 001: ID 1d6b:0003 Linux Foundation 3.0 root hub
Bus 003 Device 001: ID 1d6b:0002 Linux Foundation 2.0 root hub

This adds /dev/ttyACM0

crw-rw---- 1 root dialout 166, 0 Jun 17 18:42 /dev/ttyACM0

But, may be wiser to use /dev/serial/by-id/…  device path (in case future usb devices cause ttyACM* to change):

donn@fox:~$ ls -l /dev/serial/by-id/
total 0
lrwxrwxrwx 1 root root 13 Jun 17 21:02 usb-dresden_elektronik_ingenieurtechnik_GmbH_ConBee_II_DE2213352-if00 -> ../../ttyACM0

dmesg:

[17705070.939956] usb 1-1.2.2: Manufacturer: dresden elektronik ingenieurtechnik GmbH
[17705070.941393] cdc_acm 1-1.2.2:1.0: ttyACM0: USB ACM device
[17705074.785091] usb 1-1.2.2: Manufacturer: dresden elektronik ingenieurtechnik GmbH
[17705074.786219] cdc_acm 1-1.2.2:1.0: ttyACM0: USB ACM device

Add user to ‘dialout’ group:

donn@fox:~$ id donn
uid=1000(donn) gid=1000(donn) groups=1000(donn),4(adm),20(dialout),24(cdrom),27(sudo),30(dip),46(plugdev),116(lpadmin),126(sambashare),999(docker),130(libvirt)

Enable ZHA in Home Asssistant (hass, hassio)

Web-ui: Configuration > Intergrations > “+” icon. Search for “ZHA”. See & install “Zigbee Home Automation”.


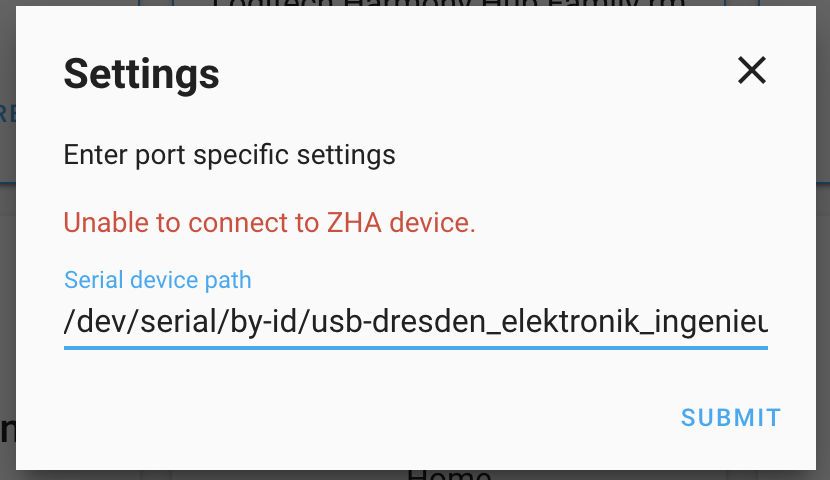
Unable to connect error:

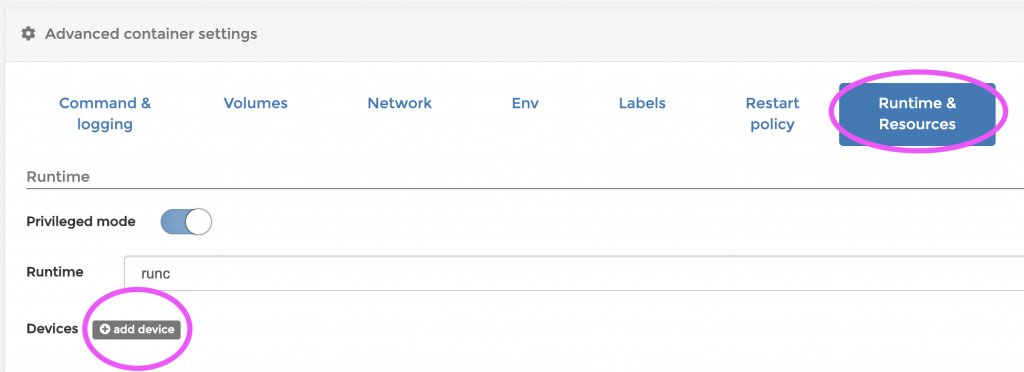
Abort integration. Use Portainer to map device into the Home Assistant container.

“Duplicate/Edit”.

Then “Runtime & Resources” > “add device”:

Map the long device path (host) to /dev/ttyACM0 within the container:

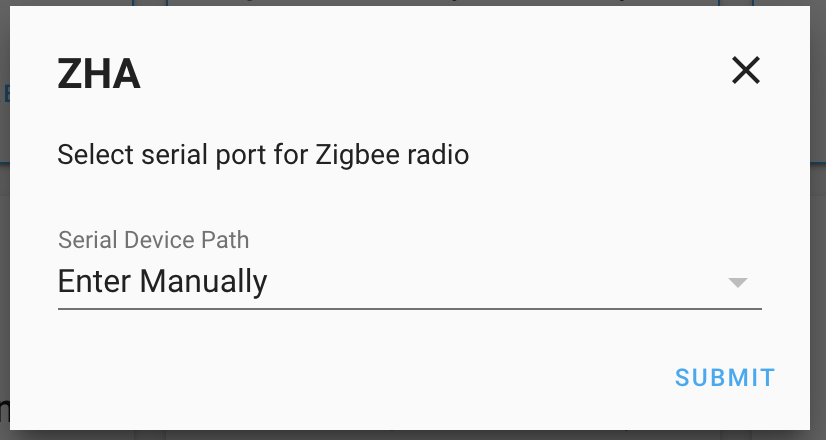
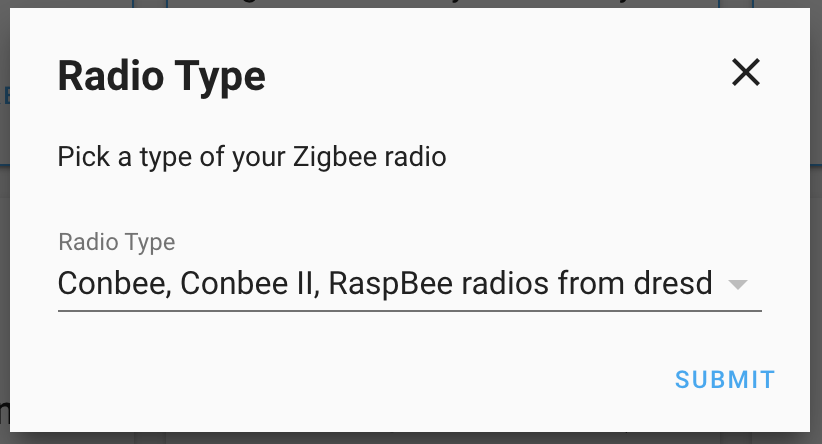
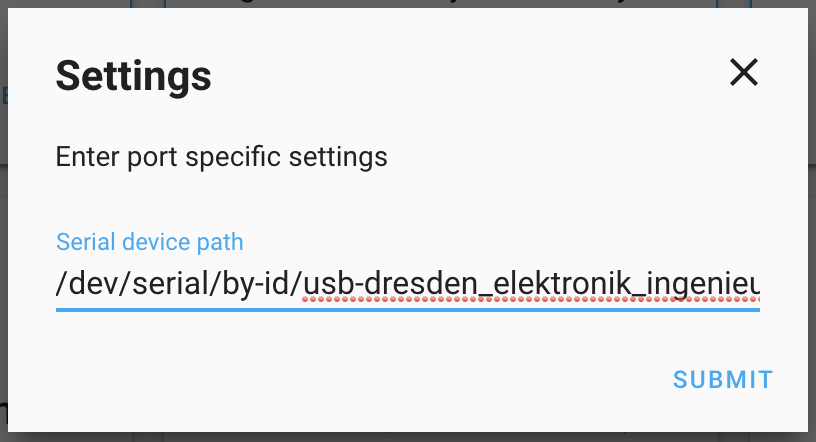
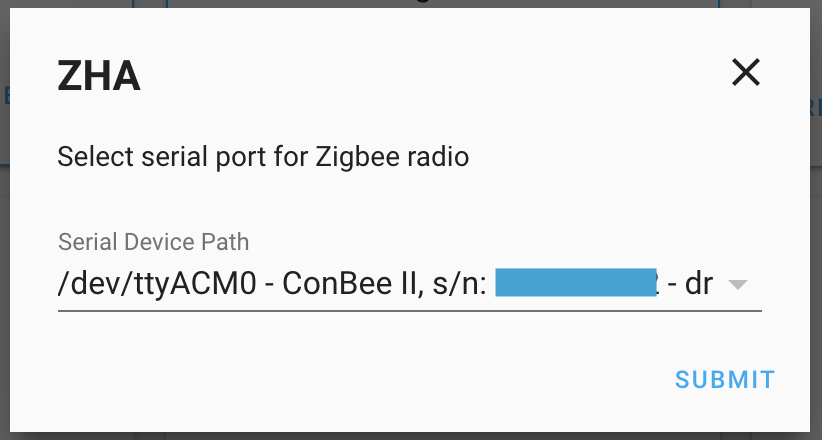
Scroll up and “Deploy the container”.  Confirm that you want to “Replace” the existing container. Wait for HA to restart. Try again to install the ZHA integration, but use /dev/ttyACM0 as the device path this time.

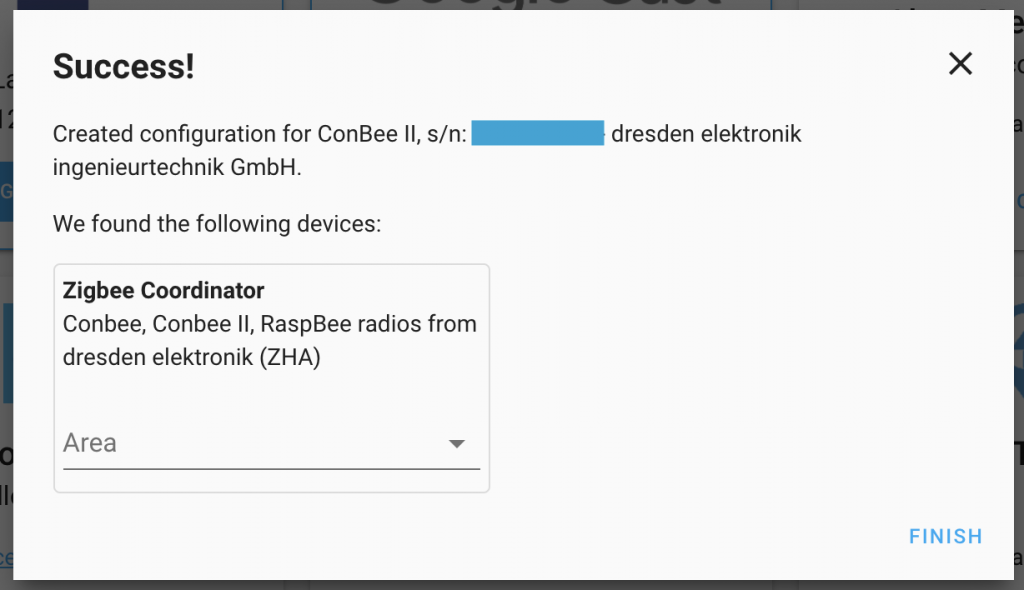
It’ll find it right away because we mapped the host’s device path to inside the container as /dev/ttyACM0:

This is HA 0.110.7

Saw a bunch of sensible “zha” logs in home-assistant.log

‘docker inspect’ output:

            "Devices": [
                {
                    "PathOnHost": "/dev/serial/by-id/usb-dresden_elektronik_ingenieurtechnik_GmbH_ConBee_II_DE2213352-if00
",
                    "PathInContainer": "/dev/ttyACM0",
                    "CgroupPermissions": "rwm"
                }
            ],

Was not prompted for zha database path; kinda expected it. Later, I found it in /config:

bash-5.0# ls -l /config/zigbee.db
-rw-r--r--    1 root     root         77824 Jun 21 01:44 /config/zigbee.db

Enable “permit” mode

From the docs:

“To add new devices to the network, call the permit service on the zha domain. Do this by clicking the Service icon in Developer tools and typing zha.permit in the Service dropdown box. Next, follow the device instructions for adding, scanning or factory reset.”

Seen in home-assistant.log when I called the permit service:

2020-06-17 21:46:32 INFO (MainThread) [homeassistant.components.zha.api] Permitting joins for 60s

Power ON SmartThings button and tap the button a few times:

2020-06-17 21:48:50 INFO (MainThread) [homeassistant.components.zha.api] Permitting joins for 60s
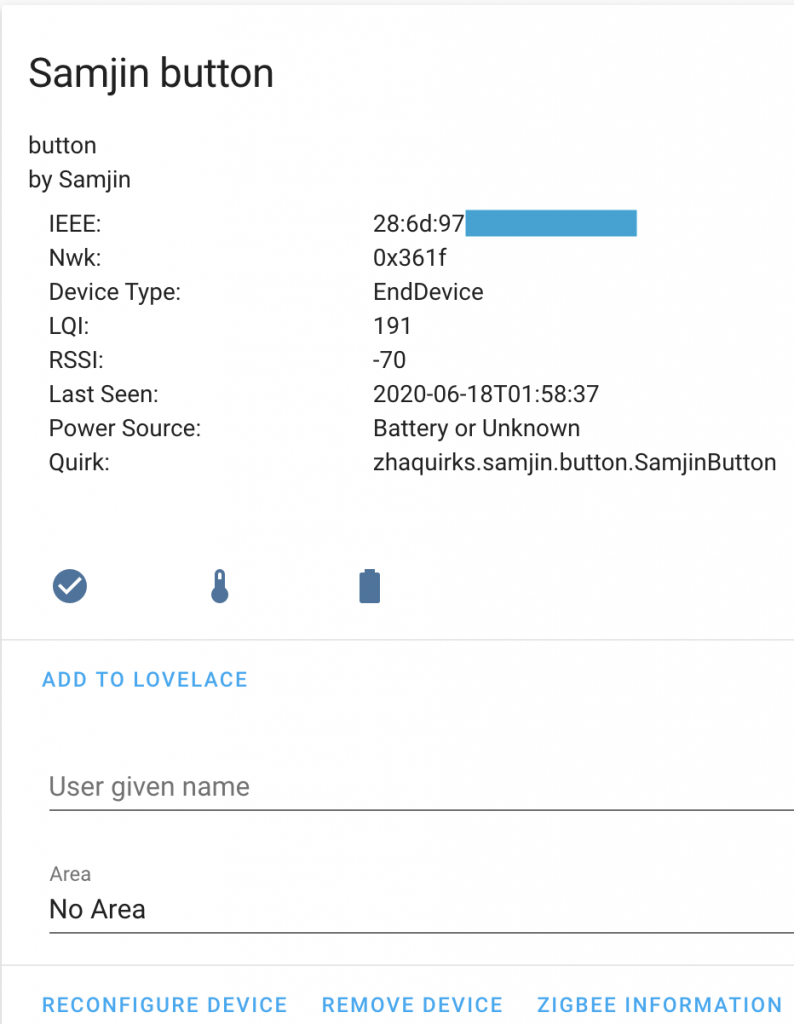
2020-06-17 21:49:08 INFO (MainThread) [zigpy_deconz.zigbee.application] New device joined: 0x361f, 28:6d:97:01:02:03:04:05
2020-06-17 21:49:08 INFO (MainThread) [zigpy.application] Device 0x361f (28:6d:97:01:02:03:04:05) joined the network
2020-06-17 21:49:08 INFO (MainThread) [zigpy.device] [0x361f] Requesting 'Node Descriptor'
2020-06-17 21:49:09 INFO (MainThread) [zigpy.device] [0x361f] Node Descriptor: <Optional byte1=2 byte2=64 mac_capability_flags=128 manufacturer_code=4673 maximum_buffer_size=82 maximum_incoming_transfer_size=82 server_mask=11264 maximum_outgoing_transfer_size=82 descriptor_capability_field=0>
2020-06-17 21:49:09 INFO (MainThread) [zigpy.device] [0x361f] Discovering endpoints
2020-06-17 21:49:09 INFO (MainThread) [zigpy.device] [0x361f] Discovered endpoints: [1]
2020-06-17 21:49:09 INFO (MainThread) [zigpy.endpoint] [0x361f:1] Discovering endpoint information
2020-06-17 21:49:09 INFO (MainThread) [zigpy.endpoint] [0x361f:1] Discovered endpoint information: <Optional endpoint=1 profile=260 device_type=1026 device_version=0 input_clusters=[0, 1, 3, 32, 1026, 1280, 2821] output_clusters=[3, 25]>
2020-06-17 21:49:16 INFO (MainThread) [homeassistant.helpers.entity_registry] Registered new binary_sensor.zha entity: binary_sensor.samjin_button_84e50d01_ias_zone
2020-06-17 21:49:16 INFO (MainThread) [homeassistant.helpers.entity_registry] Registered new sensor.zha entity: sensor.samjin_button_84e50d01_temperature
2020-06-17 21:49:16 INFO (MainThread) [homeassistant.helpers.entity_registry] Registered new sensor.zha entity: sensor.samjin_button_84e50d01_power

“samjin” button.

Entities:

Device info

HA web-ui > Configuration > Zigbee Home Automation. Click the device.

Events

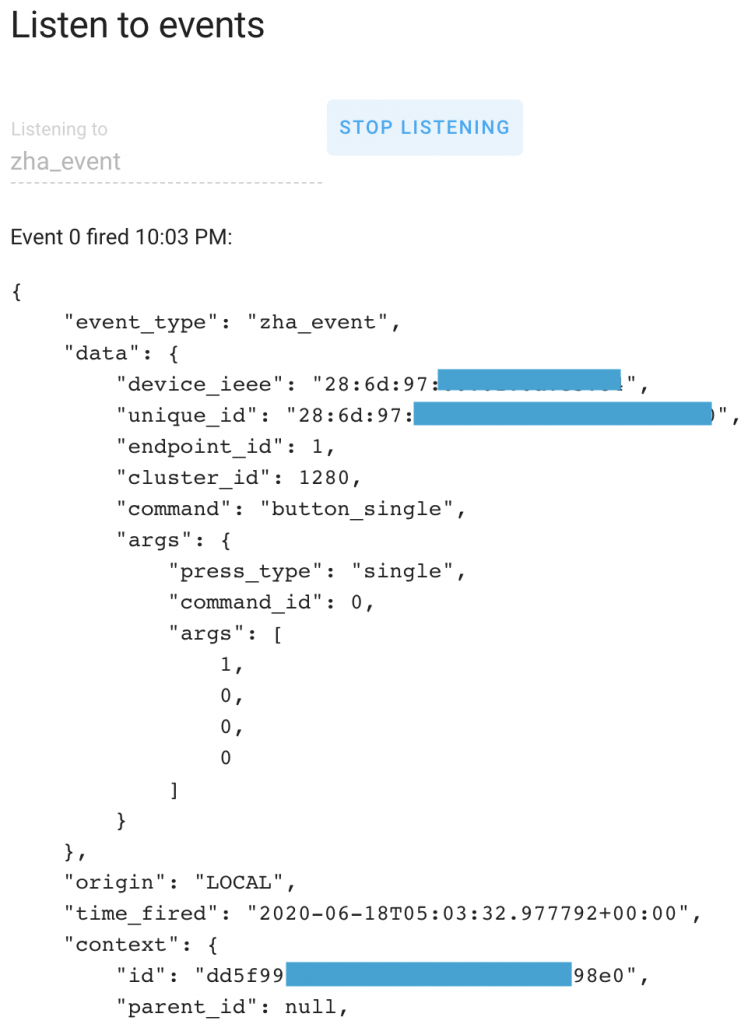
Button press event: Developer Tools > Events. Listen to “zha_event”.

Single-tap:

Double-tap:

"command": "button_double",

Long-press event:

"command": "button_hold",

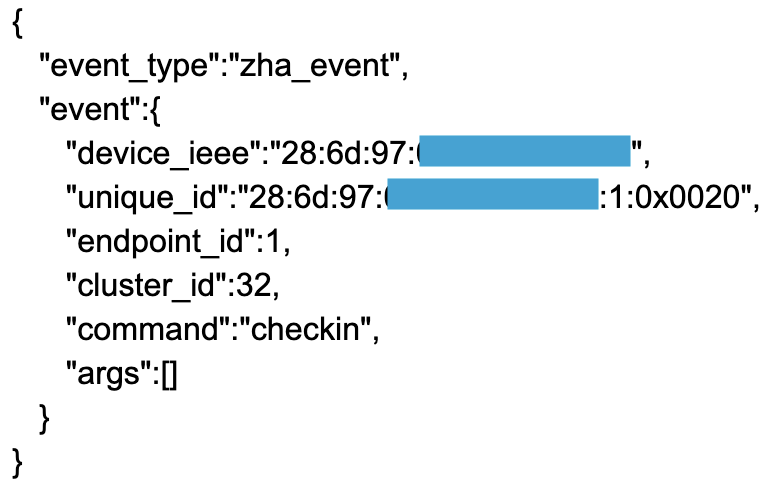
Check-in event. Might be useful as a heartbeat signal to ensure the button is really alive; and indirectly, the the quality of the zigbee network. The following is the value for msg.payload as displayed in Node Red:


Node Red

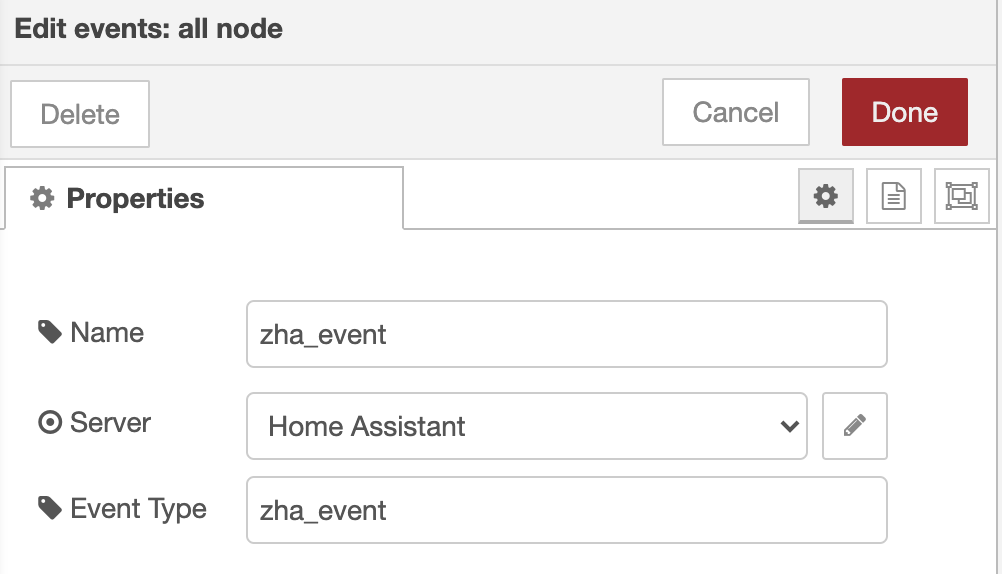
Use [events: all] node:

But filter to “zha_event”:

See the data using [debug] node:

{
   "event_type":"zha_event",
   "topic":"zha_event",
   "payload":{
      "event_type":"zha_event",
      "event":{
         "device_ieee":"28:6d:97:01:02:03:04:05",
         "unique_id":"28:6d:97:01:02:03:04:05:1:0x0500",
         "endpoint_id":1,
         "cluster_id":1280,
         "command":"button_single",
         "args":{
            "press_type":"single",
            "command_id":0,
            "args":[
               1,
               0,
               0,
               0
            ]
         }
      }
   },
   "_msgid":"5f9be8c4.631308"
}


Grafana

Grafana query, because SmartThings button has a temperature sensor inside:

According to grafana/influxdb, the SmartThings button is reporting its battery level (%) every 3 hours. But next day, changed to every 10 hours.

#