All posts by donn

XBOX Original Softmod, Hard Drive Upgrade, Clock Capacitor (2019)

Games / disc archive

Games archived at archive.org

Softmodding in 2019

99% of how to softmod is in MrMario’s video. But you don’t need to download and build Rocky5 softmodding tool from source as done in the video. Instead, you can download the prebuilt “Xbox Softmodding Tool.zip” file and “Extras” .iso disc image (link is in the official github docs). Burn the Extras .iso to DVD-R with Imgburn and low write speed (eg. 2x or 4x).

Remove clock capacitor

Figure out what version xbox you have. Eg. 1.0, 1.4, 1.6.
v1.6 does NOT need to have the Clock Capacitor removed. Softmod dashboard will also display the xbox version. So will the “xbox info.txt” file when you save your eeprom backup to a safe storage location.
https://www.reddit.com/r/originalxbox/wiki/revision
https://www.reddit.com/r/originalxbox/wiki/clock_capacitor

Hard disk upgrade

Hard drive compatibility chart. The Crucial 500GB SSD (CT500MX500SSD1Z) looks promising, $65 amazon.

Get the PATA IDE to SATA converter with two large capacitors near the IDE connector and slave/master jumper near the power connector. One user recommends the one made by Startech with red PCB [sold on Amazon and Startech website], instead of the ones with green PCB. Youtubers report green ones working fine. Youtuber reporting Startech throughput is higher/faster.

How long should the 80-wire IDE ribbon cable be?
At least 24 inches is recommended. https://www.reddit.com/r/originalxbox/comments/7j3pj5/ide_40_vs_80/

What size hard drive can I install?
Partitions F: and G: can each be sized up to 1TB, so a 2TB disk is generally the max. With a 1TB drive, you can assign the majority of the disk (about 1TB, because C: and other partitions use some of the space) to F: and have no G:
See also the FAQ

Should I use a SSD instead of spinning platters HDD?
Some mixed opinion and 3rd hand reports, but seems either SSD or HDD will work. The biggest factor is the favorable low-cost of a 1TB or 2TB HDD, not SSD performance (IDE-to-SATA converter board is probably the bottleneck). https://www.reddit.com/r/originalxbox/comments/8bilp3/solidstate_drive_to_futureproof_your_xbox/

Disc drive

Replacement drive belts: Search ebay for:
xbox drive (belt,band)
5 belts for $1.08
Approx 1″ diameter

Hardmod: Flashing the TSOP

Howto (2017)

Hexen 2018 disc image

Fix kubernetes: oci runtime error: applying cgroup configuration for process caused mountpoint for devices not found

Can’t build or push docker container?

Error:

oci runtime error: applying cgroup configuration for process caused mountpoint for devices not found

Try restarting docker. If you then get:

Error starting daemon: Devices cgroup isn't mounted

Then it may be time to shutdown and cold-start the machine.

In my case, I didn’t have to install or config anything new. Docker was running fine before this failure. Try restarting docker (eg. systemctl restart docker). If it fails, shutdown and cold-boot the machine. Ensure docker is running. After 129 days of uptime, my docker just got in a weird, bad state.

See also:

https://stackoverflow.com/questions/32002882/error-starting-docker-daemon-on-ubuntu-14-04-devices-cgroup-isnt-mounted/55657451

Monitor for C64: S-Video in, 4:3 ratio, Soundbar

I was searching for a flat-panel LCD monitor for my Commodore 64, and read the Dell 2001FP is very popular. Just make sure you get one manufactured June 2005 or earlier because Dell changed their panel supplier in July 2005, and people have reported the older panels work better with the C64.

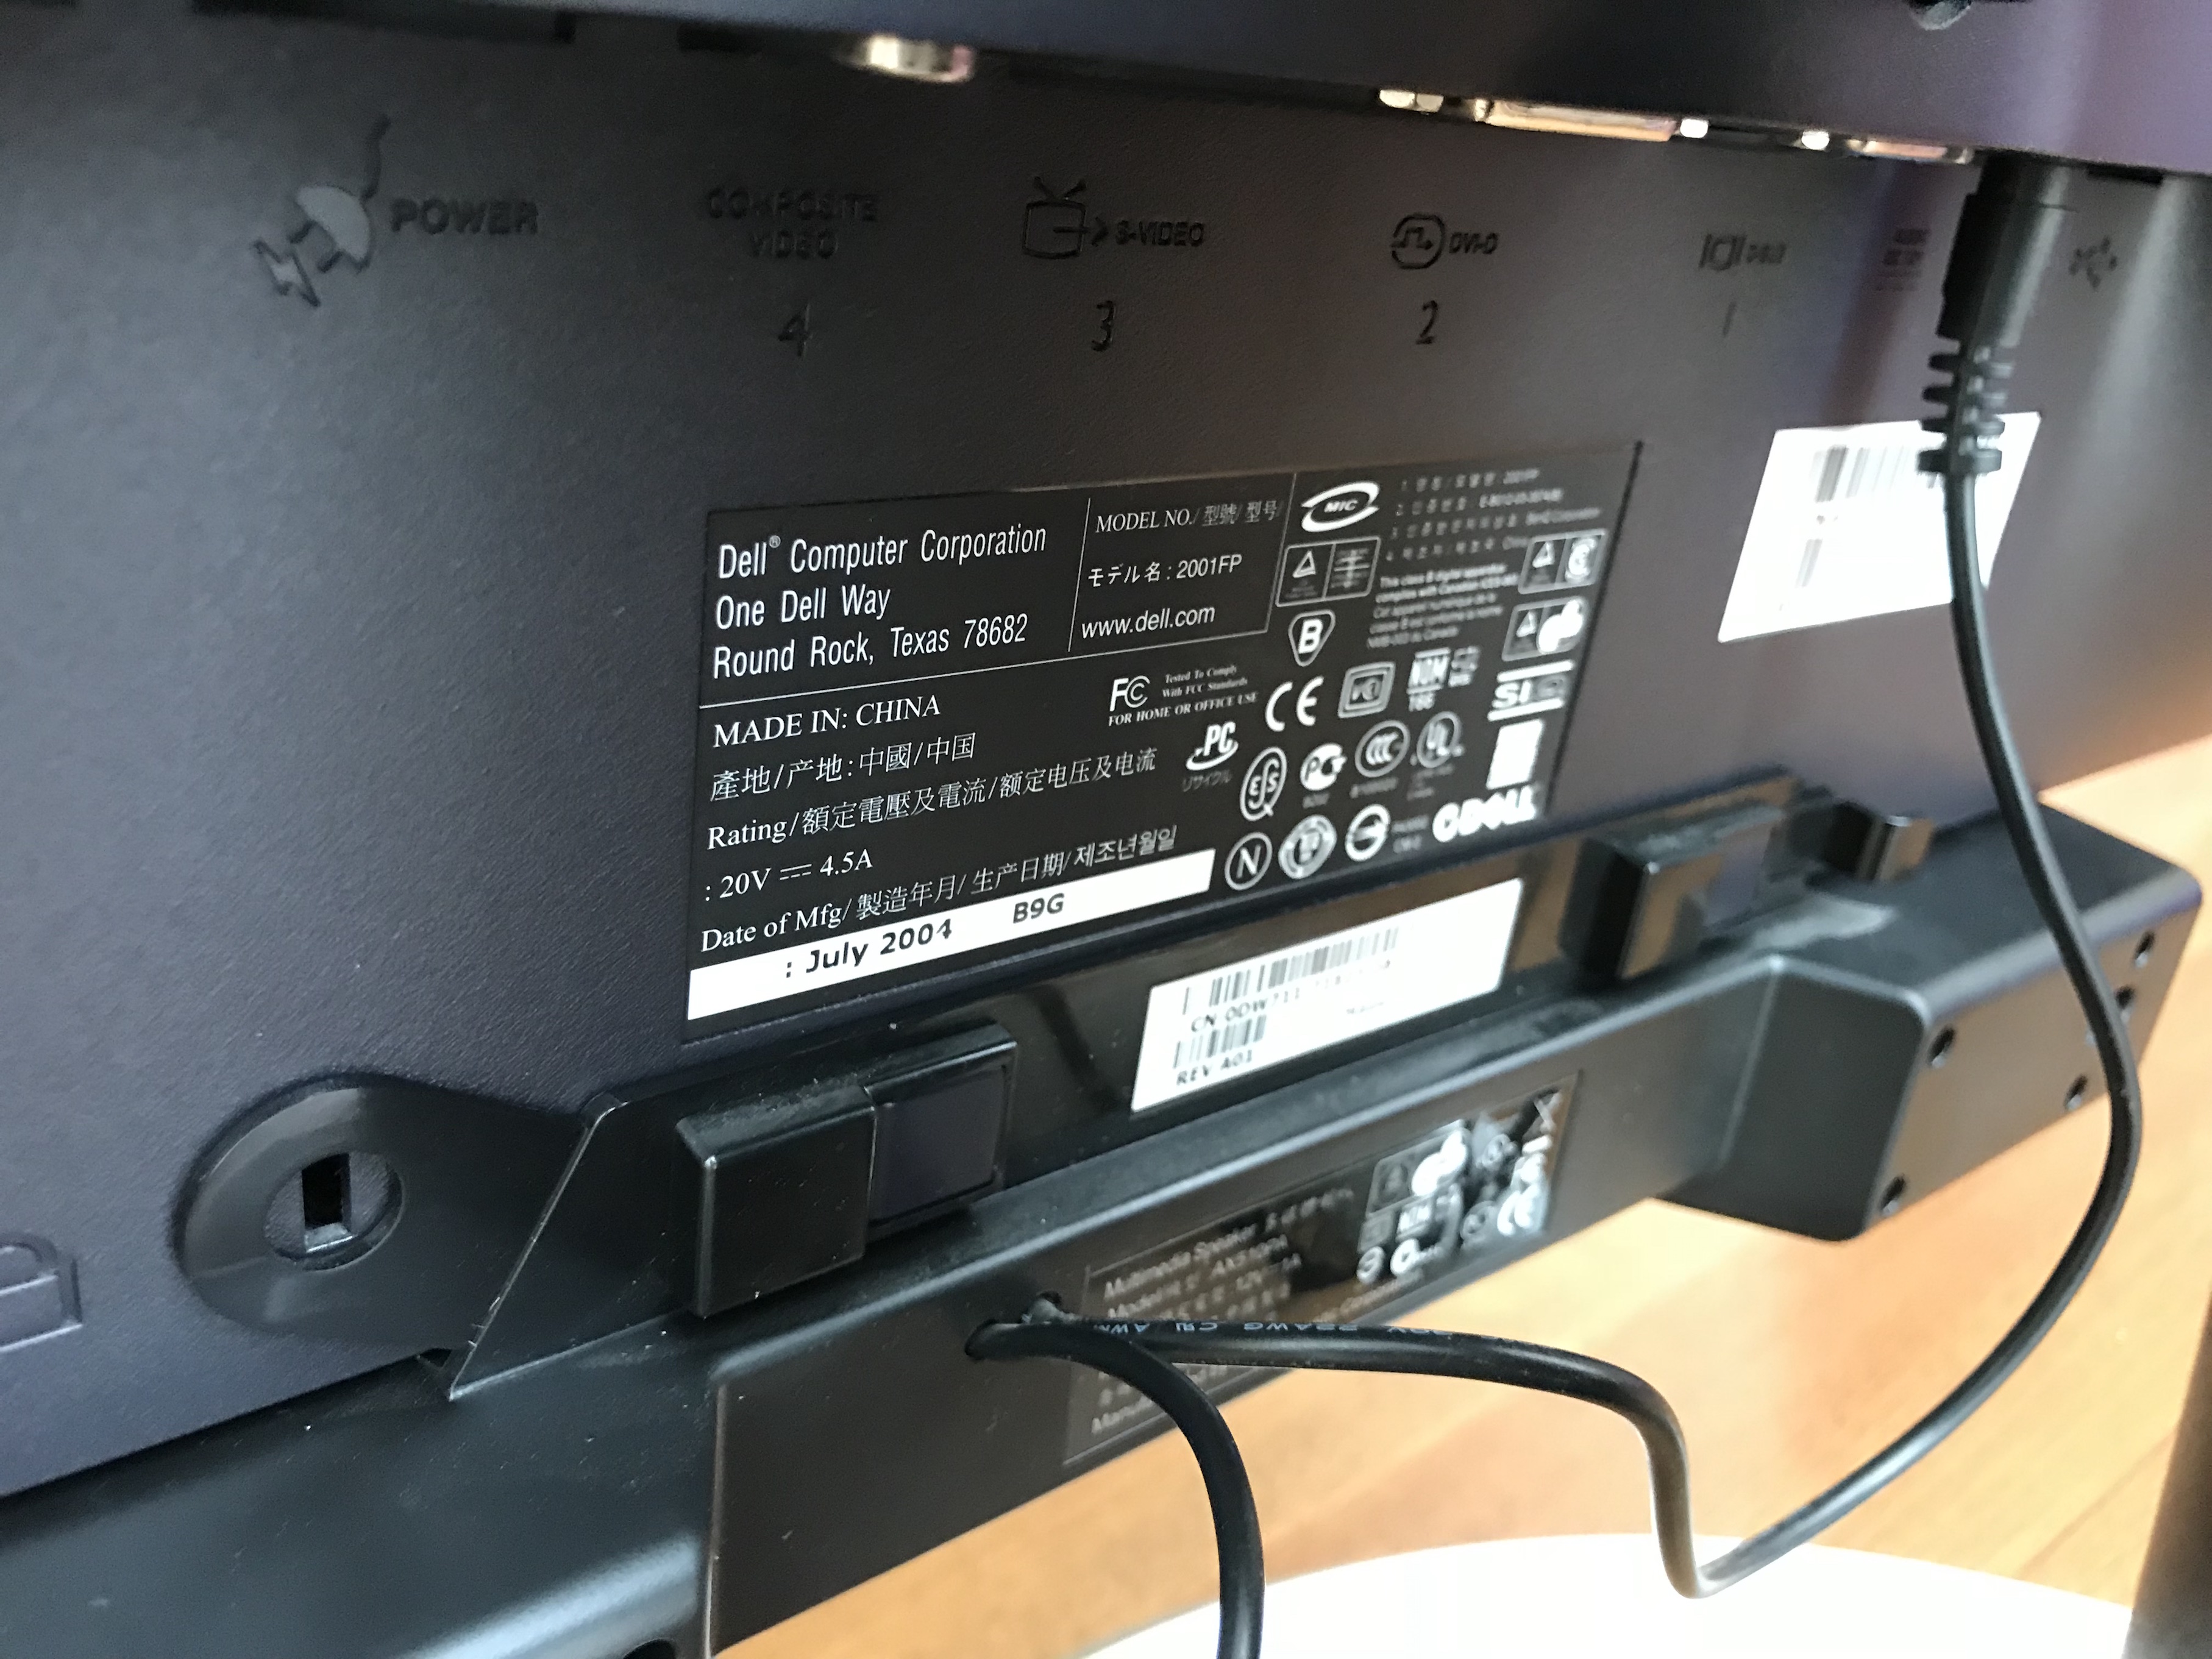
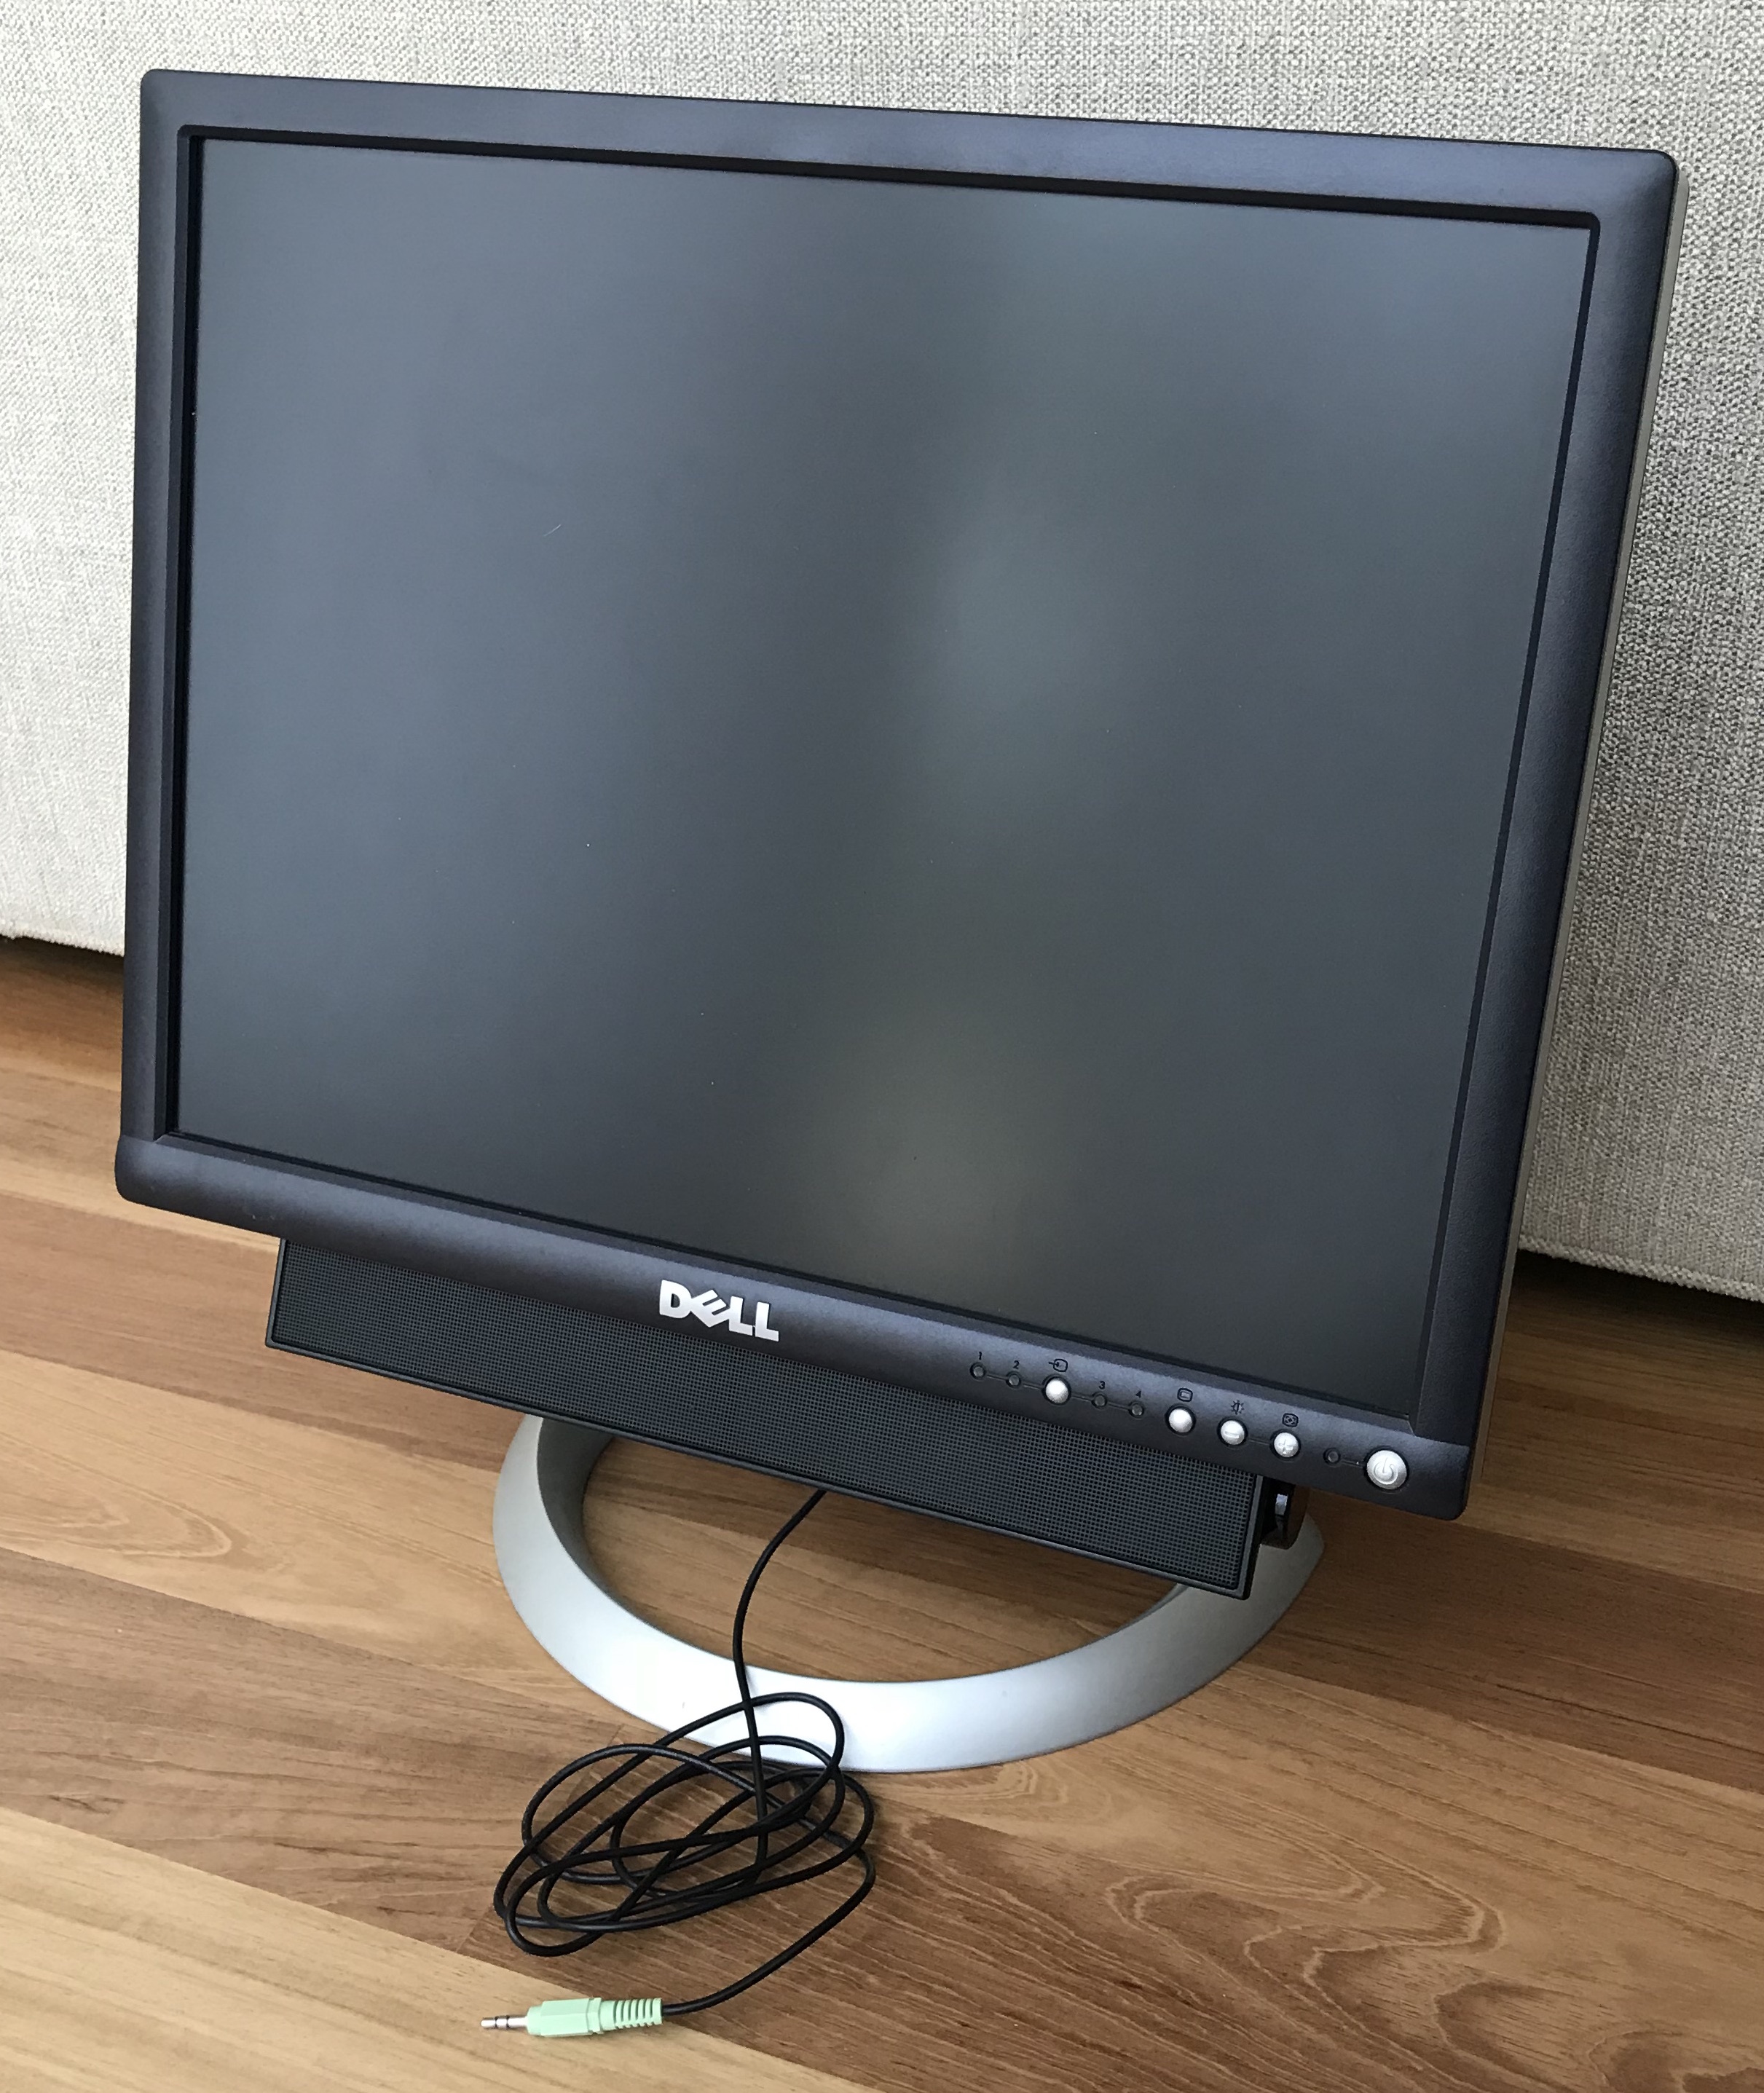
Dell 2001FP (Craigslist) with AX510PA soundbar (eBay).

In addition to being one of the best monitors in its day, it’s equipped with three analog ports: S-Video, Composite, and VGA 15-pin D-sub. Its single digital input port is DVI (DVI-D). I’m using an 8-pin DIN to s-video cable to connect the C64 to the 2001FP. The cable also breaks-out C64 mono audio to left & right “RCA-style” audio connectors. The 4:3 aspect ratio that matches these old computers is getting harder to find.

And it gets better: To my surprise, the 2001FP also has a 12V power OUTPUT port that is used to power an optional AX510PA soundbar (many for sale on eBay). This provides a clean, integrated audio system for the C64. You just need a cable (or adapter) that converts your C64’s audio to a 3.5mm stereo port (mono to stereo as necessary depending on your C64 cable).  The “PA” in AX510PA stands for Power Adapter. The power adapter is a AC to DC wall wart that powers the soundbar, because some Dell monitors did not have an onboard 12V DC that the 2001FP has. So for the 2001FP the power adapter is not necessary; the onboard 12V means less cabling & a neater appearance!

Soundbar is powered by the 2001FP. Love it.

One thing surprised me when I was testing the soundbar: The soundbar emits audio only when the monitor detects a video signal, which in retrospect makes sense and saves electricity. No reason to power the soundbar when nothing is displayed on the monitor.  It’s just that when I was testing the soundbar, I had the monitor powered on (but no computer attached) and naively expected the soundbar to emit audio from my attached iPhone.  Hint: the soundbar has white led in the center (hidden behind the grill) to indicate when it is on.

Verdict: Excellent monitor for retro computing thanks to its s-video and composite inputs. Optional soundbar looks great with clean integration of power fed by the host 2001FP.

Footnote: There’s a round dial on the soundbar’s right side for volume control (see first photo). When the volume dial is at the minimum setting, the dial clicks pleasantly to power-off the soundbar, nice!

Footnote2: The soundbar simply slides into 2 small slots on the bottom portion of the 2001FP.  There is a satisfying click after it is fully slid into place. No tools are necessary.

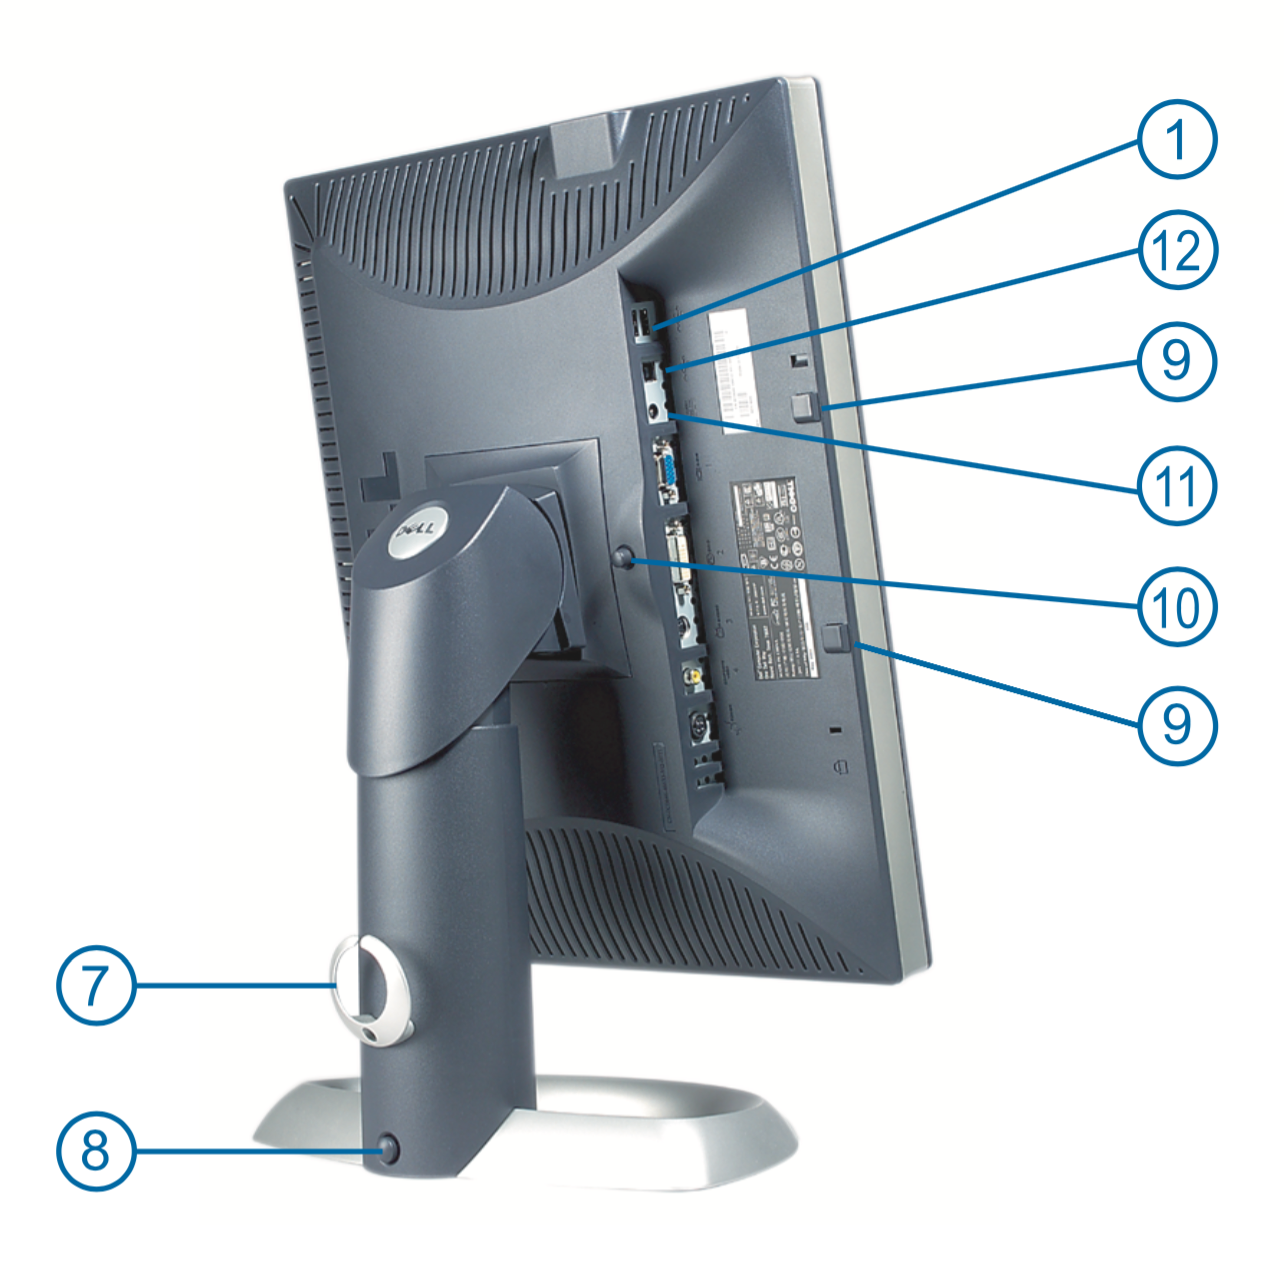
Footnote3: The stand is very good. Not all monitor stands raise & lower the screen vertically. That is, some rely on tilt for adjusting vertical view. This stand has pan, tilt, and telescopic raise/lower. It also has rotation (if you want the screen in portrait-mode instead of the common landscape-mode). See diagram item #8 below, which unlocks the vertical height adjustment.

Footnote4: There are four USB-A “downstream” ports (2 rear, 2 side). This is basically a USB hub for your peripherals. One USB-B “upstream” port in the rear is where you connect your PC.

Footnote5: The power-in port is a rather unexpected 4-pin, round. Try to find a 2001FP with the power adapter, else you’ll have to buy one off eBay.

Footnote6: C64 video looks WAY better (crisper, less blurry) via the s-video port than the composite port. This was expected, but I was surprised how unbearable composite seemed when compared to s-video; thought they would be closer in quality. Make sure the chroma pin on the 8-pin DIN connector has a 300-ohm (or 330-ohm) resistor, else the color signal will be too strong (results in bad color bleed/distortion). Adding ~300-ohms to the C64’s chroma output results in a video signal closer to the s-video standard, hence better quality.

Footnote7: Very early C64’s had a 5-pin DIN port, instead of the more common 8-pin DIN port.

Dell 2001FP Diagram
Legend for Dell 2001FP port diagram.
2001FP rear ports: 2x USB-A downstream to peripherals, USB-B upstream to PC, soundbar power-out, VGA, DVI, S-video, composite, monitor power-in.  There are two more USB-A downstream ports on the side of the monitor.

Mosh with iTerm2’s Tmux Integration


NOTE! Don’t follow this article, just use Eternal Terminal (et) instead of mosh (and instead of ssh).  It works flawlessly with iTerm2 and tmux.

I have found terminal/shell nirvana on my Mac with mosh + tmux + iTerm2 Tmux Integration, but it wasn’t easy.

My dream setup was these 3 running together:

1) mosh: Runs on client and on server. An ssh replacement that is secured with AES-128 and ssh. Virtually indestructible ssh-like sessions that remain “live” even after you change IP addresses (ie. physical locations), VPNs, or network interfaces. I can login to a server and never need to re-login for *months*. Whenever I open my macbook, my shell sessions are exactly where they were before and ready for the next command.  If your IP address changes while you commute (eg. train) or you are on VPN a lot, you really should use mosh instead of ssh. It’s not just for unreliable connections, I use mosh everywhere because it saves me time.

2) tmux: Runs on the server. Replacement for the old ‘screen’ utility. It allows you to keep active windows (and panes) in a session that remains alive even after you disconnect from the remote server.

3) iTerm2’s Tmux Integration: Runs on Mac. Very cool iTerm2 feature that renders your tmux windows as native iTerm2 tabs. Allows you to scroll back through your tmux window with Macbook touchpad gestures and iTerm hotkeys. Supports iTerm2’s very quick & capable Cmd-F (Find) instead of tmux’s Find.  Supports intuitive text selection and advanced text selection (discontiguous select & copy) built into iTerm. Switching between tabs with keyboard shortcuts. Basically everything you can do in iTerm2 regular tabs, you can probably do with your tmux session rendered by iTerm2’s Tmux Integration. It rocks.


The Problem

The problem is iTerm’s Tmux integration works fine when using ssh, but not when using mosh.


The Solution

With this howto, you can build a patched version of mosh (client and server) that is compatible with iTerm’s Tmux Integration.  Mosh is a small program, so the build is very quick.

Moreover, this howto allows you to try the patched mosh binaries without touching your existing mosh installation. This is done by specifying the ‘–client’ and ‘–server’ options when running mosh.

Once you are happy with how the patched mosh is working, you can move the patched mosh to a location in your path (need to do this on both client and server).

Note, if you are on wifi all the time, you can use Eternal Terminal instead of this howto. I use hard-wired ethernet at my desk and wifi when I leave my desk (eg. walking to a meeting). It so happens, this switching of network interfaces seems to break Eternal Terminal and close my session (in my testing).

In my setup I have a macbook (mosh client) connecting to an ubuntu 16.04 server (mosh server).

First, we’ll build mosh on the Macbook (mosh-client).


Build patched mosh-client on Macbook

Create a directory for the code:

dlee-mbp:~ donn$ mkdir -pv ~/workspace/git/github.com/rledisez/

dlee-mbp:~ donn$ cd ~/workspace/git/github.com/rledisez/

Grab the code:

dlee-mbp:rledisez donn$ git clone https://github.com/rledisez/mosh.git

dlee-mbp:rledisez donn$ cd mosh

Checkout the patched mosh branch called “localScrollback-1.3.2”:

dlee-mbp:mosh donn$ git checkout -b localScrollback-1.3.2 origin/localScrollback-1.3.2


Use Homebrew to install dependencies:

dlee-mbp:mosh donn$ brew install protobuf automake pkg-config


Build patched mosh binaries:

dlee-mbp:mosh donn$ ./autogen.sh

configure.ac:21: installing ‘./ar-lib’

configure.ac:13: installing ‘./compile’

configure.ac:6: installing ‘./install-sh’

configure.ac:6: installing ‘./missing’

src/crypto/Makefile.am: installing ‘./depcomp’

parallel-tests: installing ‘./test-driver’


./configure

<See many lines of output>


make

<See many lines of output>


You don’t have to do ‘make install’ at this point. You can try the binary without installing it (see below).


But, we also need a patched mosh on the server, so next…


Build mosh on ubuntu server

Install debian package dependencies:

Note: Boost (libboost-dev) not needed for mosh 1.2+ so I didn’t install it.

sudo apt-get install automake libtool g++ protobuf-compiler libprotobuf-dev libutempter-dev libncurses5-dev zlib1g-dev libio-pty-perl libssl-dev pkg-config

Build mosh-client and mosh-server:

git clone https://github.com/rledisez/mosh.git

cd mosh

git checkout -b localScrollback-1.3.2 origin/localScrollback-1.3.2

./autogen.sh

./configure

make


Again, you don’t have to ‘make install’ if you just want to try things out.


Running the patched mosh

Locate the path to patched mosh-client on my Macbook:

/Users/donn/workspace/git/github.com/rledisez/mosh/src/frontend/mosh-client

Locate the path to patched mosh-server on my ubuntu server:

/home/donn/workspace/github.com/rledisez/mosh/src/frontend/mosh-server


With this info, I can try my first iTerm + tmux + mosh session:

The ‘mosh’ command is found in the ‘scripts’ subdirectory of the source code directory.


dlee-mbp:mosh donn$ scripts/mosh \
--client=/Users/donn/workspace/git/github.com/rledisez/mosh/src/frontend/mosh-client \
--server=/home/donn/workspace/github.com/rledisez/mosh/src/frontend/mosh-server 10.1.1.1


After logging in to 10.1.1.1, start tmux on remote host:

remote_host$ tmux -CC

[or ‘tmux -CC a’ if resuming an existing tmux session]


… and then see iTerm2 window with Tmux Integration enabled.  Cmd-T to open a new tab.

Enjoy!


Switching to patched mosh permanently


Mac: Just put mosh and mosh-client in your path.  To see your installed version of mosh:

$ which mosh

$ which mosh-client


To see your path:

$ echo $PATH


Maybe copy your originals as mosh.orig, mosh-client.orig


Ubuntu server: Same thing but with mosh-server.  Maybe save your original as mosh-server.orig


From this point forward, be aware that normal, standard mosh clients will not be compatible with patched mosh on the server.  If you want to support both, then use the ‘–server’ option when starting a mosh session to specify which version of mosh-server will be run on the server (eg. mosh-server or mosh-server.orig).


Fixing Problems


If your session dies abruptly with an error like the following, it means your mosh-client or your mosh-server is not running the patched version of mosh; it is probably running your normal, installed version of mosh.


Assertion failed: (*i == *my_it), function diff_from, file user.cc, line 69.

Abort trap: 6


Resources


iTerm2’s Tmux Integration:

https://gitlab.com/gnachman/iterm2/wikis/TmuxIntegration


Build instructions for mosh:

https://github.com/mobile-shell/mosh/wiki/Build-Instructions


Patched mosh that supports tmux control-mode (tmux -CC). Original patch by github user 4ast. Rebased on mosh 1.3.2 by rledisez:

https://github.com/rledisez/mosh/tree/localScrollback-1.3.2

At the time of this article, v1.3.2 was the latest stable version for download at mosh.org


Original patched mosh:

https://github.com/4ast/mosh

Note: Commit d5bd1d31d86d4003705e69f87466aa7e10f9c5b9 “add support for resize events” is already part of mosh mainline.


“tmux integration hangs when logged in with mosh (ok w/ ssh)”

https://gitlab.com/gnachman/iterm2/issues/5924


Homebrew package manager for Mac:

https://brew.sh/

Bounty ($$$) for adding tmux control-mode support to mosh:

https://www.bountysource.com/issues/2052677-mosh-prevents-the-use-of-scrollback
 

Postfix SMTP configuration: Sending (relay) email to Gmail and other Internet mail servers


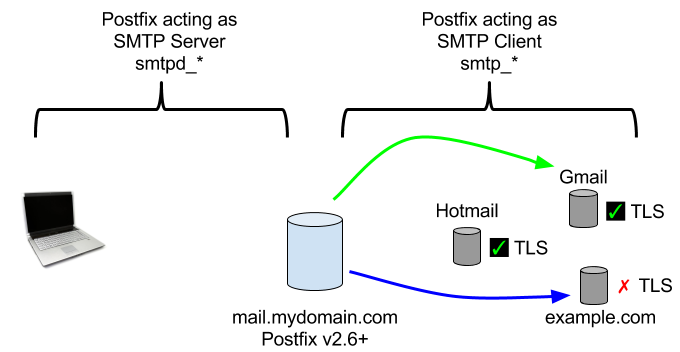
Postfix Server diagram

This might be helpful for people like me who recently started learning Postfix:
If you want to eliminate the “red padlock” icon in Gmail, you do not need to get a certificate. Mail servers like Gmail don’t require you to have a certificate (aka client certificate) to connect to them over a secure TLS connection, and subsequently send mail to them (however, things like SPF TXT records and DKIM are needed to avoid Gmail marking your mail as spam).

To send mail to Gmail (and others) with TLS and get rid of the “red padlock”, you only need:

smtp_tls_security_level = may
smtp_tls_loglevel = 1
smtp_tls_CAfile = /etc/ssl/certs/ca-certificates.crt

…in /etc/postfix/main.cf

TLS-security-level “may” (“You *may* use TLS”) means your mail will be relayed even if the other mail server lacks TLS.  This is represented by the BLUE arrow in the diagram showing mail sent to “example.com”. In other words, such mail will be sent unencrypted, but it will successfully reach example.com.

“smtp_*” are the parameters for the Postfix SMTP Client (the code that talks to public Internet mail servers like Gmail’s mail servers). The “smtpd_*” parameters are for the Postfix SMTP Server (the code that your users connect to when they need to send email to Gmail or some other public Internet mail server).

Make sure ca-certificates.txt exists in postfix’s chroot “jail” (on my ubuntu server it was: /var/spool/postfix/etc/ssl/certs/ca-certificates.crt). This is a database of certs of well-known CAs that your postfix server needs to know when it connects to Gmail (or other mail server). When your postfix server connects to Gmail, Gmail will present to postfix *Gmail’s server cert*, and that server cert will be signed by one of these well-known CAs.

I’m running postfix 2.11.0 on ubuntu 14.04.

You may configure smtp_tls_ciphers and smtp_tls_protocols, but the defaults are OK and recommended. The default for smtp_tls_ciphers is ‘medium’. If you do ‘high’, there’s a (small) chance some of your mail won’t reach destinations that don’t support the strongest ciphers. The default for smtp_tls_protocols is ‘!SSLv2, !SSLv3’ (disable SSL v2 and v3), which is considered safe; it allows TLSv1.

Svenn (https://www.svennd.be) wrote very helpful articles about how to use LetsEncrypt. Such certs are needed when *your* remote users (email clients) need to connect to your postfix server over a secure TLS connection. That’s another article.

OwnCloud SMTP config error: “A problem occurred while sending the email” (Authentication failed)

Problem: With correct login and password, and correct SMTP settings for Gmail SMTP, owncloud “Test email settings” button fails with:

  • A problem occurred while sending the email. Please revise your settings. (Error: Failed to authenticate on SMTP server with username “bob@gmail.com” using 1 possible authenticators)

Other symptom (and hint): Gmail login works fine at other locations, home vs. work, for example.

First, in your gmail account settings, change the “Allow less secure apps” setting to ON. This is found at https://myaccount.google.com in section “Signing in to Google”. NOTE: This makes your gmail account less secure so you might want to create a throwaway gmail account just for SMTP (that’s what I did). I would not use my valuable gmail accounts:

  • Allow less secure apps: ON

Other things to check:

  • Ensure your owncloud user profile (not owncloud admin settings, but your actual user’s account) has an email address set. This address will receive email from owncloud for password reset email messages and email notifications.  Find your user profile in the upper-right part of the web interface: your_name > Personal.

OwnCloud admin config for smtp:

Send mode: smtp
Encryption: TLS
From address: bob
@ (domain): gmail.com
Authentication method: Login
Authentication required: [checked]
Server address: smtp.gmail.com
: (port) 587
Credentials: bob@gmail.com, mypassword

If you don’t use the webui, Owncloud’s {$owncloud_dir}/config/config.php has these text configuration lines for smtp:

 'mail_smtpmode' => 'smtp',
 'mail_smtpsecure' => 'tls',
 'mail_from_address' => 'bob',
 'mail_domain' => 'gmail.com',
 'mail_smtpauthtype' => 'LOGIN',
 'mail_smtpauth' => 1,
 'mail_smtpport' => '587',
 'mail_smtphost' => 'smtp.gmail.com',
 'mail_smtpname' => 'bob@gmail.com',
 'mail_smtppassword' => 'mypassword',

Still doesn’t work?  I had to also do the following:

Basically, google is smart and treats logins from different geographical locations with different security restrictions (blocks).  In my case, my owncloud server was a VPS thousands of miles away from my laptop location.  So I guessed that google didn’t like that some random location (my vps) was trying to access my gmail account (even though I had “Allow less secure apps” enabled.

I found a big hint that you can “unlock” or re-auth your google account with the following url:

https://accounts.google.com/UnlockCaptcha

So basically, to prove to google that my VPS’s IP address is legit, I had to do this UnlockCaptcha from my VPS. BUT, I have no web browser (gui) on my VPS!  Except for ‘lynx’, the shell/cli based web browser!  Lynx does work for passing the UnlockCaptcha url 🙂

#

Juniper SSG 5 Error when upgrading via USB flash device

Problem: SSG5 (SSG 20) doesn’t upgrade via it’s usb port and reports error “USB flash is not existed. Please insert USB first!”

Solution: You need to use a usb flash drive/stick that is 4GB OR SMALLER!  And formatted FAT (aka FAT16).  FAT32 will probably work too (I haven’t tried).

More detail:

If you are on the SSG’s console, you will see the following error if you attempt to use a usb flash device bigger than 4GB:

“Usb disk size is larger than 4G.Mount failed!”

When you use a 4GB or smaller usb flash disk, you will see success:

“usb device (usb) ready.”

Again, this is on the SSG’s console.

Then you can upgrade via usb (put the *unzipped* screenos image in the *root* directory of the FAT usb drive):

ssg5-> save soft from usb ssg5ssg20.6.3.0r21.0 to flash

Then reboot:

ssg5-> reset

SSG5/SSG20 is a legacy Netscreen ScreenOS firewall/router.