All posts by donn

My reaction to “Warren Buffett: Why stocks beat gold and bonds”

Update 2020/08: Warren Buffett’s Berkshire invests $563 million into gold. Here’s one of many news articles.

Warren Buffett recently argued for stocks vs. gold (and vs. bonds/currency) in http://finance.fortune.cnn.com/2012/02/09/warren-buffett-berkshire-shareholder-letter
 
My take is that, yes, I like to diversify, so I have equities in my portfolio. Some equities are like hard resources and thus similar to gold. Eg. XOM and WMT have physical assets, distribution, and business that is not easy to replicate overnight (or over a decade even). Income producing real estate (and your house) is also a real, physical asset. My goal is to reduce exposure to fiat money and its related risk, and so gold and some stocks are in my portfolio.


I should add that my own personal experience is that it is difficult and risky to think I, or any “experts”, can predict what products people will want and subsequently exchange for “what they produce” [as Buffett wrote]. Especially when companies fall out of favor. This is the inherent risk in stocks. When the iphone was released, I thought Blackberry was toast, but there are always “experts” and people who argue the iphone will be a flop; so I cannot be sure my crystal ball is better than theirs. Moreover, when data is released that Blackberry’s market share dropped last quarter, it’s too late to react because the market reflects such news in microseconds.

Anyone can claim that stocks are “the best” but that is because they are using a perfect crystal ball: the past performance of stocks they have cherry-picked to make their argument. This is basically what Buffett and others are doing.

It would be better if such “experts” like Buffett make a FUTURE prediction on a basket of stocks, and then we use a time machine to zip 10-20 years into the future and see if they are right. Expanding on this exercise, we ask them to also declare when they will shift in & out of each stock and how much. The fact they cannot and will not do this, shows the risk of stock investing. Even still, I invest in stocks to the best of my ability by trying to predict the things people will want in the future. Good luck to you and the “experts” in doing the same.

 
Where Buffett is wrong: Gold has been money to humans consistently for some 3000 years.  His attempt to group it with tulips, seashells, and the like is rather sophomoric.  Because he has been alive for only a few decades and not during the entire 3000 year span, we must give him some slack: He doesn’t have a lot of personal experience with things other than “modern” instruments like paper money and shares.


Bio for Donn Lee

Donn Lee joined Facebook in 2007. As a Sr. Network Engineer, his duties include designing networks, evaluating products, optimizing performance, and performing escalation troubleshooting. Previous to Facebook, Donn worked in Google’s Network Architecture group for four years and during rapid growth of Google’s backbone, optical, and datacenter networks. While working as a Consulting Systems Engineer at Cisco Systems (CCIE #3262) he worked on large global networks and wrote his book, Enhanced IP Services for Cisco Networks, that is published by Cisco Press. He holds a bachelor’s degree in Electrical Engineering from UCLA.

Image
Continue reading Bio for Donn Lee

Using mutt instead of MS Outlook on an Exchange server

Problem Statement

  • MS Outlook & Exchange sucks but that’s what your company supports.
  • Mutt over IMAP is too slow. What you want is something like mutt + spool like the good email old days.
  • Just about every GUI-based email client sucks (any OS). They are too slow compared to mutt.

Design Goals

  • Use mutt from local disk to keep mutt fast.
  • Keep mail on corporate IMAP/Exchange servers so it is still backed up & maintained by the IT dept.
  • Use IMAP because Exchange servers support it.
  • No manual sync or push. Automate everything so all you have to do is use mutt.
  • Allow straight-forward use of GUI email clients should you ever need them.

Design Concepts

  • OfflineIMAP synchronizes mail folders between the Exchange server and your machine (mutt’s local disk).
  • You read mail in mutt. Mutt reads mail from disk.
  • You write mail filtering rules in fdm.  fdm filters mail into folders to your liking.
  • Use cron to automate syncs and filtering jobs behind the scenes.

Howto

Step 1: Install ubuntu packages: mutt, offlineimap, fdm, msmtp (ubuntu 10.04 LTS package names)

Step 2: Config mutt to send mail using msmtp

~/.msmtprc

account default
host smtp.mymailserver.com
port 587
from donn@bigcorp.com
auth login
user donn
password s00perSekrit 
tls on
tls_starttls on
tls_certcheck off
#Or:
#tls_fingerprint FE:39:F9:B4:64:31:0E:DF:31:51:72:DA:A7:4F:35:4B
logfile ~/.msmtp.log

Paste view: http://pastie.org/9129773

~/.muttrc

set sendmail=/usr/bin/msmtp

Step 3: Setup Maildir directory

Add to ~/.muttrc:

set mbox_type=Maildir
set folder="~/Maildir"
mailboxes `echo -n "+ "; for file in ~/Maildir/*; do box=$(basename "$file"); echo -n "\"+$box\" "; done`
set spoolfile="~/Maildir/work/INBOX"
set postponed="+Drafts"
set record="+work/Sent"

Paste view: http://pastie.org/9129744

Step 4: Setup OfflineIMAP

The key point of offlineimap: Mutt can read your messages from local hard disk, instead of over the network. This greatly reduces the lag / delay when reading messages quickly.

OfflineIMAP syncs your ~/Maildir/work message base with MS Exchange over IMAP. So, if you read a message in mutt, it will be marked read in ~/Maildir, and then offlineimap will sync this change with Exchange. If you later check your inbox with Thunderbird, OWA, Outlook, or other client, that message will have ‘read’ status (awesome). OfflineIMAP downloads new mail from Exchange and stores them in ~/Maildir/work/INBOX, but this is really the syncing process: Exchange has the new messages, ~/Maildir/work/INBOX does not, until after a sync.

offlineimaprc:

[general]
accounts = Work
 
[Account Work]
localrepository = Local
remoterepository = Remote
 
[Repository Local]
type = Maildir
localfolders = ~/Maildir/work
 
[Repository Remote]
type = IMAP
remotehost = mail.mymailserver.com
ssl = yes
remoteuser = donn
remotepass = myPass
# Folders to skip during sync.
folderfilter = lambda foldername: foldername not in ['Deleted Items', 'Contacts', 'Calendar', 'Trash', 'MyFolderOfReallyOldMail']

Paste view: http://pastie.org/9129763

Step 5: Setup FDM

FDM is used to filter mail between your INBOX and your other Maildir “folders”. For example, I filter mailing-list email to a separate folder. OfflineIMAP puts ALL incoming mail into INBOX, then FDM moves messages from INBOX to other folders based on your rules. All of this FDM work is done on local Maildir subdirs (local disk). I also have FDM move (ie. archive) all email over 30 days to a local, “old mail” folder.

WARNING: Be extra cautious as you develop your FDM rules. If you make a typo (eg. regex typo), you could accidentally delete incoming mail. Use the -n switch (test syntax) and -v (verbose output) to check your rules carefully.

#unmatched keep default. A lot of these, just to be safe.
set unmatched-mail keep
 
# Delivery actions.
action "INBOX" maildir "%h/Maildir/work/INBOX"
action "widgets-list" maildir "%h/Maildir/work/widgets-list"
action "ix_email" maildir "%h/Maildir/work/ix_email"
action "inbox_overflow" maildir "%h/Maildir/work/inbox_overflow"
 
#Bread and Butter INBOX account only operates on one folder
account "WORK" maildir "%h/Maildir/work/INBOX"
 
# Match regex's are *not* case-sensitive by default.
match account "WORK" {
 match "^subject:.*\\[ubuntu-widgets\\].*" in headers {
 match all action "widgets-list"
 }
 # Negative match regex.
 match "^(to:|cc:)(.*linx.net|.*tech-l@ams-ix.*)" in headers {
 match "^From:(?!.*linx.net.*)" in headers {
 # If not from linx admins, move it.
 match all action "ix_email"
 }
 }
 # Move older msgs to overflow box so fdm doesn't have to process them over and over.
 # My email is donn @ bigcorp.com
 match age > 1 months {
 match "^To:(?!.*donn@.*)" in headers {
 # If not to-donn, archive the old mail to overflow box.
 match all action "inbox_overflow"
 }
 }
 # Last catchall match term.
 match unmatched action keep
}
# Send all mail to inbox.
match unmatched action keep

Paste view: http://pastie.org/9129776

Step 6: Setup mutt basics

muttrc:

set hostname="bigcorp.com"
set realname="Donn Lee"
set from="donn@bigcorp.com"
set envelope_from=yes
set hidden_host=yes
set use_domain=yes
set pager_stop=yes
my_hdr From: donn@bigcorp.com
set attribution="%n <%a> wrote on %{%a} [%{%Y-%b-%d %H:%M:%S %Z}]:"
set strict_threads = no
set date_format="!%a, %b %d, %Y at %I:%M:%S%p %Z"
set index_format="%4C %Z[%[%a %m/%d %H:%M]] %-16.16L%?X? [%X]? (%?l?%4l&%4c?) %s"
set pager_index_lines=20
# Change default subject format for fwd'd msgs.
set forward_format="Fwd: %s"
# Use emacs to compose mail.
set editor = "/usr/bin/emacs -nw %s"
# Create a nice status bar.
set status_format=" %r %b %f New:%n Del:%d TotMsgs:%m Tag:%t Flag:%F Size:%l %> Lim:%V (%P)"
# Ignore all lines by default
ignore *
# Set what I want to see
unignore from to cc subject date reply-to mail-followup-to x-url organisation organization x-mailer user-agent xmail-sent-to
hdr_order from to cc subject date reply-to mail-followup-to x-url organisation organization x-mailer user-agent xmail-sent-to
# Create a cache for performance.
# http://www.mutt.org/doc/devel/manual.html#header-cache
set header_cache="~/.mutt_cache"
set maildir_header_cache_verify="yes"
set header_cache_pagesize="65536"
# And all your other mutt goodies...

Paste view: http://pastie.org/9129782

Step 7: Read messages that are html formatted

Add to muttrc:

# View html email
# Must also add these two lines to ~/.mailcap
# text/html; links %s; nametemplate=%s.html
# text/html; links -dump %s; nametemplate=%s.html; copiousoutput
auto_view text/html

Paste view: http://pastie.org/9129786

Step 8: Opening email attachments

I use Outlook Web App (OWA) to open an attachment (eg. a Powerpoint file). I always have a browser up and OWA is usually loaded in one of the tabs.

#
Continue reading Using mutt instead of MS Outlook on an Exchange server

Prius accident

Prius bumper damage 11/3/2008. Click to enlarge photo.  Old guy didn’t notice his light was red and almost T-boned the Prius. By luck, a police car was immediately behind the Prius and saw everything.
Image

Inniskillin Icewine Vidal 2004

Icewine is truly winter’s gift to the wine lover. Originally developed in the cool-climate regions of Europe, the production of Icewine is ideally suited to the climatic condtions of Canada’s Niagara Peninsula. The grapes, having already reached full ripeness in October, are left untouched on the vines under a cloak of protective netting until the first deep freeze of the Canadian winter. During the time, the grapes are naturally dehydrated by the elements, adding to the concentration of flavours, aromas, sugars and acids in the juice. Temperatures dipping to below -10C in December and January freeze the grapes solid, initiating the arduous task, usually undertaken at night, of hand harvesting and pressing.

The yield of highly concentrated juice is extremely low (5-10% of normal) since most of the natural water content of the juice is left behind in the press in the form of ice crystals. Icewine is characterized by intense natural sweetness, a highly aromatic bouquet and a depth of flavours that is without equal in the realm of dessert wines. Savour Icewine well chilled (5-7C), either on its own or accompanied by dessert. One sip and you’ll discover why Inniskillin is ranked among the world’s finest wines.

[From Inniskillin brochure that came with Vidal ’04]

UCLA Cheerleaders Lead Final Four Hottest Google Searches

So it’s the evening after the first Final Four games, and guess what people are searching for on Google?  Uh, game results, highlights, perhaps awesome dunk photos?  No.  The public is smarter than that, they are searching for the blazing hot UCLA Cheerleaders.

We may have lost to Memphis, but we still have the smokin’ hottest women in all of college athletics.

Image

UCLA cheerleaders rank above ucla-memphis and unc-kansas

Check that out.  "ucla cheerleaders" rank above both "ucla memphis" and "unc kansas".  CBS should get some clue here and improve their coverage.

Rover / Lucas 5AS Immobilizer & Alarm System Info (Rover Mini Cooper)

The 1997-2000 Rover Minis have a factory installed alarm/immobilizer system that is difficult to service, especially if you live in the United States. This is because Rover no longer exists and the ’97-’00 Rover Minis were not exported to the US. If you lose your remote key “fob”, you cannot start the car… EVER. This is what I was told by a very respected Mini expert. However, I learned there are solutions if you lose your fob or otherwise destroy the fob (eg. dropping it in the pool is a favorite one).  I’ve spent many hours researching the solutions and what you will read in the following paragraphs is the summary of that research. Please contact me if you have more information or corrections!

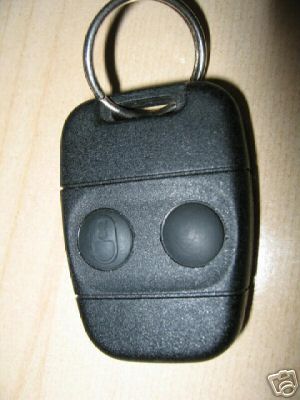
If you own a Rover Mini, please join the Rover Mini Owners Group on Facebook Most, if not all, of the Rover Minis of this era are equipped with the Lucas 5AS alarm / immobilizer system. Most common “fobs” (the plastic remote for your keychain) are the 2-button 3TXB, 3TXC, and 3TXA fobs by Lucas. Note however, that the 3TXA fobs will not work with the later versions of the 5AS (saw it mentioned on a forum posting; have not verified personally). So, I would stay away from the 3TXA fobs as candidate spares unless you feel adventurous. My Rover Mini came with a 3TXB. Moreover, there’s the Lucas 17TN fob that is commonly found on places like eBay and this 17TN fob reportedly works with the 5AS unit. I have tried it myself and the 17TN does indeed work.
Image

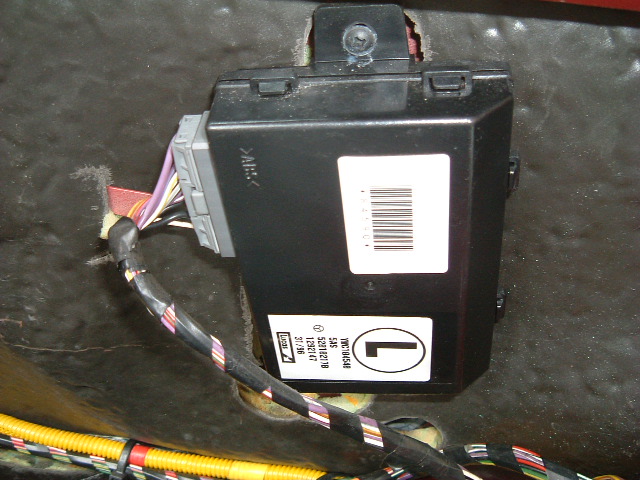
Lucas 5AS unit installed in a Rover Mini
Image

Lucas 3TXB fob

Note, common spelling is “immobiliser” in the UK. In case, you are doing any searches. What can you do if you lose (or destroy) your fob? What if you have only one fob and want the security of a backup fob? I have found these options:

  • Option 1: With help from some folks in the UK, you can buy a small device that will program your 5AS unit to accept one or more new fobs. This is my favorite choice, but it did not work with my car for some weird reason.
  • Option 2: You can remove the 5AS unit inside your dash and mail it to folks in the UK who will program your 5AS to accept one or more fobs. This is what I did and it worked.
  • Option 3: You can remove the 5AS unit inside your dash and mail it to folks in the UK who will install a Bypass Circuit Board that will permanently disable the immobilizer feature.
  • Please contact me if you find other options!

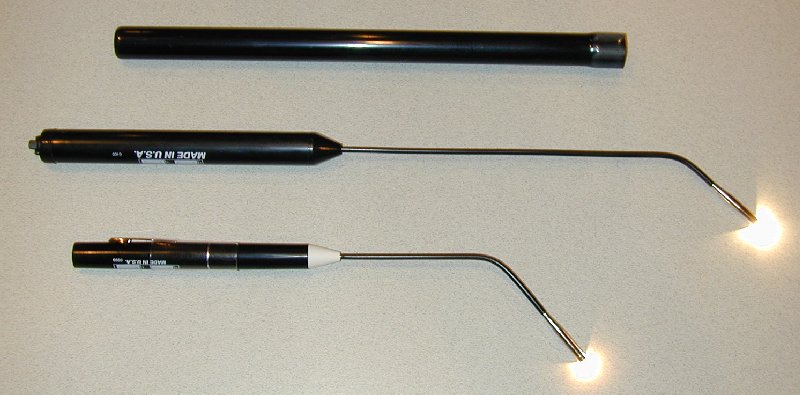
Before we go into the details of each option, some Q&A: What do you mean by program the 5AS to “accept one or more fobs”? It is the 5AS unit (in the dash) that is “programmed”, not the fob. I know, it seems counter-intuitive, but remember that the 5AS is the intelligent device and the fob is the small dumb device.  The fob just has a hard-coded serial number. Each fob is unique.  So what you do when you program the 5AS is you put the 5AS in “learn” mode and tell it which fobs are kosher by pressing the fob buttons while in learn-mode. After exiting learn-mode, the 5AS will ignore all fobs except the ones you told it to accept while in learn-mode. The fobs themselves are never “programmed”. Where is the 5AS unit in the Rover Mini? In the dash near the radio. You usually have to remove your radio to get at it. How to identify your immobilizer unit [archived version]. When I removed my 5AS unit, I removed the radio and the DIN sleeve holding the radio. The 5AS in the Rover Mini is mounted vertically such that there is an upper screw and a lower screw. With the DIN sleeve removed I used a Bend-A-Light flashlight to get a good view of the two screws. Then, I used an 8-inch long #2 phillips screwdriver to remove the two screws. You need a long screwdriver to reach the top screw (it also helps to have a long screwdriver for the lower screw).  I’m happy to help any Mini owners with removing and installing their 5AS.
Image

The always very helpful Bend-A-Light flashlight

How many fobs will the 5AS accept? Up to four (4) fobs can be used with the 5AS. How many other Rover cars used the 5AS? Quite a few apparently. Immobilizers were a big fad in the UK and other parts of Europe in the 90s because cars were getting stolen and never seen again (probably moved to other countries, eg. central Europe). Rover made several cars during this time and many were equipped with the Lucas 5AS (or similar) units. The other cars were Rover 100, 200, 25, 400, 45, Metro, MG, MGF. This is a lucky thing for us Mini owners as immobilizer “locksmiths” were needed after Rover went away. How good is the 5AS security? Can it be bypassed in other ways? The security is pretty strong: it uses a rolling code system where the code changes everytime the fob button is pressed. Good luck coming up with your own bypass technique. To give you an idea how difficult it is to resolve an unresponsive immobilizer problem, I’ll tell you the story that Don at MiniMania told me: When BMW was preparing to launch their new MINI Cooper in the States, they got hold of a Classic Mini for part of the marketing event. It had the immobilizer system and the main ECU blew up. They contacted Don and got a new ECU. They installed the new ECU, but of course the car would not start because the new ECU was not “mated” with the old immobilizer system. BMW tried everything to get the car to start. Then they used their insider connections to reach people who worked for Rover. Eventually, they found some expert who could help them and somehow got that person to either bypass the immobilizer or sync the ECU to the immobilizer (I bet it was the latter: syncing). Bottom line, have a backup plan NOW for when you misplace your fob! Update 2012/04/19: I have just learned from the folks at remobilise.co.uk that there is now a way to marry together the ECU with *any* 5AS.  This is great news because now it means you can repair your car even if your original 5AS dies. Option 1 details: Some shops in the UK (aka immobilizer locksmiths) who work on the 5AS sell a small programming “pod” that simply plugs into the diagnostics port of your Mini and puts the 5AS in “learn” mode. Following some simple instructions, you assign your fobs to the 5AS and exit “learn” mode and.. voila! the 5AS is programmed and fobs are ready to rock. Some notes:

  • The fobs that the 5AS knew previously will be forgotten: reprogramming wipes the slate clean. So, you’ll need to have all fobs (old and new) go through the “learn” mode process.
  • The diagnostics socket is typically located under the dash and near the steering column.
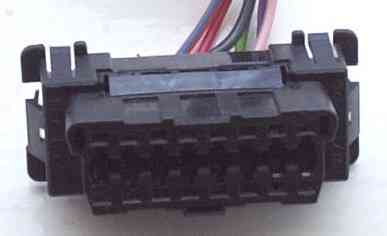
  • The diag socket looks like a standard 16-pin, triangular-ish OBD2 port, but it doesn’t talk OBD2. The car doesn’t speak the OBD2 protocol. It’s proprietary and talks to a Rover technician’s computer called Testbook (the later Rover T4 computer might work too, the T4 is reportedly backwards-compatible).
  • The pod is configured to work only once (or only a certain number of times depending on how much you pay).
Image

16-pin diagnostics socket

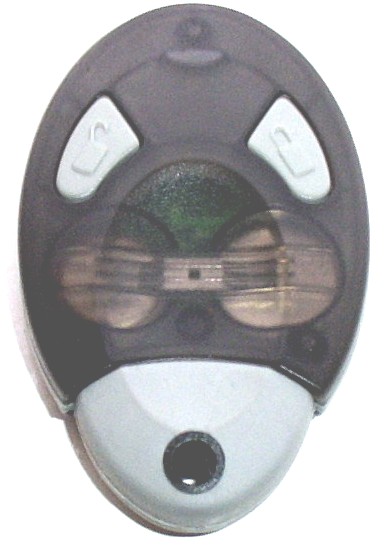
I’ve been very happy with the service from David at alarmremotes.co.uk who sells this programming pod (called the “ROV2”). You put down a deposit that is refunded to you after you return the used-up pod to him. David includes a better, more durable fob too (called the MT2). The MT2 fob has a unique key code that can be used to order an exact replacement fob. This is an excellent feature because it means you won’t have to reprogram the 5AS when you lose the MT2 fob. A clone can be shipped to you based on the key code. tech-tronics.net sells the programming pod too (called the RPD, Rover Programming Device) and they don’t need the pod itself returned to them.  If you discover how these pods are made, please let me know and I will share with the Rover Mini owners group. NOTE: The pod did not work with my Rover Mini (I tried two different pods, one pod was definitely good because it was used by David on a car immediately before mine). Seems that the wiring between my diag socket and the 5AS was altered previous to my ownership of the car. It’s possible that this happened when the radio was installed (I don’t have the stock radio).
Image

MT2 fob (better than Lucas fobs)

Option 2 details: For this, you de-install your 5AS unit and send it to a shop to have it programmed with fobs. You send any good fobs you already have too. Of course, the downside is that you won’t be able to drive while the 5AS is out. One advantage of this option is you may have more choice of vendors and therefore an opportunity to get a lower price. One person who is liked on the MG-Rover forum is Lates at lates600.com . Another shop is remotekey.co.uk Because the pod didn’t work for me, I had to do Option 2. I now have three operational fobs: the original 3TXB, a 17TN purchased off eBay, and an MT2 fob from David. Primarily, I use the MT2 fob because it’s thinner and I can easily replace it if I lose it (see MT2 info above). Option 3 details: Here, you remove the dependency on the immobilizer completely. Basically, you de-install the 5AS and send it to a locksmith (in the UK, of course) who installs a bypass circuit board inside your 5AS. This is a permanent bypass, so don’t count on your 5AS ever going back to normal immobilizer mode again. alarmremotes.co.uk can do this work, as well as one other place I found (forgot the name). While it sounded great to me at first, one potential downside to this option is what happens if the bypass circuit board fails? You’ll need to find, buy, and install a replacement bypass board. If this happens 5-10 years from now, will these bypass boards still be available? I might buy a spare board and keep it in a safe place. The bypass board works by sending a secure code to the Mini’s main ECU at ignition time. The code is the same code that comes from your 5AS when an authenticated fob turns off immobilization (disables the immobilizer). So, the bypass board tricks your ECU: it always tells the ECU that immobilization is off. No fobs are needed. The 5AS and ECU are “mated” to each other when they are installed. If you change either the ECU or the 5AS, the ECU will have to learn the secret code of the 5AS. This is done by a locksmith. And yes, you’ll have to send both the ECU and the 5AS to them. Note: There are two “ECUs” often discussed. The main engine ECU and the 5AS immobilizer ECU. I avoid calling the 5AS an “ECU” to avoid confusion. Other sites call the 5AS the “alarm ECU”. Covering All Your Bases If you really want to cover all your bases, you could do a combination of Option 1 and Option 3. Basically, you would program 4 fobs today and keep the spares in safe places (uh, one in a safe deposit box?!). Then buy an additional programming pod and keep it unused in a safe place (in case you need to reprogram in the future and the pods are hard to find). THEN, you would also buy the bypass board and keep that in a safe place in case you ever need it (perhaps your 5AS dies one day). That would be the ultimate plan for the most paranoid, haha. And remember, if you ever sell your Rover Mini, these measures will be useful to the new owner.   Note, if your 5AS doesn’t respond to your fob, the fix may be simple (don’t assume that programming is needed):

  • Make sure the fob battery is not weak or dead.
  • The fob may be out-of-sync with the 5AS (rolling code is out of sync). Try pressing the unlock button of the fob 8 times to sync it with the 5AS. If that fails, try the lock button 8 times. If that fails, try pressing the two buttons alternately. If that fails, do the “How to change the fob battery” procedure (below) using the original battery instead of a new one. And if that fails, try searching and posting on the forums listed below.
  • Sometimes these cheap Lucas fobs die. That’s why having at least one spare is important. Try your spare.

Most of the systems run on 433MHz (433.92 to be exact). If you buy used fobs, they may be on a different frequency. So just be aware. In fact, yours might not be on 433MHz. How to check the frequency of a fob [archived version]. I figured out how to check the frequency of a 17TN fob. Open it. On the PCB, there’s a chip labelled “EPCOS” (name of the company). If below the word “EPCOS” you have the number “2701”, then the fob is 433.92 MHz.  This is the Epcos R2701 resonator and you can find the datasheet by doing a google search for “epcos 2701”. Some shops sell fob refurb kits to “refresh” your fob. They often contain new rubber buttons and other bits. I find used fobs in decent condition on eBay, so I haven’t had to go this route. How to change the fob battery:

  • Open the fob case, prying carefully starting at the edge with the keyring hole.
  • Take note of the orientation of the positive side of the battery and carefully remove old battery.
  • Very important: Press both buttons of fob one at a time for at least 10 seconds to drain any power left in the capacitors and such. I once forgot this step, and had to reopen the fob and start over.
  • Install new battery, positive “+” side in the original orientation.
  • Reassemble the fob case halves.
  • Press the lock button 4 to 8 times next to the vehicle, then press the unlock button once.

Forums that I used for research: mg-rover.org theminiforum.co.uk Shops that I mention: alarmremotes.co.uk tech-tronics.net lates600.com remotekey.co.uk remobilise.co.uk If you own a Rover Mini, please join the Rover Mini Owners Group on Facebook Copyright 2007 and onwards by Donald C. Lee This information is offered without warranty or guarantee of its accuracy. Use at own risk.

HET FA-18: Use an audible countdown timer for flights

Problem: When flying the FA-18 (or any fast moving aircraft), it’s dicey to take your eyes off of it, even for a moment…  Even for, say, looking at the time left on the flight!  I would glance at my countdown timer and when I looked back at the jet, it was often rolling to one side or the other. Kinda scary. Though my radio beeps when time has expired, I like to know how much time is left during the flight.

Solution: Buy a cheap, audible countdown timer, so you don’t have to look.

I was able to google some audible countdown timers, but they were more than I wanted to pay for. These were very nice units made for the blind. Some were meant for a kitchen countertop, so they really weren’t portable for RC.

Then I got a great search hit. Turns out that paintball players use audible countdown timers. Most paintball games have a set duration before the game is over.  And you really want to keep your eyes looking for enemies rather than get a cap in your ass for looking at your watch.

Their timers are perfect because they are cheap, rugged, and very lightweight.

The one I found was $10 on eBay and called the "Talkin’ Timer" (made by Viewloader).

Image Image

A digitized voice (female) will announce the time left every minute. Eg. "5 minutes remaining". There’s one memory preset for that frequently used timer setting. There’s also a mute button.  Unit has no power switch: It just shuts-off automatically when not in use. It comes with a lanyard, which is handy for wearing around the neck (I sling it over one shoulder so it doesn’t get in the way of my radio). If you’ve seen the abuse paintball gear gets, you know this unit is built for durability.

The volume is nice and loud, which is great for outdoor use like RC.

It rocks.  Eyes are always on the fast movin’ plane.

See my other FA-18 tips:

Enjoy,
Donn Lee

HET FA-18: Quick and accurate 65mm block-up for gluing wings

Problem: The assembly instructions say that the wings should be glued-on and blocked-up 65mm from the table surface. And just where am I supposed to find this 65mm block?  Making a custom one sure sounds like a pain in the butt.

Solution: Go over to your CD collection (you know, that cabinet of round, shiny discs that no one uses anymore). Grab yourself four standard jewel case and one double-disc album case (in my case, The Best of The Doors. oh yeah):

CLICK TO ENLARGE/REDUCE IMAGE !

Image

Voila! A 65mm block up for gluing your FA-18’s wings.

Don’t forget to put some weight on top of the wing so its pressed down on the block-up while the epoxy cures. In the above photo, I used a plastic bag full of aquarium gravel.

Another tip: I like to use white melamine shelf boards for flat gluing surfaces. Found at any home improvement store (or storage/get-yourself-organized store). Cheap, heavy, and very flat.

See my other FA-18 tips:

Enjoy!
Donn Lee

Jig for gluing 110-degree angles for HET FA-18 Vertical Stabilizers

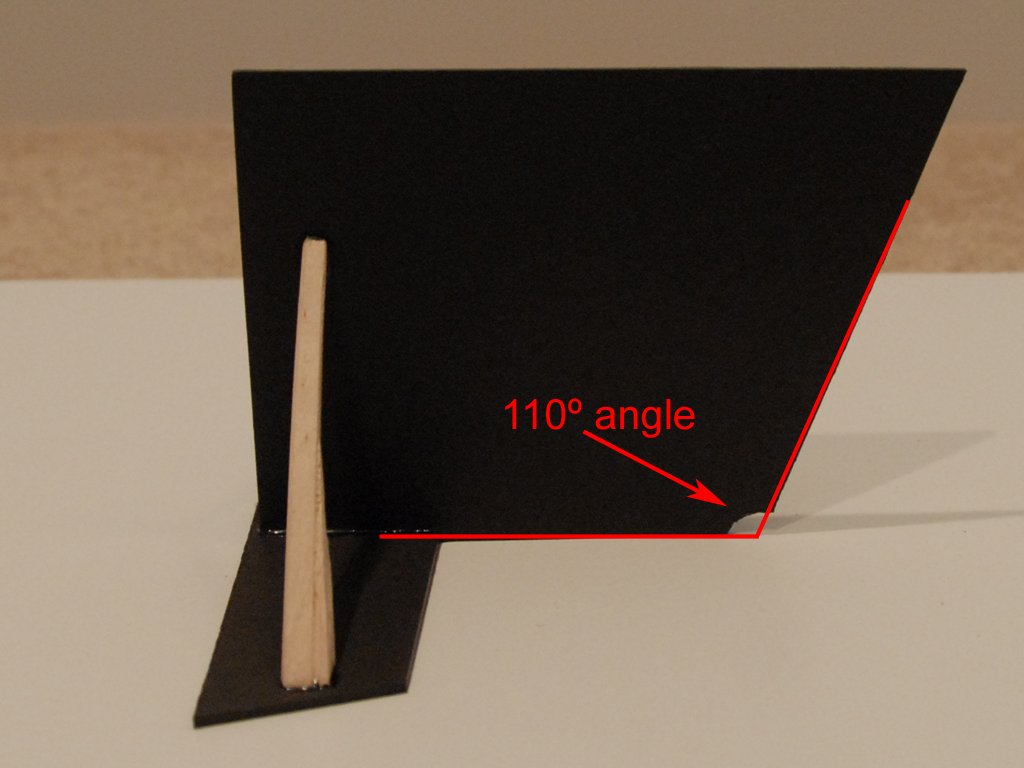
The HET FA-18 ARF kit is not terribly hard to assemble. However, the vertical stabs are probably the trickiest (and most annoying) part. The instructions tell you they are to be glued at 110-degree angles. But, even with a template cut at 110-degrees, it ain’t easy to immobilize those fins while the epoxy cures. Sure, you can use pins, rubber bands, tape, etc., but here’s an option that I like much better.

MAKE A GLUING JIG FOR 110-DEGREE FINS

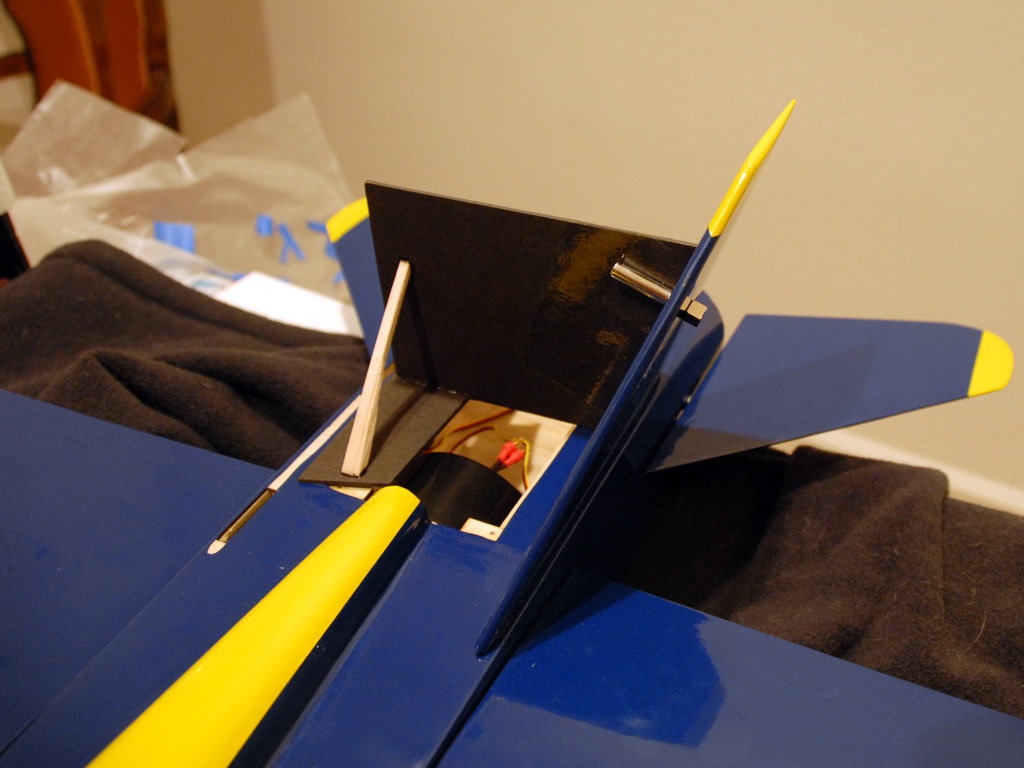
Making a simple gluing jig doesn’t take that much time and it will save you frustration when it comes to gluing the oh-so critical 110-degree vertical stabs.  Here’s a photo that shows the basic idea:

Note: CLICK TO ENLARGE/REDUCE IMAGES !

Image

This glamorized template does two things over the simple 110-degree flat template:

  1. Provides a horizontal footing so the vertical template can stand-up solidly.
  2. Uses rare earth magnets to hold the vertical stab firmly and cleanly (no pins, rubber bands, or tape!).

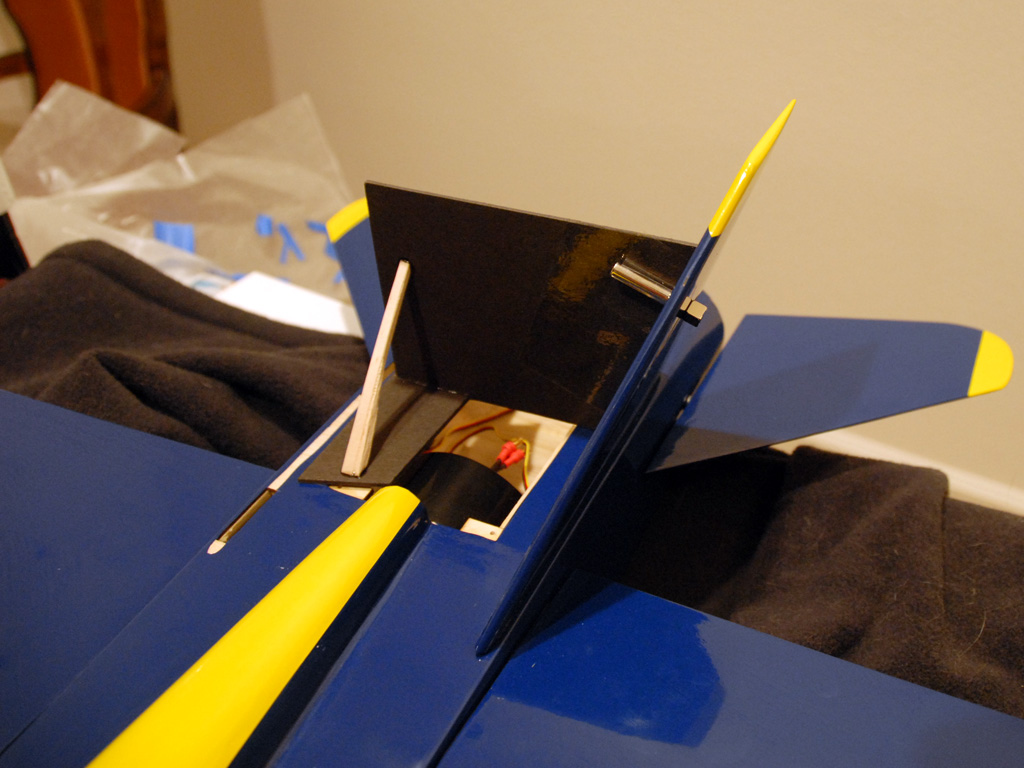
Notice there are two rare earth magnets holding the vertical stab in-place: A cylinder-shaped magnet taped to the jig and a smaller cubed-shaped one on the other side of the stab that is held in place by magnetic force.  It’s like a magnet sandwich that secures the stab to the edge of the jig.

Where to get rare earth magnets: I bought an assorted pack of rare earth magnets from thinkgeek.com ("Curiously Strong Magnets") and they have been useful in many applications around the house and RC. The variety pack has several shapes and sizes. 87 pieces in all. The flat shaped magnets are great for securing a removeable canopy. Great investment for lots of uses that continually come up (love ’em!).

Here are more pics of the jig:

Image Image

The black material is a very thick cardboard backing I found on an old memo pad (it does not flex). I just expoxied pieces of a wooden chopstick to act as support braces. You can’t see it, but there’s a long notch in the corner of the vertical piece that allows the horizontal footing to sit flush with the bottom edge of the vertical piece.

You can see in the following pic that I used a long cylinder shaped magnet and taped it to the jig with clear packing tape:

Image

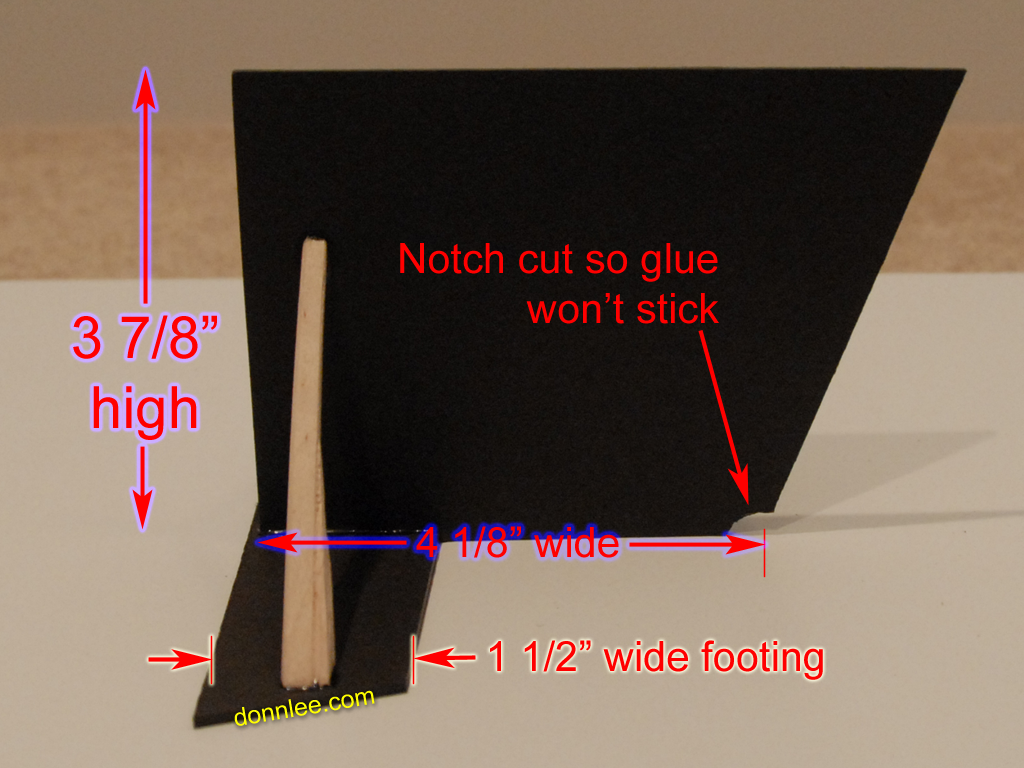
Here are the dimensions:

Image
Image

Note: It is important that the bottom edge of the vertical piece measure 4 and 1/8th inches. This width is narrow enough to allow you to glue the second vertical stab after the first one is done. And this width is wide enough to span the opening left by the absent rear hatch (so the jig doesn’t fall into the fan compartment).

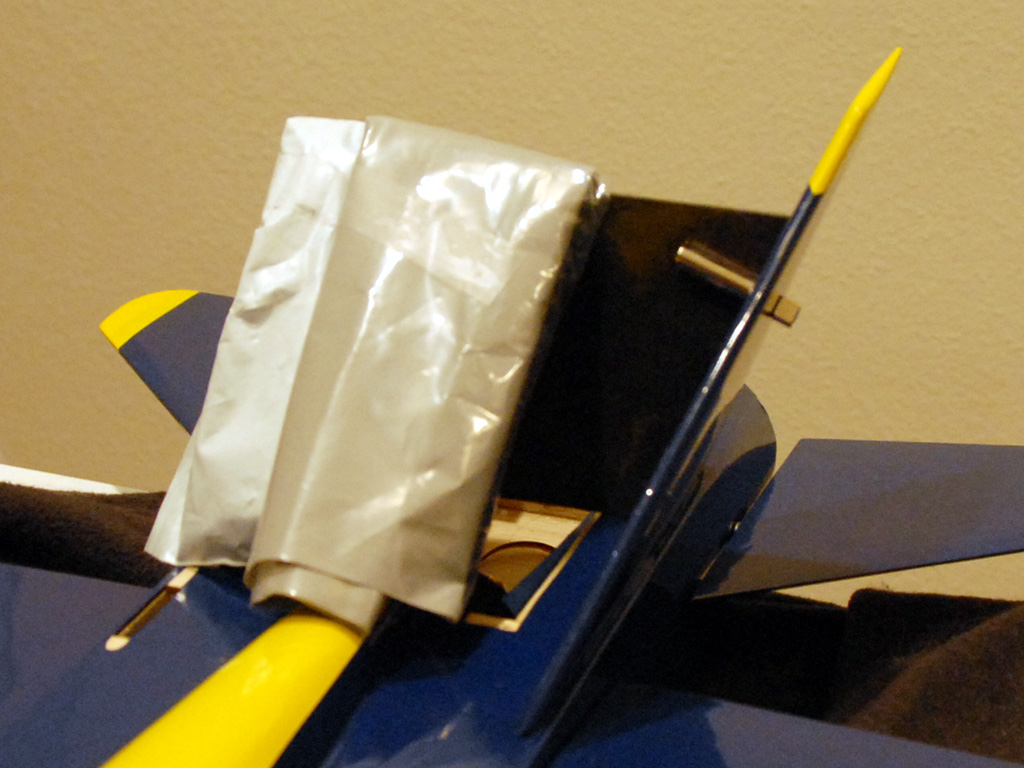
So, I place the jig over the opening, lay down the epoxy, set the stab in-place, and immobilize with the outer magnet:

Image

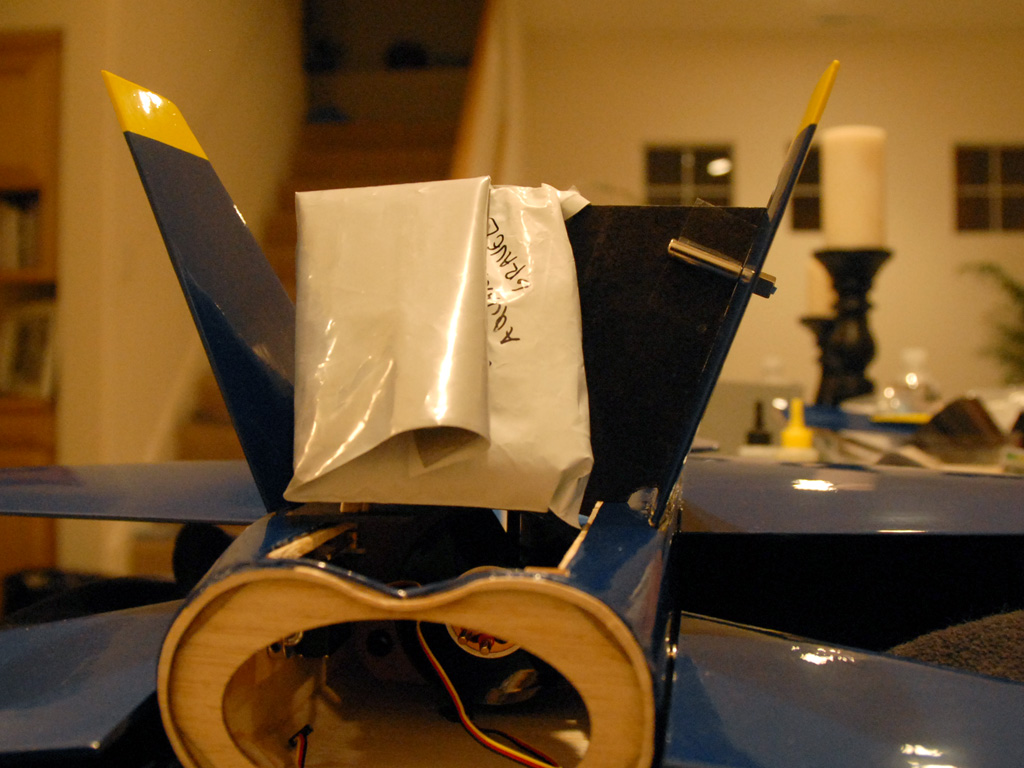
Then, I anchor the jig down with a little weight.  Here I used a small plastic bag of clean, dry aquarium gravel. This keeps the jig from moving around.

Image

THAT’S SO EASY.  And I know that baby is rock-solid and exactly 110-degrees for the entire epoxy curing time.

And then the other side:

Image
Image

A little pre-work saves hassle and errors when it counts!

See my other FA-18 tips:

Enjoy!
Donn Lee

Special thanks to warbirds-rc.com for helping build and fly this great EDF jet.