Category Archives: Linux


Saving your WD hard drive: Setting the idle3 timer

I recently learned of the hidden idle3 setting in WD Blue and WD Green drives. Shucked usb enclosures are often of these type.
When this timer expires, the heads park. Default is 8s and means your poor drive will be parking heads a lot, causing unnecessary wear in a linux environment.
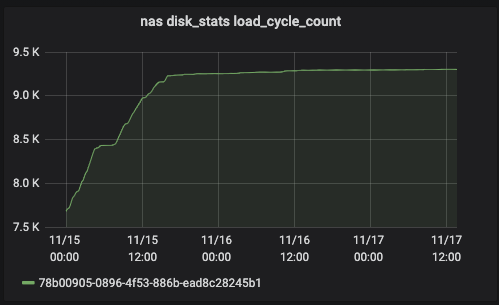
smartctl stores a running counter: Load_Cycle_Count
In this graph, you can see when i used the idle3-tools ubuntu pkg to adjust the idle3 timer.

View the disk’s current setting:

$ sudo idle3ctl -g /dev/sdb
Idle3 timer set to 80 (0x50)

Set idle3 to 30s:

sudo idle3ctl -s 129 /dev/sdb
The number on newer drives is not just divided by 10 but is staggered scale so 1-128 is divided by 10 but 129-255 is in 30 seconds increments (129 = 30sec, 130 = 60sec and so on) for newer drives but it is just divided by 10 for older drives. I do not know what is deemed new or old manufacturing date for WD drives.

ref: https://www.openmutual.org/2018/02/fixing-the-western-digital-excessive-load-unload-problem-with-idle3-tools/

#

Fix kubernetes: oci runtime error: applying cgroup configuration for process caused mountpoint for devices not found

Can’t build or push docker container?

Error:

oci runtime error: applying cgroup configuration for process caused mountpoint for devices not found

Try restarting docker. If you then get:

Error starting daemon: Devices cgroup isn't mounted

Then it may be time to shutdown and cold-start the machine.

In my case, I didn’t have to install or config anything new. Docker was running fine before this failure. Try restarting docker (eg. systemctl restart docker). If it fails, shutdown and cold-boot the machine. Ensure docker is running. After 129 days of uptime, my docker just got in a weird, bad state.

See also:

https://stackoverflow.com/questions/32002882/error-starting-docker-daemon-on-ubuntu-14-04-devices-cgroup-isnt-mounted/55657451

Mosh with iTerm2’s Tmux Integration


NOTE! Don’t follow this article, just use Eternal Terminal (et) instead of mosh (and instead of ssh).  It works flawlessly with iTerm2 and tmux.

I have found terminal/shell nirvana on my Mac with mosh + tmux + iTerm2 Tmux Integration, but it wasn’t easy.

My dream setup was these 3 running together:

1) mosh: Runs on client and on server. An ssh replacement that is secured with AES-128 and ssh. Virtually indestructible ssh-like sessions that remain “live” even after you change IP addresses (ie. physical locations), VPNs, or network interfaces. I can login to a server and never need to re-login for *months*. Whenever I open my macbook, my shell sessions are exactly where they were before and ready for the next command.  If your IP address changes while you commute (eg. train) or you are on VPN a lot, you really should use mosh instead of ssh. It’s not just for unreliable connections, I use mosh everywhere because it saves me time.

2) tmux: Runs on the server. Replacement for the old ‘screen’ utility. It allows you to keep active windows (and panes) in a session that remains alive even after you disconnect from the remote server.

3) iTerm2’s Tmux Integration: Runs on Mac. Very cool iTerm2 feature that renders your tmux windows as native iTerm2 tabs. Allows you to scroll back through your tmux window with Macbook touchpad gestures and iTerm hotkeys. Supports iTerm2’s very quick & capable Cmd-F (Find) instead of tmux’s Find.  Supports intuitive text selection and advanced text selection (discontiguous select & copy) built into iTerm. Switching between tabs with keyboard shortcuts. Basically everything you can do in iTerm2 regular tabs, you can probably do with your tmux session rendered by iTerm2’s Tmux Integration. It rocks.


The Problem

The problem is iTerm’s Tmux integration works fine when using ssh, but not when using mosh.


The Solution

With this howto, you can build a patched version of mosh (client and server) that is compatible with iTerm’s Tmux Integration.  Mosh is a small program, so the build is very quick.

Moreover, this howto allows you to try the patched mosh binaries without touching your existing mosh installation. This is done by specifying the ‘–client’ and ‘–server’ options when running mosh.

Once you are happy with how the patched mosh is working, you can move the patched mosh to a location in your path (need to do this on both client and server).

Note, if you are on wifi all the time, you can use Eternal Terminal instead of this howto. I use hard-wired ethernet at my desk and wifi when I leave my desk (eg. walking to a meeting). It so happens, this switching of network interfaces seems to break Eternal Terminal and close my session (in my testing).

In my setup I have a macbook (mosh client) connecting to an ubuntu 16.04 server (mosh server).

First, we’ll build mosh on the Macbook (mosh-client).


Build patched mosh-client on Macbook

Create a directory for the code:

dlee-mbp:~ donn$ mkdir -pv ~/workspace/git/github.com/rledisez/

dlee-mbp:~ donn$ cd ~/workspace/git/github.com/rledisez/

Grab the code:

dlee-mbp:rledisez donn$ git clone https://github.com/rledisez/mosh.git

dlee-mbp:rledisez donn$ cd mosh

Checkout the patched mosh branch called “localScrollback-1.3.2”:

dlee-mbp:mosh donn$ git checkout -b localScrollback-1.3.2 origin/localScrollback-1.3.2


Use Homebrew to install dependencies:

dlee-mbp:mosh donn$ brew install protobuf automake pkg-config


Build patched mosh binaries:

dlee-mbp:mosh donn$ ./autogen.sh

configure.ac:21: installing ‘./ar-lib’

configure.ac:13: installing ‘./compile’

configure.ac:6: installing ‘./install-sh’

configure.ac:6: installing ‘./missing’

src/crypto/Makefile.am: installing ‘./depcomp’

parallel-tests: installing ‘./test-driver’


./configure

<See many lines of output>


make

<See many lines of output>


You don’t have to do ‘make install’ at this point. You can try the binary without installing it (see below).


But, we also need a patched mosh on the server, so next…


Build mosh on ubuntu server

Install debian package dependencies:

Note: Boost (libboost-dev) not needed for mosh 1.2+ so I didn’t install it.

sudo apt-get install automake libtool g++ protobuf-compiler libprotobuf-dev libutempter-dev libncurses5-dev zlib1g-dev libio-pty-perl libssl-dev pkg-config

Build mosh-client and mosh-server:

git clone https://github.com/rledisez/mosh.git

cd mosh

git checkout -b localScrollback-1.3.2 origin/localScrollback-1.3.2

./autogen.sh

./configure

make


Again, you don’t have to ‘make install’ if you just want to try things out.


Running the patched mosh

Locate the path to patched mosh-client on my Macbook:

/Users/donn/workspace/git/github.com/rledisez/mosh/src/frontend/mosh-client

Locate the path to patched mosh-server on my ubuntu server:

/home/donn/workspace/github.com/rledisez/mosh/src/frontend/mosh-server


With this info, I can try my first iTerm + tmux + mosh session:

The ‘mosh’ command is found in the ‘scripts’ subdirectory of the source code directory.


dlee-mbp:mosh donn$ scripts/mosh \
--client=/Users/donn/workspace/git/github.com/rledisez/mosh/src/frontend/mosh-client \
--server=/home/donn/workspace/github.com/rledisez/mosh/src/frontend/mosh-server 10.1.1.1


After logging in to 10.1.1.1, start tmux on remote host:

remote_host$ tmux -CC

[or ‘tmux -CC a’ if resuming an existing tmux session]


… and then see iTerm2 window with Tmux Integration enabled.  Cmd-T to open a new tab.

Enjoy!


Switching to patched mosh permanently


Mac: Just put mosh and mosh-client in your path.  To see your installed version of mosh:

$ which mosh

$ which mosh-client


To see your path:

$ echo $PATH


Maybe copy your originals as mosh.orig, mosh-client.orig


Ubuntu server: Same thing but with mosh-server.  Maybe save your original as mosh-server.orig


From this point forward, be aware that normal, standard mosh clients will not be compatible with patched mosh on the server.  If you want to support both, then use the ‘–server’ option when starting a mosh session to specify which version of mosh-server will be run on the server (eg. mosh-server or mosh-server.orig).


Fixing Problems


If your session dies abruptly with an error like the following, it means your mosh-client or your mosh-server is not running the patched version of mosh; it is probably running your normal, installed version of mosh.


Assertion failed: (*i == *my_it), function diff_from, file user.cc, line 69.

Abort trap: 6


Resources


iTerm2’s Tmux Integration:

https://gitlab.com/gnachman/iterm2/wikis/TmuxIntegration


Build instructions for mosh:

https://github.com/mobile-shell/mosh/wiki/Build-Instructions


Patched mosh that supports tmux control-mode (tmux -CC). Original patch by github user 4ast. Rebased on mosh 1.3.2 by rledisez:

https://github.com/rledisez/mosh/tree/localScrollback-1.3.2

At the time of this article, v1.3.2 was the latest stable version for download at mosh.org


Original patched mosh:

https://github.com/4ast/mosh

Note: Commit d5bd1d31d86d4003705e69f87466aa7e10f9c5b9 “add support for resize events” is already part of mosh mainline.


“tmux integration hangs when logged in with mosh (ok w/ ssh)”

https://gitlab.com/gnachman/iterm2/issues/5924


Homebrew package manager for Mac:

https://brew.sh/

Bounty ($$$) for adding tmux control-mode support to mosh:

https://www.bountysource.com/issues/2052677-mosh-prevents-the-use-of-scrollback
 

Postfix SMTP configuration: Sending (relay) email to Gmail and other Internet mail servers


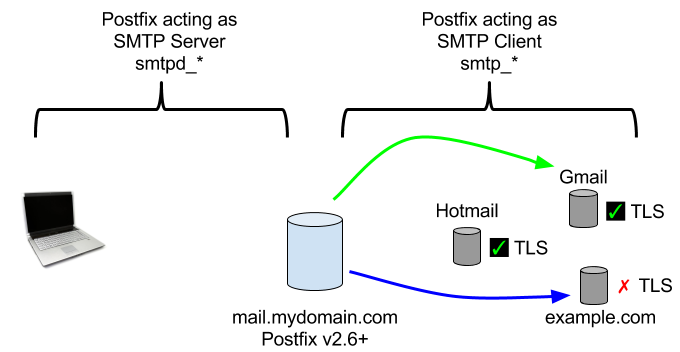
Postfix Server diagram

This might be helpful for people like me who recently started learning Postfix:
If you want to eliminate the “red padlock” icon in Gmail, you do not need to get a certificate. Mail servers like Gmail don’t require you to have a certificate (aka client certificate) to connect to them over a secure TLS connection, and subsequently send mail to them (however, things like SPF TXT records and DKIM are needed to avoid Gmail marking your mail as spam).

To send mail to Gmail (and others) with TLS and get rid of the “red padlock”, you only need:

smtp_tls_security_level = may
smtp_tls_loglevel = 1
smtp_tls_CAfile = /etc/ssl/certs/ca-certificates.crt

…in /etc/postfix/main.cf

TLS-security-level “may” (“You *may* use TLS”) means your mail will be relayed even if the other mail server lacks TLS.  This is represented by the BLUE arrow in the diagram showing mail sent to “example.com”. In other words, such mail will be sent unencrypted, but it will successfully reach example.com.

“smtp_*” are the parameters for the Postfix SMTP Client (the code that talks to public Internet mail servers like Gmail’s mail servers). The “smtpd_*” parameters are for the Postfix SMTP Server (the code that your users connect to when they need to send email to Gmail or some other public Internet mail server).

Make sure ca-certificates.txt exists in postfix’s chroot “jail” (on my ubuntu server it was: /var/spool/postfix/etc/ssl/certs/ca-certificates.crt). This is a database of certs of well-known CAs that your postfix server needs to know when it connects to Gmail (or other mail server). When your postfix server connects to Gmail, Gmail will present to postfix *Gmail’s server cert*, and that server cert will be signed by one of these well-known CAs.

I’m running postfix 2.11.0 on ubuntu 14.04.

You may configure smtp_tls_ciphers and smtp_tls_protocols, but the defaults are OK and recommended. The default for smtp_tls_ciphers is ‘medium’. If you do ‘high’, there’s a (small) chance some of your mail won’t reach destinations that don’t support the strongest ciphers. The default for smtp_tls_protocols is ‘!SSLv2, !SSLv3’ (disable SSL v2 and v3), which is considered safe; it allows TLSv1.

Svenn (https://www.svennd.be) wrote very helpful articles about how to use LetsEncrypt. Such certs are needed when *your* remote users (email clients) need to connect to your postfix server over a secure TLS connection. That’s another article.

OwnCloud SMTP config error: “A problem occurred while sending the email” (Authentication failed)

Problem: With correct login and password, and correct SMTP settings for Gmail SMTP, owncloud “Test email settings” button fails with:

  • A problem occurred while sending the email. Please revise your settings. (Error: Failed to authenticate on SMTP server with username “bob@gmail.com” using 1 possible authenticators)

Other symptom (and hint): Gmail login works fine at other locations, home vs. work, for example.

First, in your gmail account settings, change the “Allow less secure apps” setting to ON. This is found at https://myaccount.google.com in section “Signing in to Google”. NOTE: This makes your gmail account less secure so you might want to create a throwaway gmail account just for SMTP (that’s what I did). I would not use my valuable gmail accounts:

  • Allow less secure apps: ON

Other things to check:

  • Ensure your owncloud user profile (not owncloud admin settings, but your actual user’s account) has an email address set. This address will receive email from owncloud for password reset email messages and email notifications.  Find your user profile in the upper-right part of the web interface: your_name > Personal.

OwnCloud admin config for smtp:

Send mode: smtp
Encryption: TLS
From address: bob
@ (domain): gmail.com
Authentication method: Login
Authentication required: [checked]
Server address: smtp.gmail.com
: (port) 587
Credentials: bob@gmail.com, mypassword

If you don’t use the webui, Owncloud’s {$owncloud_dir}/config/config.php has these text configuration lines for smtp:

 'mail_smtpmode' => 'smtp',
 'mail_smtpsecure' => 'tls',
 'mail_from_address' => 'bob',
 'mail_domain' => 'gmail.com',
 'mail_smtpauthtype' => 'LOGIN',
 'mail_smtpauth' => 1,
 'mail_smtpport' => '587',
 'mail_smtphost' => 'smtp.gmail.com',
 'mail_smtpname' => 'bob@gmail.com',
 'mail_smtppassword' => 'mypassword',

Still doesn’t work?  I had to also do the following:

Basically, google is smart and treats logins from different geographical locations with different security restrictions (blocks).  In my case, my owncloud server was a VPS thousands of miles away from my laptop location.  So I guessed that google didn’t like that some random location (my vps) was trying to access my gmail account (even though I had “Allow less secure apps” enabled.

I found a big hint that you can “unlock” or re-auth your google account with the following url:

https://accounts.google.com/UnlockCaptcha

So basically, to prove to google that my VPS’s IP address is legit, I had to do this UnlockCaptcha from my VPS. BUT, I have no web browser (gui) on my VPS!  Except for ‘lynx’, the shell/cli based web browser!  Lynx does work for passing the UnlockCaptcha url 🙂

#

Juniper SSG 5 Error when upgrading via USB flash device

Problem: SSG5 (SSG 20) doesn’t upgrade via it’s usb port and reports error “USB flash is not existed. Please insert USB first!”

Solution: You need to use a usb flash drive/stick that is 4GB OR SMALLER!  And formatted FAT (aka FAT16).  FAT32 will probably work too (I haven’t tried).

More detail:

If you are on the SSG’s console, you will see the following error if you attempt to use a usb flash device bigger than 4GB:

“Usb disk size is larger than 4G.Mount failed!”

When you use a 4GB or smaller usb flash disk, you will see success:

“usb device (usb) ready.”

Again, this is on the SSG’s console.

Then you can upgrade via usb (put the *unzipped* screenos image in the *root* directory of the FAT usb drive):

ssg5-> save soft from usb ssg5ssg20.6.3.0r21.0 to flash

Then reboot:

ssg5-> reset

SSG5/SSG20 is a legacy Netscreen ScreenOS firewall/router.


Using mutt instead of MS Outlook on an Exchange server

Problem Statement

  • MS Outlook & Exchange sucks but that’s what your company supports.
  • Mutt over IMAP is too slow. What you want is something like mutt + spool like the good email old days.
  • Just about every GUI-based email client sucks (any OS). They are too slow compared to mutt.

Design Goals

  • Use mutt from local disk to keep mutt fast.
  • Keep mail on corporate IMAP/Exchange servers so it is still backed up & maintained by the IT dept.
  • Use IMAP because Exchange servers support it.
  • No manual sync or push. Automate everything so all you have to do is use mutt.
  • Allow straight-forward use of GUI email clients should you ever need them.

Design Concepts

  • OfflineIMAP synchronizes mail folders between the Exchange server and your machine (mutt’s local disk).
  • You read mail in mutt. Mutt reads mail from disk.
  • You write mail filtering rules in fdm.  fdm filters mail into folders to your liking.
  • Use cron to automate syncs and filtering jobs behind the scenes.

Howto

Step 1: Install ubuntu packages: mutt, offlineimap, fdm, msmtp (ubuntu 10.04 LTS package names)

Step 2: Config mutt to send mail using msmtp

~/.msmtprc

account default
host smtp.mymailserver.com
port 587
from donn@bigcorp.com
auth login
user donn
password s00perSekrit 
tls on
tls_starttls on
tls_certcheck off
#Or:
#tls_fingerprint FE:39:F9:B4:64:31:0E:DF:31:51:72:DA:A7:4F:35:4B
logfile ~/.msmtp.log

Paste view: http://pastie.org/9129773

~/.muttrc

set sendmail=/usr/bin/msmtp

Step 3: Setup Maildir directory

Add to ~/.muttrc:

set mbox_type=Maildir
set folder="~/Maildir"
mailboxes `echo -n "+ "; for file in ~/Maildir/*; do box=$(basename "$file"); echo -n "\"+$box\" "; done`
set spoolfile="~/Maildir/work/INBOX"
set postponed="+Drafts"
set record="+work/Sent"

Paste view: http://pastie.org/9129744

Step 4: Setup OfflineIMAP

The key point of offlineimap: Mutt can read your messages from local hard disk, instead of over the network. This greatly reduces the lag / delay when reading messages quickly.

OfflineIMAP syncs your ~/Maildir/work message base with MS Exchange over IMAP. So, if you read a message in mutt, it will be marked read in ~/Maildir, and then offlineimap will sync this change with Exchange. If you later check your inbox with Thunderbird, OWA, Outlook, or other client, that message will have ‘read’ status (awesome). OfflineIMAP downloads new mail from Exchange and stores them in ~/Maildir/work/INBOX, but this is really the syncing process: Exchange has the new messages, ~/Maildir/work/INBOX does not, until after a sync.

offlineimaprc:

[general]
accounts = Work
 
[Account Work]
localrepository = Local
remoterepository = Remote
 
[Repository Local]
type = Maildir
localfolders = ~/Maildir/work
 
[Repository Remote]
type = IMAP
remotehost = mail.mymailserver.com
ssl = yes
remoteuser = donn
remotepass = myPass
# Folders to skip during sync.
folderfilter = lambda foldername: foldername not in ['Deleted Items', 'Contacts', 'Calendar', 'Trash', 'MyFolderOfReallyOldMail']

Paste view: http://pastie.org/9129763

Step 5: Setup FDM

FDM is used to filter mail between your INBOX and your other Maildir “folders”. For example, I filter mailing-list email to a separate folder. OfflineIMAP puts ALL incoming mail into INBOX, then FDM moves messages from INBOX to other folders based on your rules. All of this FDM work is done on local Maildir subdirs (local disk). I also have FDM move (ie. archive) all email over 30 days to a local, “old mail” folder.

WARNING: Be extra cautious as you develop your FDM rules. If you make a typo (eg. regex typo), you could accidentally delete incoming mail. Use the -n switch (test syntax) and -v (verbose output) to check your rules carefully.

#unmatched keep default. A lot of these, just to be safe.
set unmatched-mail keep
 
# Delivery actions.
action "INBOX" maildir "%h/Maildir/work/INBOX"
action "widgets-list" maildir "%h/Maildir/work/widgets-list"
action "ix_email" maildir "%h/Maildir/work/ix_email"
action "inbox_overflow" maildir "%h/Maildir/work/inbox_overflow"
 
#Bread and Butter INBOX account only operates on one folder
account "WORK" maildir "%h/Maildir/work/INBOX"
 
# Match regex's are *not* case-sensitive by default.
match account "WORK" {
 match "^subject:.*\\[ubuntu-widgets\\].*" in headers {
 match all action "widgets-list"
 }
 # Negative match regex.
 match "^(to:|cc:)(.*linx.net|.*tech-l@ams-ix.*)" in headers {
 match "^From:(?!.*linx.net.*)" in headers {
 # If not from linx admins, move it.
 match all action "ix_email"
 }
 }
 # Move older msgs to overflow box so fdm doesn't have to process them over and over.
 # My email is donn @ bigcorp.com
 match age > 1 months {
 match "^To:(?!.*donn@.*)" in headers {
 # If not to-donn, archive the old mail to overflow box.
 match all action "inbox_overflow"
 }
 }
 # Last catchall match term.
 match unmatched action keep
}
# Send all mail to inbox.
match unmatched action keep

Paste view: http://pastie.org/9129776

Step 6: Setup mutt basics

muttrc:

set hostname="bigcorp.com"
set realname="Donn Lee"
set from="donn@bigcorp.com"
set envelope_from=yes
set hidden_host=yes
set use_domain=yes
set pager_stop=yes
my_hdr From: donn@bigcorp.com
set attribution="%n <%a> wrote on %{%a} [%{%Y-%b-%d %H:%M:%S %Z}]:"
set strict_threads = no
set date_format="!%a, %b %d, %Y at %I:%M:%S%p %Z"
set index_format="%4C %Z[%[%a %m/%d %H:%M]] %-16.16L%?X? [%X]? (%?l?%4l&%4c?) %s"
set pager_index_lines=20
# Change default subject format for fwd'd msgs.
set forward_format="Fwd: %s"
# Use emacs to compose mail.
set editor = "/usr/bin/emacs -nw %s"
# Create a nice status bar.
set status_format=" %r %b %f New:%n Del:%d TotMsgs:%m Tag:%t Flag:%F Size:%l %> Lim:%V (%P)"
# Ignore all lines by default
ignore *
# Set what I want to see
unignore from to cc subject date reply-to mail-followup-to x-url organisation organization x-mailer user-agent xmail-sent-to
hdr_order from to cc subject date reply-to mail-followup-to x-url organisation organization x-mailer user-agent xmail-sent-to
# Create a cache for performance.
# http://www.mutt.org/doc/devel/manual.html#header-cache
set header_cache="~/.mutt_cache"
set maildir_header_cache_verify="yes"
set header_cache_pagesize="65536"
# And all your other mutt goodies...

Paste view: http://pastie.org/9129782

Step 7: Read messages that are html formatted

Add to muttrc:

# View html email
# Must also add these two lines to ~/.mailcap
# text/html; links %s; nametemplate=%s.html
# text/html; links -dump %s; nametemplate=%s.html; copiousoutput
auto_view text/html

Paste view: http://pastie.org/9129786

Step 8: Opening email attachments

I use Outlook Web App (OWA) to open an attachment (eg. a Powerpoint file). I always have a browser up and OWA is usually loaded in one of the tabs.

#
Continue reading Using mutt instead of MS Outlook on an Exchange server

mplayer: Play video file

DVD compliant .mpg file:
mplayer /mythtv/ll_20060721_ff-dvd.mpg -monitoraspect 16:9 -vo xv -ao alsa:device=digital2c -aid 128 -fs

mount -t iso9660 /dev/hdb /cdrom
mplayer p101.vob -fs -zoom -monitoraspect 16:9 -vo xv -ao
alsa:device=digital2c -aid 128

mplayer dvd://1 -dvd-device /dev/hdb -fs -zoom -monitoraspect 16:9 -vo xv -ao alsa:device=hw=0.0

mplayer dvd:// -dvd-device %d -fs -zoom -monitoraspect 16:9 -vo xv -ao
alsa:device=hw=1.0 -alang en

# Play a ripped dvd from hard drive.
mplayer dvd://1 -dvd-device /dvd/test/ -vo xv -ao alsa:device=digital2c -aid 128

# Play xvid file.
mplayer /mythtv/video/test_xvid.avi -vo xv -ao alsa:device=digital2c -fs -zoom

# Play hipix file.
mplayer CH 11-1.ts.0001 -vo xv -ao alsa:device=digital2c -fs -zoom -monitoraspect 16:9

Thinkpad T41p and Fedora Core 5

Installed FC5 off all 5 cdroms.
During installation, configured monitor for "LCD 1400×1050"
eth0 was auto-discovered, but not ath0 (wireless).
Get eth0 up: ifconfig eth0 192.168.1.222 up, route add default gw 192.168.1.1
vi /etc/resolv.conf, and add line "nameserver 206.13.28.12"
Downloaded madwifi drivers (.tar.gz) from madwifi.org
Untar’d to tmp dir
Requires kernel srcs! So, ‘yum install kernel-devel-[match kernel version].i686’
yum install gcc (for building madwifi)
cd madwifi_subdir
make
make install
modprobe ath_pci
ifconfig -a (should see ath0 now)
Load scanner: modprobe wlan_scan_sta
ifconfig ath0 up
iwlist ath0 scan (view APs in the area and which are encrypted)
iwconfig ath0 essid "default"
iwconfig ath0 key <wep key in hex>
dhclient ath0

(this is from the madwifi "newbie howto" doc)

Disabled acpi in kernel boot options (disable suspend/power management)
kernel … acpi=off rhgb quiet
(/boot/grub/grub.conf)

Disabled apmd (suspend results in freeze)
[root@localhost ~]# chkconfig –list| egrep apm
apmd            0:off   1:off   2:on    3:on    4:on    5:on    6:off
[root@localhost ~]# chkconfig apmd off
chkconfig apmd off
[root@localhost ~]# chkconfig –list| egrep apm
apmd            0:off   1:off   2:off   3:off   4:off   5:off   6:off

Change /etc/X11/xorg.conf to read:
Section "Monitor"
        Identifier   "Monitor0"
        VendorName   "Monitor Vendor"
        ModelName    "Generic Laptop Display Panel 1400×1050"
        HorizSync    31.5 – 90.0
        VertRefresh  59.0 – 75.0
        Option      "dpms"
EndSection

Section "Device"
        Identifier  "Videocard0"
        Driver      "radeon"
        VendorName  "Videocard vendor"
        BoardName   "ATI Radeon Mobility M9"
        Option      "AGPMode" "4"
        Option      "EnableDepthMoves" "on"
        Option      "EnablePageFlip" "on"
EndSection

Section "Screen"
        Identifier "Screen0"
        Device     "Videocard0"
        Monitor    "Monitor0"
        DefaultDepth     24
        SubSection "Display"
                Depth     24
                Modes    "1400×1050" "1280×1024" "1280×960" "1152×864" "1024×768" "640×480"
                Virtual  0 0
        EndSubSection
EndSection

Section "DRI"
        Group        0
        Mode         0666
EndSection
(end of xorg.conf)