All posts by donn

Pairing the Xiaomi/Aqara Vibration Sensor (zigbee)

Goal: To pair the sensor to the CC2531 zigbee router.

See also CC2531 Router Operations

Enable Permit (aka pairing) Mode

I am using ZHA included in Home Assistant.

In Home Assistant (HA, aka hass), enable pairing mode:

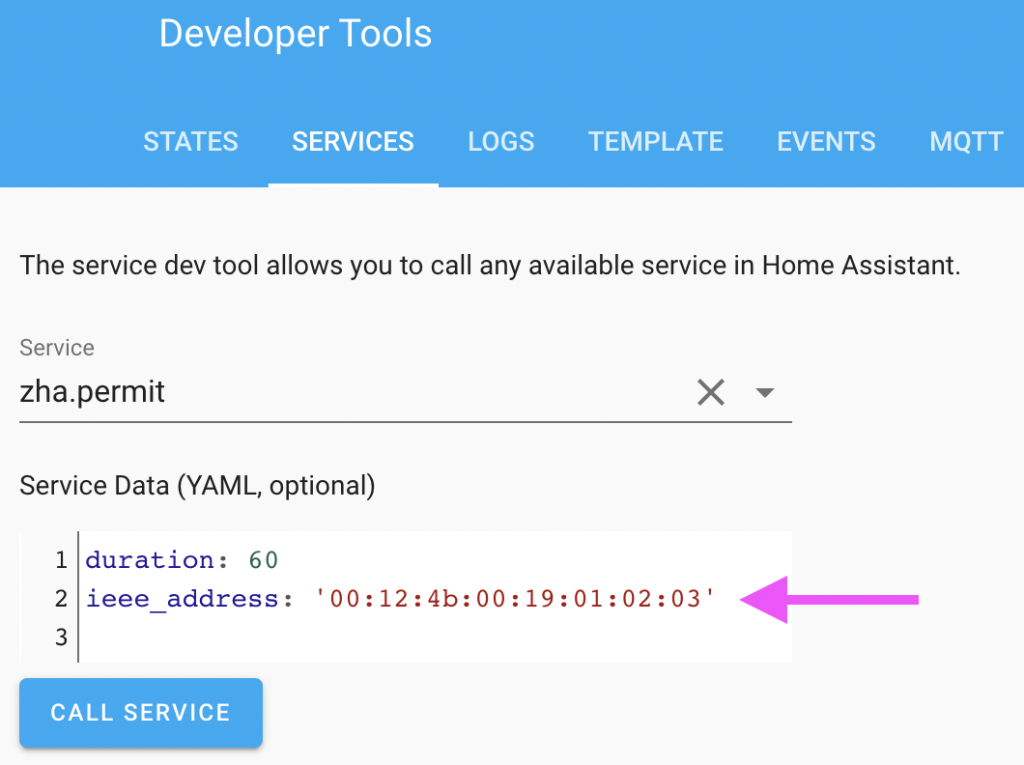
Developer Tools > Services

The service to call is “zha.permit”

Note, I change duration to 250 seconds to give me plenty of time to fuss with the sensors buttons.

“ieee_address” is the zigbee MAC address of the zigbee router (eg. CC2531 running router firmware) that is permitted to add end-devices (eg. sensors) during the “duration” period.

If “ieee_address” is not provided, then the coordinator and all routers are permitted to add end-devices during the permit period. For Xiaomi sensors, I found it’s best to “lock” the sensor to the desired router (ie. closest router), so I always use “ieee_address” to ensure the sensor pairs to the router I want.

How to find the router’s MAC address

In HA with ZHA:

Configuration > Zigbee Home Automation > LUMI router > IEEE

Or, I run zha_map and read the “neighbours” file:

donn@fox:/usr/share/hassio/homeassistant$ cat neighbours/neighbours_00124b0019010203.txt
...
    "device_type": "Router",
    "ieee": "00:12:4b:00:19:01:02:03",
    "lqi": 104,
    "manufacturer": "LUMI",
    "model": "lumi.router",

Push the button on the sensor (a lot)

Here’s what happened after I enabled permit-mode:

Saw in home-assistant.log:

2020-06-25 15:34:49 INFO (MainThread) [homeassistant.components.zha.api] Permitting joins for 60s on 00:12:4b:00:19:01:02:03 device

Press and hold sensor button for 5s. Saw blue led flash 3 times.

Press button every 1 to 2s. See blue led flash once, on most button presses.

10s go by. Nothing is happening in the HA log, so…

Press and hold button for 5s, again.

Press button every 1 to 2s, again.

This time I start seeing messages in HA log that sensor is discovered.

IMPORTANT: Keep pressing the button every 1 to 2s for another 1 minute until new zigbee log messages no longer appear.

HA log results

2020-06-25 15:34:49 INFO (MainThread) [homeassistant.components.zha.api] Permitting joins for 60s on 00:12:4b:00:19:01:02:03 device
2020-06-25 15:35:42 INFO (MainThread) [zigpy_deconz.zigbee.application] New device joined: 0xb1e2, 00:15:8d:00:02:11:22:33
2020-06-25 15:35:42 INFO (MainThread) [zigpy.application] Device 0xb1e2 (00:15:8d:00:02:11:22:33) joined the network
2020-06-25 15:35:42 INFO (MainThread) [zigpy.device] [0xb1e2] Requesting 'Node Descriptor'
2020-06-25 15:35:46 INFO (MainThread) [zigpy.device] [0xb1e2] Node Descriptor: <Optional byte1=2 byte2=64 mac_capability_flags=128 manufacturer_code=4151 maximum_buffer_size=127 maximum_incoming_transfer_size=100 server_mask=0 maximum_outgoing_transfer_size=100 descriptor_capability_field=0>
2020-06-25 15:35:46 INFO (MainThread) [zigpy.device] [0xb1e2] Discovering endpoints
2020-06-25 15:35:49 INFO (MainThread) [zigpy.device] [0xb1e2] Discovered endpoints: [1, 2]
2020-06-25 15:35:49 INFO (MainThread) [zigpy.endpoint] [0xb1e2:1] Discovering endpoint information
2020-06-25 15:35:52 INFO (MainThread) [zigpy.endpoint] [0xb1e2:1] Discovered endpoint information: <Optional endpoint=1 profile=260 device_type=10 device_version=1 input_clusters=[0, 3, 25, 257] output_clusters=[0, 4, 3, 5, 25, 257]>
2020-06-25 15:35:57 INFO (MainThread) [zigpy.endpoint] [0xb1e2:2] Discovering endpoint information
2020-06-25 15:36:02 INFO (MainThread) [zigpy.endpoint] [0xb1e2:2] Discovered endpoint information: <Optional endpoint=2 profile=260 device_type=24322 device_version=1 input_clusters=[3, 18] output_clusters=[4, 3, 5, 18]>
2020-06-25 15:36:13 INFO (MainThread) [homeassistant.helpers.entity_registry] Registered new binary_sensor.zha entity: binary_sensor.lumi_lumi_vibration_aq1_33221102_ias_zone
2020-06-25 15:36:13 INFO (MainThread) [homeassistant.helpers.entity_registry] Registered new sensor.zha entity: sensor.lumi_lumi_vibration_aq1_33221102_power

Verify the pairing

HA “Services” page: Call the service “zha_map.scan_now” to rebuild the zigbee network map data.

The router’s “neighbours” file confirms the Xiaomi sensor is a “Child” of the router, so pairing was successful:

        {
            "depth": 2,
            "device_type": "End_Device",
            "ieee": "00:15:8d:00:02:11:22:33",
            "lqi": 7,
            "manufacturer": "LUMI",
            "model": "lumi.vibration.aq1",
            "new_joins_accepted": "Unknown",
            "nwk": "0xb1e2",
            "offline": false,
            "pan_id": "00:21:2e:ff:ff:0a:0b:0c",
            "relation": "Child",
            "rx_on_when_idle": "Off",
            "supported": true
        }

Test the sensor

Tap the sensor to vibrate it.  Entity state changes from “off” to “on”:


Refs:

https://github.com/home-assistant/core/issues/28614


#
CC2531 Router Operations (zigbee)

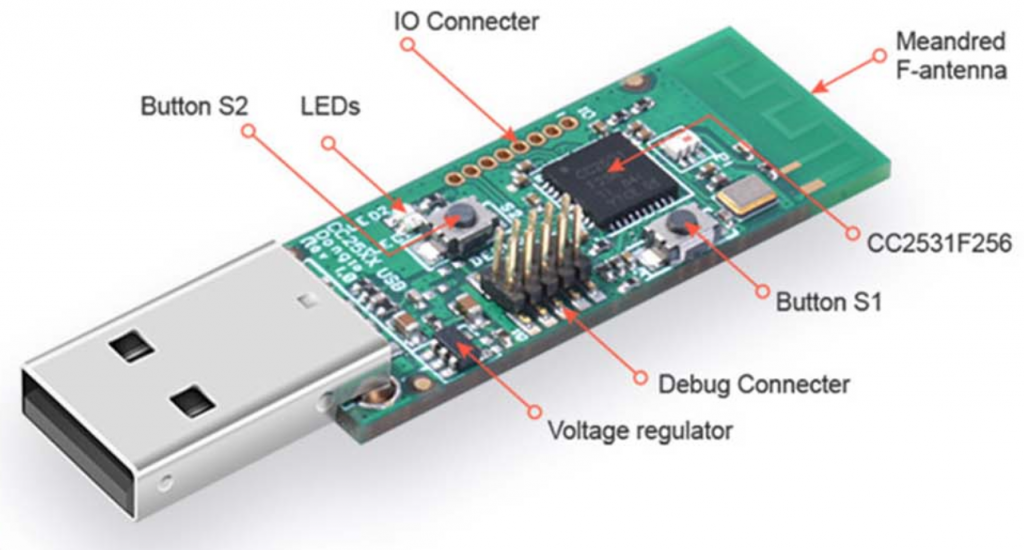
UPDATE 2020/07/25: I have upgraded to a CC2530+CC2591 router ($15 on eBay) with external antenna because I found the CC2531’s range to be too short/limiting. Operations are the same, but CC2530 does not have LEDs.

If you are having trouble with the CC2531 as a zigbee router (aka repeater), follow these steps.

The CC2531 router works well with Xiaomi sensors, which are notoriously picky about what zigbee routers/repeaters/hubs they work with.

When using the CC2531 as a router, you do NOT need to connect it to a Raspberry Pi (or other computer). You can simply plug the CC2531 into a USB-A charger like a smartphone charger.

This assumes you are running the CC2531 router firmware (router-cc2531-std.hex) that is part of the zigbee2mqtt project.

You do not have to run zigbee2mqtt. The CC2531 with router firmware is a totally standalone zigbee router.

This assumes you have already paired the CC2531 router with your zigbee coordinator (aka hub, aka gateway). To pair, enable “permit” mode on your coordinator, then power-on the CC2531 and it will join the network automatically. The CC2531’s red LED will slow-blink when it is joined to the network.

After pairing, ensure Home Assistant (HA, aka hass) has entity IDs for the CC2531 router. Search for “lumi_router”:

Ensure the CC2531 is in “normal operation” mode. If you see the LED flash/blink RED once every 4 seconds, then it is in normal operation mode.

Ensure the CC2531 has an active link to the zigbee coordinator. The S1 button on the CC2531 is valuable for testing this. I call S1 the “test button”.

When you press S1, the CC2531 LED toggles between flashing-red and green, and emits that state (green = on) like a sensor. That’s all it does. It’s only for testing. Green doesn’t mean the router is doing anything different. It’s just a “sensor” for you to test the link between the CC2531 router and your coordinator.

In HA, check Developer Tools > States and the state of the entity-id for your CC2531 similar to:

light.lumi_lumi_router_abcdef_on_off

The state of this entity will be “on” when the CC2531 LED is GREEN, and state will be “off” when the CC2531 LED is slow-flashing RED (every 4s).

NOTE: It may take 1 or 2 minutes for the state change to appear in the HA “States” page, so be patient.

If the entity state is “unavailable” or the state doesn’t change after 2 minutes of pressing the S1 button, then the CC2531 doesn’t have an active link with the coordinator.

  • If the CC2531 is far away, try moving it closer to the coordinator (or a known-good router) and testing again.
  • Try re-pairing the CC2531 with your coordinator. To re-pair: Power on, press and hold down the S2 button for 5 seconds.

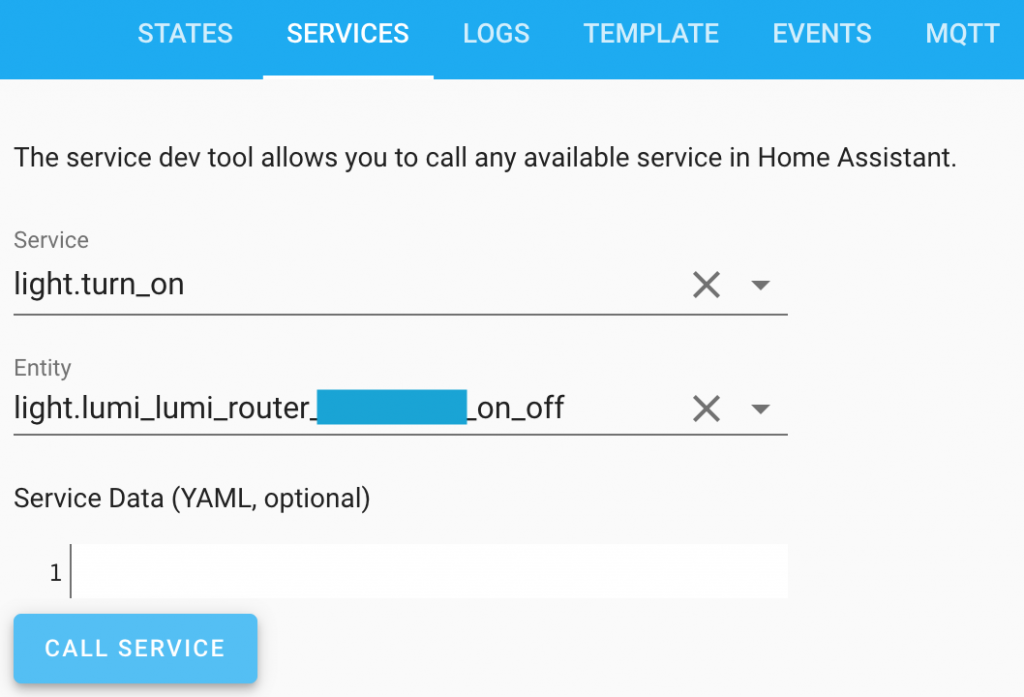
You can also control the green/red LED on the CC2531 with HA service calls (light.turn_on), which also tests the connectivity between the router and the coordinator:

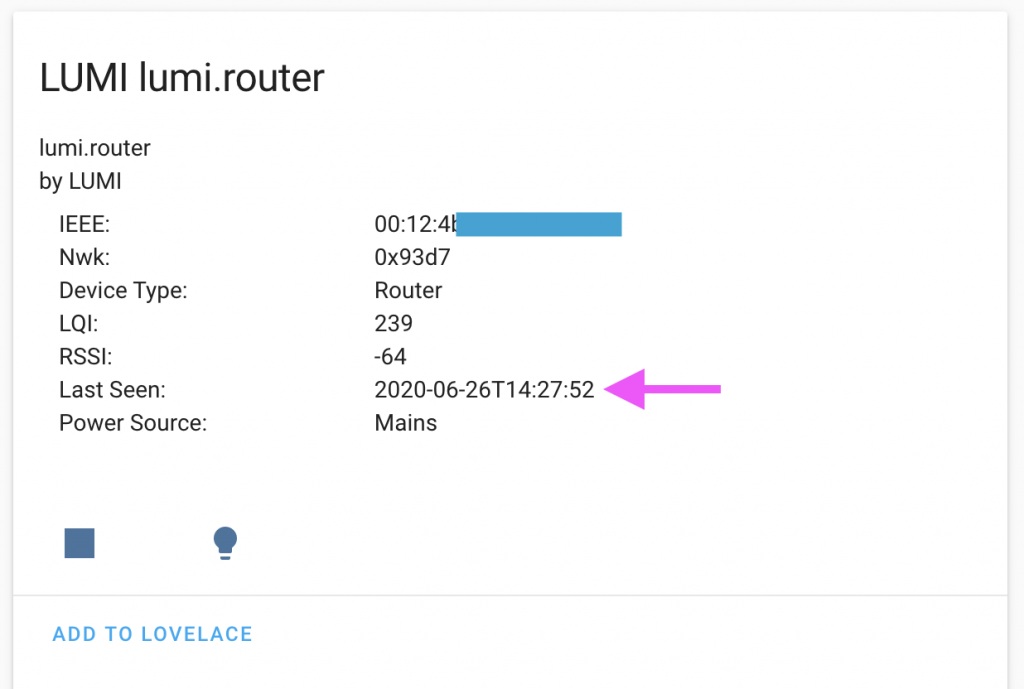
Also check the last time HA was in-contact with the CC2531:

HA 0.112 and higher: Configuration > Integrations > Zigbee Home Automation > Configure > Devices > lumi.router

HA 0.111 and lower: Configuration > Zigbee Home Automation > lumi.router


See also: Pairing Xiaomi sensor with CC2531 router

#

Wyze Sense bridge & sensors with Home Assistant (hass)

You do not have to connect the Wyze Sense “bridge” to a Wyze cam. You do not have to use the Wyze app. However, if you need to update the firmware of the bridge, you’ll need to connect it to a Wyze cam and use their app.

Home Assistant (HA) version: 0.110.7

Connect wyze sense bridge to HA server using a USB extension cable to keep bridge away from server hardware (better RF rx/tx).

lsusb:

Bus 001 Device 018: ID 1a86:e024 QinHeng Electronics

Device path for wyze bridge:

donn@fox:~$ ls -l /dev/hidraw0

crw------- 1 root root 238, 0 Jun 19 20:41 /dev/hidraw0

Map this into HA container with portainer like we did with Conbee II, except device path will be the same inside the container: /dev/hidraw0

Update: No need to add the github url as a Custom Repository in HACS.

Update to latest version of HACS. Restart HA.

Go to HACS tab in HA. Search integrations for “wyze” and install “Ha Wyzesense” integration. Restart HA.

Explore some more:

bash-5.0# ls -l /sys/class/hidraw/
total 0
lrwxrwxrwx 1 root root 0 Jun 19 20:47 hidraw0 -> ../../devices/pci0000:00/0000:00:1a.0/usb1/1-1/1-1.2/1-1.2.3/1-1.2.3:1.0/0003:1A86:E024.0001/hidraw/hidraw0

bash-5.0# lsusb | grep -i 1a86
Bus 001 Device 018: ID 1a86:e024 QinHeng Electronics

Add to configuration.yaml:

binary_sensor:
  - platform: wyzesense
    device: auto

And restart HA again.

Log:

bash-5.0# cat home-assistant.log | grep -i wyze
2020-06-19 21:03:58 WARNING (MainThread) [homeassistant.loader] You are using a custom integration for wyzesense which has not been tested by Home Assistant. This component might cause stability problems, be sure to disable it if you experience issues with Home Assistant.
2020-06-19 21:03:58 INFO (MainThread) [homeassistant.components.binary_sensor] Setting up binary_sensor.wyzesense
2020-06-19 21:03:59 INFO (Thread-7) [custom_components.wyzesense.wyzesense_custom] LOG: time=1969-12-31T16:00:00, data=b'14ff'

Wyze Sense bridge LED is steady blue (good).

Developer Tools > Services.  In the Service box, type “wyze” and see wyzesense.scan service.

Per docs, call the service and, within 30s, push the sensor’s reset button until LED flashes 3 times.

Bridge LED changed to flashing blue but pairing failed “with no sensor found”:

Enabled debug for the custom component. No interesting log messages.

2020-06-19 21:28:09 DEBUG (SyncWorker_4) [custom_components.wyzesense.binary_sensor] Scan completed with no sensor found.

Saw tip from BlindLemon comment on github issue, and found the following pairing procedure worked OK:

Press bridge’s button until its led goes solid yellow. Call wyzesense.scan using Developer Tools > Services (flashing led on bridge). Now hold-down reset button on door sensor for 3s. It pairs and bridge led goes solid blue.

HA log says:

2020-08-30 17:06:16 INFO (MainThread) [homeassistant.helpers.entity_registry] Registered new binary_sensor.wyzesense entity: binary_sensor.wyzesense_01234567

Now there’s a new entity in Developer Tools > States:

It is nice to have rssi and battery level information for setting up alerts/notifications.

Note: When pairing my 2nd sensor, I did not have to press the bridge’s button. Just call wyzesense.scan and hold down the reset button on the sensor for ~5s, release, and it was paired and appeared in HA States page.

Door sensor states in HA:

off = The two pieces are touching (or close enough, about 1 inch)

on = The two pieces are far apart

Create a sensor for the battery level

Here’s the native sensor:

Make a custom sensor using the battery_level attribute (configuration.yaml):

sensor:
  - platform: template
    # Custom sensors created from other ents' attributes.
    sensors:
      wyzesense_70123456_battery_level:
        friendly_name: "Door sensor 70123456 battery level"
        unit_of_measurement: '%'
        entity_id: binary_sensor.wyzesense_70123456
        value_template: "{{ state_attr('binary_sensor.wyzesense_70123456', 'battery_level') }}"
        device_class: battery

Restart HA and check States page again for the newly created sensor:

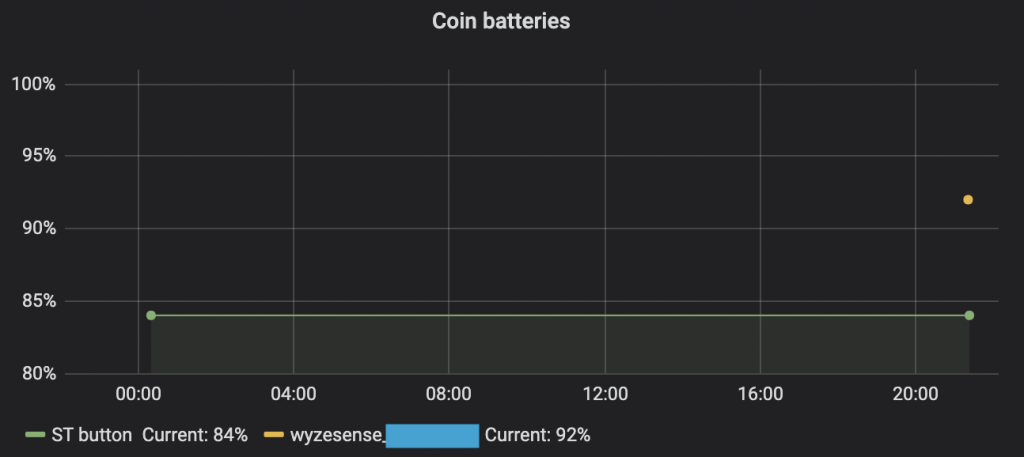
Add wyze battery level to grafana:


Ref:

Github repo for Ha Wyzesense

#

Zigbee: Conbee II installation, Home Assistant, ZHA, SmartThings button

Goal is to get SmartThings zigbee button working with Home Assistant first. Then, Wyze Sense sensors. Conbee II will be the zigbee coordinator (aka gateway, aka hub).

Use Windows PC to update firmware and set 2.4GHz channel. Download GCFFlasher and deConz.

GCFFlasher.exe install error:

The code execution cannot proceed because FTD2XX.dll was not found. Reinstalling the program may fix this problem.

So skip for now and install deConz for Win. Connect Conbee II. deConz app says frequency band is 2400 – 2483.5MHz.

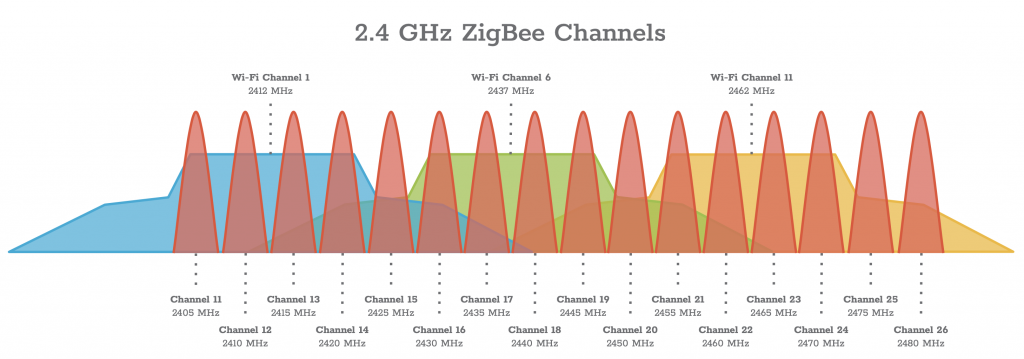
Ensure status is “Not in Network”, else click “Leave”. Click icon for “Network Preferences”, top-center. Device type = Coordinator with Channel Mask 15.

Metageek diagram:

Don’t untick current channel, but rather tick channel 20 checkbox then “Save”, “Done”. Close deConz. Restart deConz. Verify channel is 20.

Download firmware deCONZ_ConbeeII_0x26580700.bin.GCF

Download D2XX drivers 2.12.28 (x64). Copy ftd2xx.dll from “i386” folder of drivers to same folder as GCFFlasher.exe.

Open powershell shell, navigate to folder with  GCFFlasher.

List devices:

.\GCFFlasher.exe -l

Shows “path” is COM3, but no firmware version info. Firmware ver is displayed when flashing.

Copy firmware file to same folder as GCFFlasher.exe. Flash:

PS D:\snapraid_protected\cloudbu-d-drive\hass_home_assistant\zigbee\conbee ii\flashtool\unzipped\GCFFlasher_V3_10> .\GCFFlasher.exe -d COM3 -f .\deCONZ_ConBeeII_0x26580700.bin.GCF
GCFFlasher V3_10 (c) dresden elektronik ingenieurtechnik gmbh
Reboot device COM3 (ConBee II)
deCONZ firmware version 264A0700
action: update firmware after 6726 ms
flashing 160930 bytes: |==============================|
verify: .
SUCCESS
Wait 10 seconds until application starts
PS D:\snapraid_protected\cloudbu-d-drive\hass_home_assistant\zigbee\conbee ii\flashtool\unzipped\GCFFlasher_V3_10>

Ran same command again to see expected version:

deCONZ firmware version 26580700

ubuntu

Move conbee II from Windows pc to ubuntu Home Assistant server.

Dresden Elektronik:

donn@fox:~$ sudo lsusb
Bus 002 Device 002: ID 8087:0024 Intel Corp. Integrated Rate Matching Hub
Bus 002 Device 001: ID 1d6b:0002 Linux Foundation 2.0 root hub
Bus 001 Device 004: ID 0c45:643f Microdia Dell Integrated HD Webcam
Bus 001 Device 009: ID 1cf1:0030 Dresden Elektronik
Bus 001 Device 007: ID 058f:9254 Alcor Micro Corp. Hub
Bus 001 Device 002: ID 8087:0024 Intel Corp. Integrated Rate Matching Hub
Bus 001 Device 001: ID 1d6b:0002 Linux Foundation 2.0 root hub
Bus 004 Device 001: ID 1d6b:0003 Linux Foundation 3.0 root hub
Bus 003 Device 001: ID 1d6b:0002 Linux Foundation 2.0 root hub

This adds /dev/ttyACM0

crw-rw---- 1 root dialout 166, 0 Jun 17 18:42 /dev/ttyACM0

But, may be wiser to use /dev/serial/by-id/…  device path (in case future usb devices cause ttyACM* to change):

donn@fox:~$ ls -l /dev/serial/by-id/
total 0
lrwxrwxrwx 1 root root 13 Jun 17 21:02 usb-dresden_elektronik_ingenieurtechnik_GmbH_ConBee_II_DE2213352-if00 -> ../../ttyACM0

dmesg:

[17705070.939956] usb 1-1.2.2: Manufacturer: dresden elektronik ingenieurtechnik GmbH
[17705070.941393] cdc_acm 1-1.2.2:1.0: ttyACM0: USB ACM device
[17705074.785091] usb 1-1.2.2: Manufacturer: dresden elektronik ingenieurtechnik GmbH
[17705074.786219] cdc_acm 1-1.2.2:1.0: ttyACM0: USB ACM device

Add user to ‘dialout’ group:

donn@fox:~$ id donn
uid=1000(donn) gid=1000(donn) groups=1000(donn),4(adm),20(dialout),24(cdrom),27(sudo),30(dip),46(plugdev),116(lpadmin),126(sambashare),999(docker),130(libvirt)

Enable ZHA in Home Asssistant (hass, hassio)

Web-ui: Configuration > Intergrations > “+” icon. Search for “ZHA”. See & install “Zigbee Home Automation”.


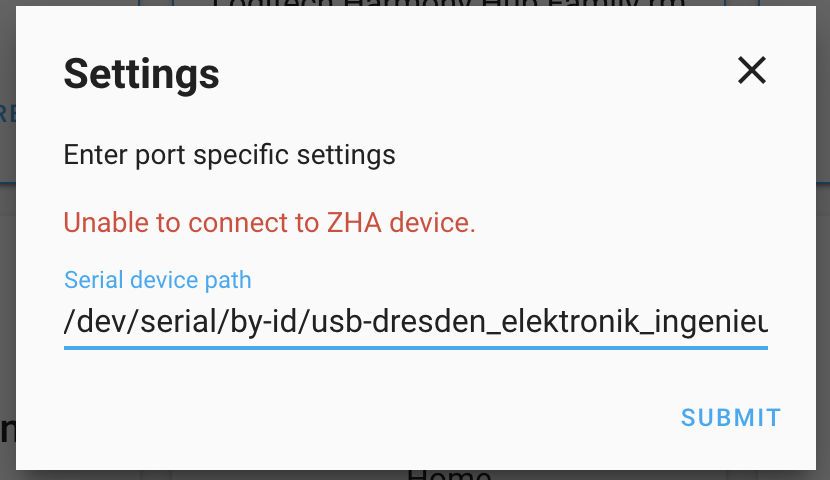
Unable to connect error:

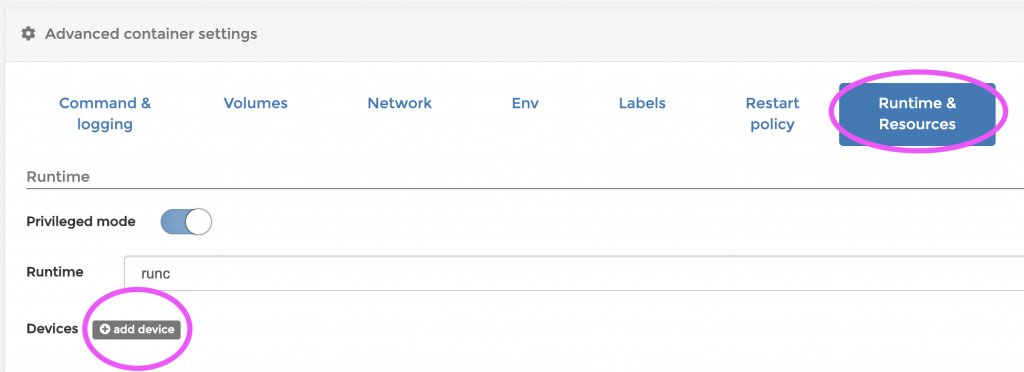
Abort integration. Use Portainer to map device into the Home Assistant container.

“Duplicate/Edit”.

Then “Runtime & Resources” > “add device”:

Map the long device path (host) to /dev/ttyACM0 within the container:

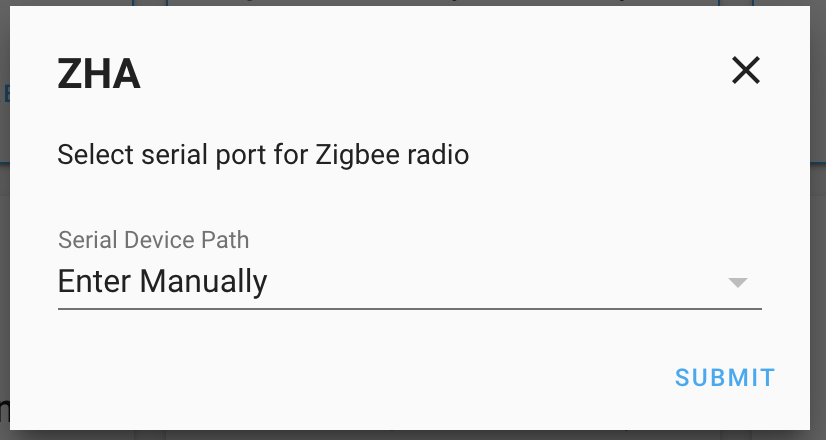
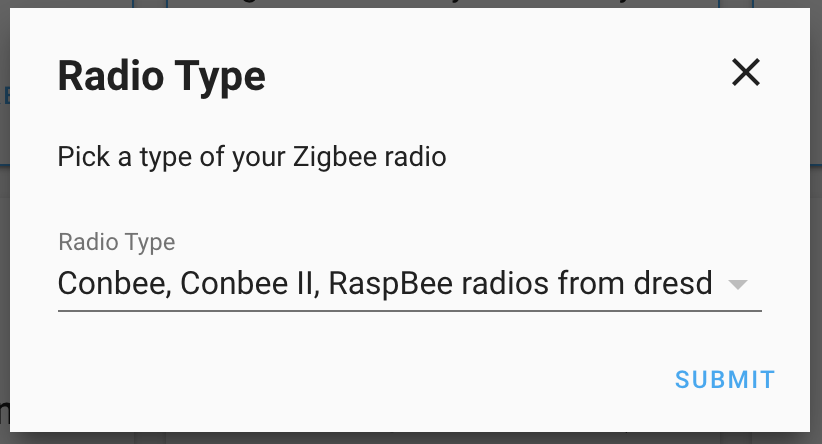
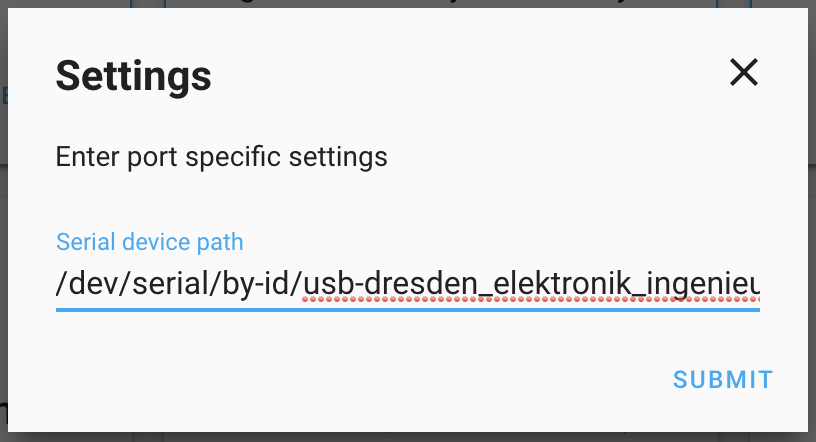
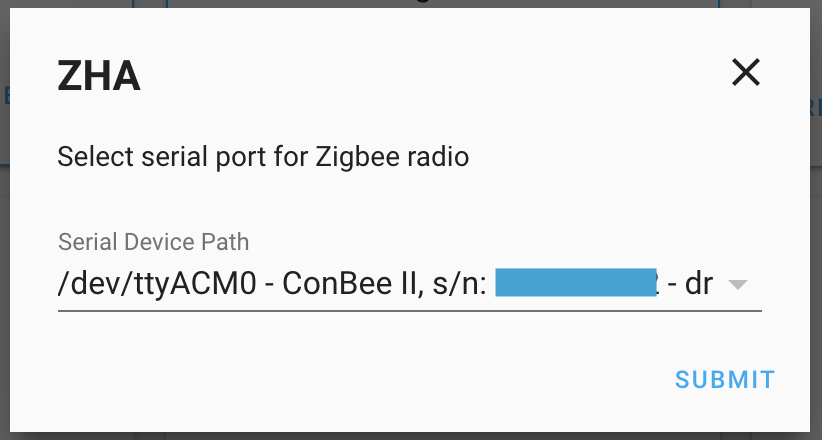
Scroll up and “Deploy the container”.  Confirm that you want to “Replace” the existing container. Wait for HA to restart. Try again to install the ZHA integration, but use /dev/ttyACM0 as the device path this time.

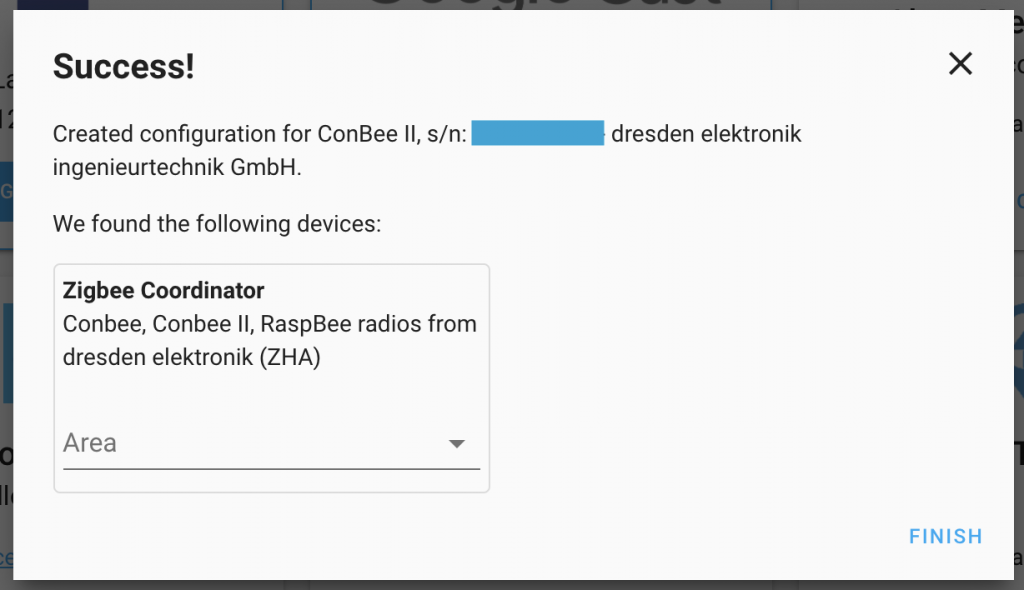
It’ll find it right away because we mapped the host’s device path to inside the container as /dev/ttyACM0:

This is HA 0.110.7

Saw a bunch of sensible “zha” logs in home-assistant.log

‘docker inspect’ output:

            "Devices": [
                {
                    "PathOnHost": "/dev/serial/by-id/usb-dresden_elektronik_ingenieurtechnik_GmbH_ConBee_II_DE2213352-if00
",
                    "PathInContainer": "/dev/ttyACM0",
                    "CgroupPermissions": "rwm"
                }
            ],

Was not prompted for zha database path; kinda expected it. Later, I found it in /config:

bash-5.0# ls -l /config/zigbee.db
-rw-r--r--    1 root     root         77824 Jun 21 01:44 /config/zigbee.db

Enable “permit” mode

From the docs:

“To add new devices to the network, call the permit service on the zha domain. Do this by clicking the Service icon in Developer tools and typing zha.permit in the Service dropdown box. Next, follow the device instructions for adding, scanning or factory reset.”

Seen in home-assistant.log when I called the permit service:

2020-06-17 21:46:32 INFO (MainThread) [homeassistant.components.zha.api] Permitting joins for 60s

Power ON SmartThings button and tap the button a few times:

2020-06-17 21:48:50 INFO (MainThread) [homeassistant.components.zha.api] Permitting joins for 60s
2020-06-17 21:49:08 INFO (MainThread) [zigpy_deconz.zigbee.application] New device joined: 0x361f, 28:6d:97:01:02:03:04:05
2020-06-17 21:49:08 INFO (MainThread) [zigpy.application] Device 0x361f (28:6d:97:01:02:03:04:05) joined the network
2020-06-17 21:49:08 INFO (MainThread) [zigpy.device] [0x361f] Requesting 'Node Descriptor'
2020-06-17 21:49:09 INFO (MainThread) [zigpy.device] [0x361f] Node Descriptor: <Optional byte1=2 byte2=64 mac_capability_flags=128 manufacturer_code=4673 maximum_buffer_size=82 maximum_incoming_transfer_size=82 server_mask=11264 maximum_outgoing_transfer_size=82 descriptor_capability_field=0>
2020-06-17 21:49:09 INFO (MainThread) [zigpy.device] [0x361f] Discovering endpoints
2020-06-17 21:49:09 INFO (MainThread) [zigpy.device] [0x361f] Discovered endpoints: [1]
2020-06-17 21:49:09 INFO (MainThread) [zigpy.endpoint] [0x361f:1] Discovering endpoint information
2020-06-17 21:49:09 INFO (MainThread) [zigpy.endpoint] [0x361f:1] Discovered endpoint information: <Optional endpoint=1 profile=260 device_type=1026 device_version=0 input_clusters=[0, 1, 3, 32, 1026, 1280, 2821] output_clusters=[3, 25]>
2020-06-17 21:49:16 INFO (MainThread) [homeassistant.helpers.entity_registry] Registered new binary_sensor.zha entity: binary_sensor.samjin_button_84e50d01_ias_zone
2020-06-17 21:49:16 INFO (MainThread) [homeassistant.helpers.entity_registry] Registered new sensor.zha entity: sensor.samjin_button_84e50d01_temperature
2020-06-17 21:49:16 INFO (MainThread) [homeassistant.helpers.entity_registry] Registered new sensor.zha entity: sensor.samjin_button_84e50d01_power

“samjin” button.

Entities:

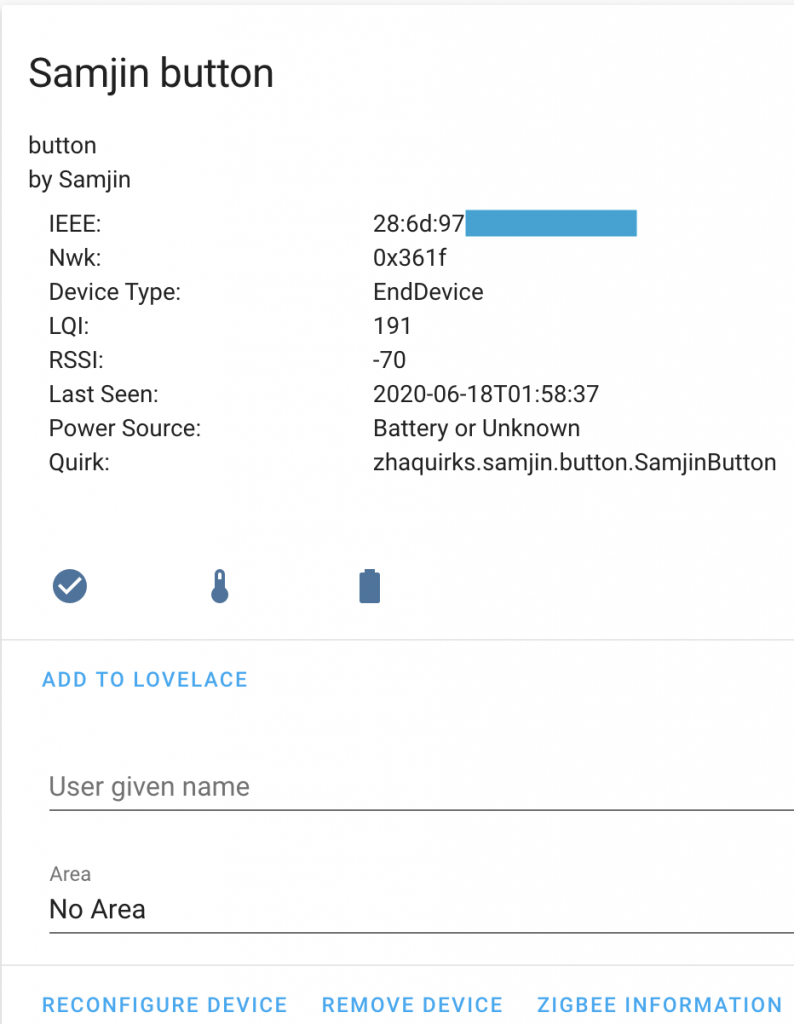
Device info

HA web-ui > Configuration > Zigbee Home Automation. Click the device.

Events

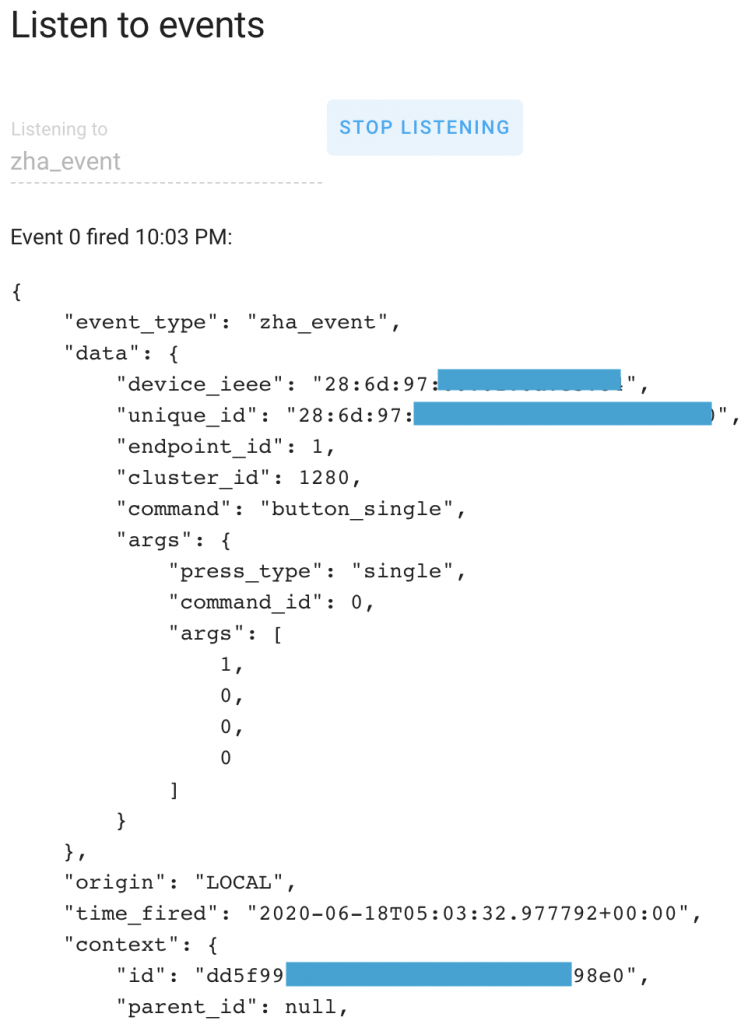
Button press event: Developer Tools > Events. Listen to “zha_event”.

Single-tap:

Double-tap:

"command": "button_double",

Long-press event:

"command": "button_hold",

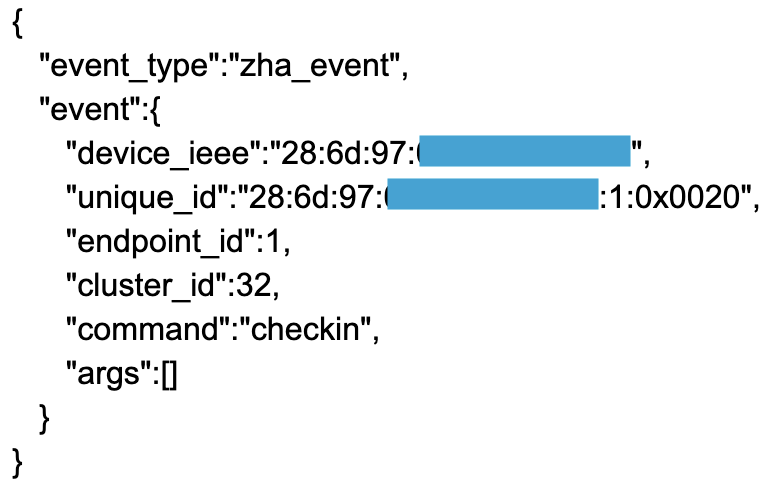
Check-in event. Might be useful as a heartbeat signal to ensure the button is really alive; and indirectly, the the quality of the zigbee network. The following is the value for msg.payload as displayed in Node Red:


Node Red

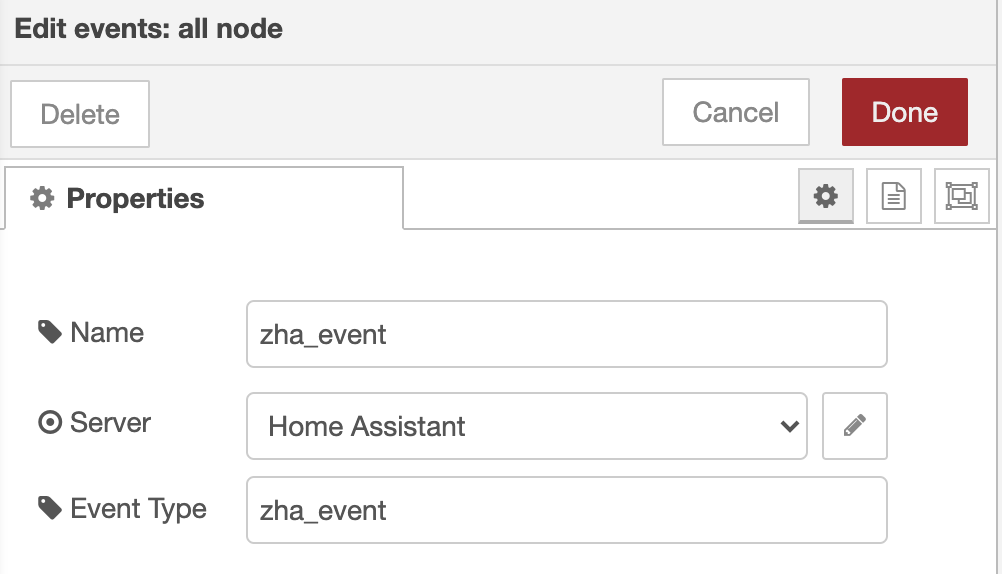
Use [events: all] node:

But filter to “zha_event”:

See the data using [debug] node:

{
   "event_type":"zha_event",
   "topic":"zha_event",
   "payload":{
      "event_type":"zha_event",
      "event":{
         "device_ieee":"28:6d:97:01:02:03:04:05",
         "unique_id":"28:6d:97:01:02:03:04:05:1:0x0500",
         "endpoint_id":1,
         "cluster_id":1280,
         "command":"button_single",
         "args":{
            "press_type":"single",
            "command_id":0,
            "args":[
               1,
               0,
               0,
               0
            ]
         }
      }
   },
   "_msgid":"5f9be8c4.631308"
}


Grafana

Grafana query, because SmartThings button has a temperature sensor inside:

According to grafana/influxdb, the SmartThings button is reporting its battery level (%) every 3 hours. But next day, changed to every 10 hours.

#

Reuse a Node Red flow for multiple devices

The key for me was the ability to extract strings from mqtt topics (msg.topic) with regex’s.

Eg. using node red’s Change node and jsonata expressions:

$match(topic, /binary_sensor.(cam_\w{5})_motion/).groups[0].$string()

That gives you ‘bacon’ in binary_sensor.cam_bacon_motion. Set msg.data.foo to that and the flow can be used for anything matching the regex. Moreover, you can use $.data.foo in the same change node to set other msg.*

It’s really powerful.

Fix: Megasync stopped syncing files

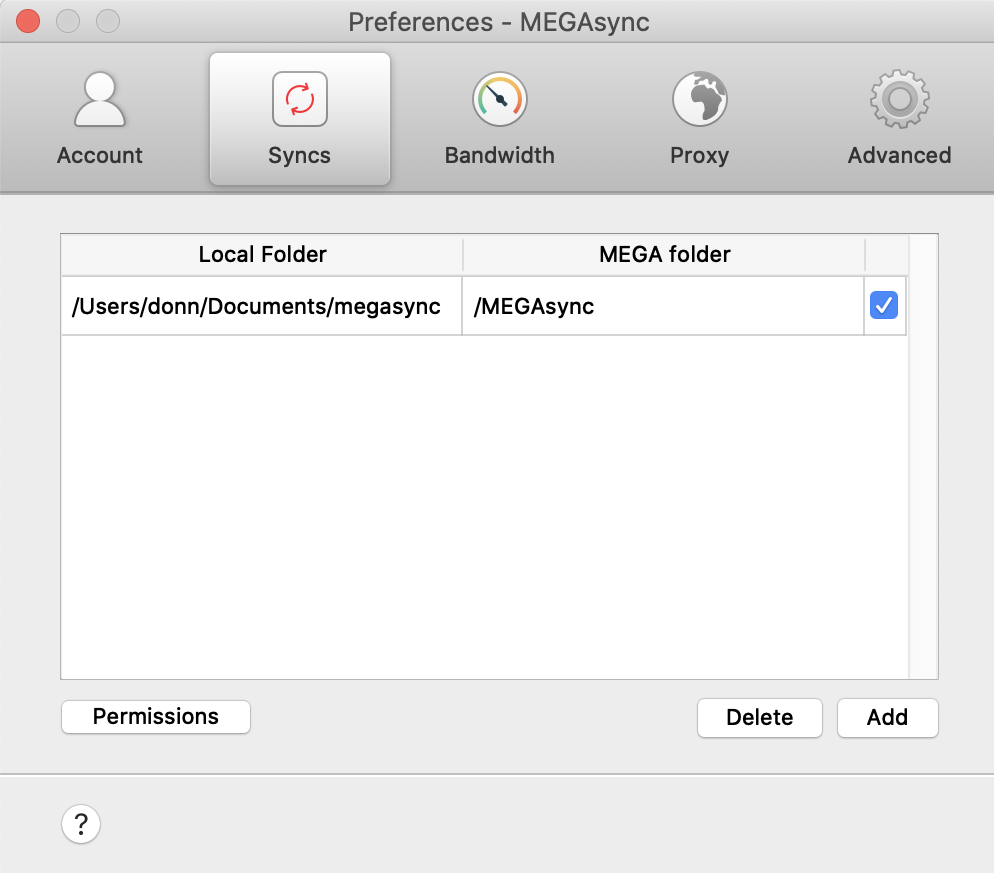
First, open Megasync Preferences, “Syncs” tab, and ensure the local folder has sync enabled (checkbox):

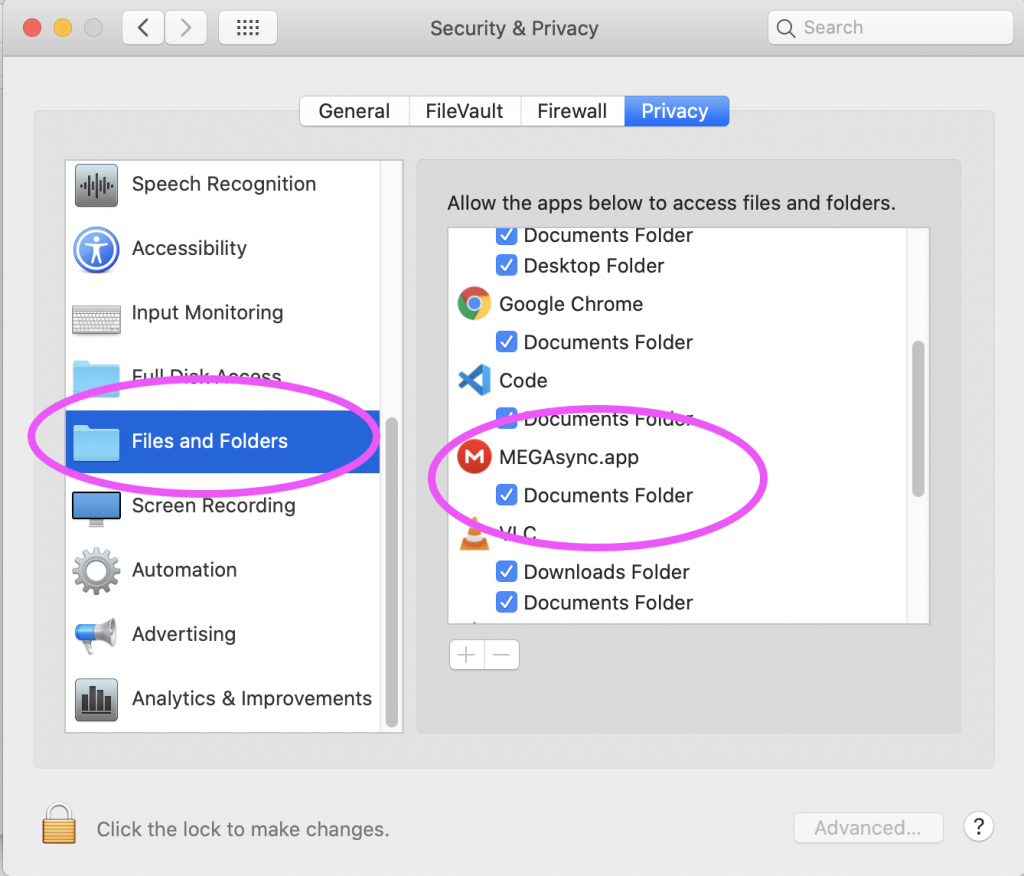
If you click the checkbox but it refuses to change to the enabled (checked, ticked) state, then you need to refresh MacOS privacy settings for Megasync, as follows:

Open Mac “System Preferences” app, then “Security & Privacy”.  Click “Privacy” at the top. Click “Files and Folders” on the left. On the right, find MEGAsync.app and toggle the checkbox to UNCHECKED. If it prompts you to quit Megasync, decline. Then toggle the checkbox back to CHECKED. When it prompts you to quit Megasync, choose the option to quit/close Megasync. Now if you restart Megasync, it should start syncing again.  If not, then ensure Megasync Preferences > “Syncs” tab has the local folder enabled/checked (see first paragraph, above).

#

Setup OwnTracks for room presence with iBeacon & Home Assistant

I want Home Assistant to quickly know when I arrive home, and waiting for my iPhone to connect to my Unifi wifi is too slow, too late, because I don’t blast my wifi APs at full-power to reach very far outside. When my iPhone is close to my mailbox would be a suitable trigger.

It would also be nice to track when I’m in the bedroom for more than 2 hours, after 10pm, to trigger “I have gone to sleep” automations.  Ditto for “It’s morning, and I have woken up” automations. These are easily buildable in Node Red.

Setup your iBeacon/beacon

First, setup & configure your iBeacon/beacon. Article: How-to for RadBeacon Dot beacons

Install the Home Assistant OwnTracks integration

Using the Home Assistant web-ui front-end, install the OwnTracks integration.

Configuration > Integrations > “+” icon, and search for “owntracks”.

Copy the instructions and especially the URL and “secret” it gives you and stash it somewhere safe.

“entity-id” in this article is the Home Assistant entity ID.

Setup the OwnTracks iOS app

Install the OwnTracks app from the Apple app store.

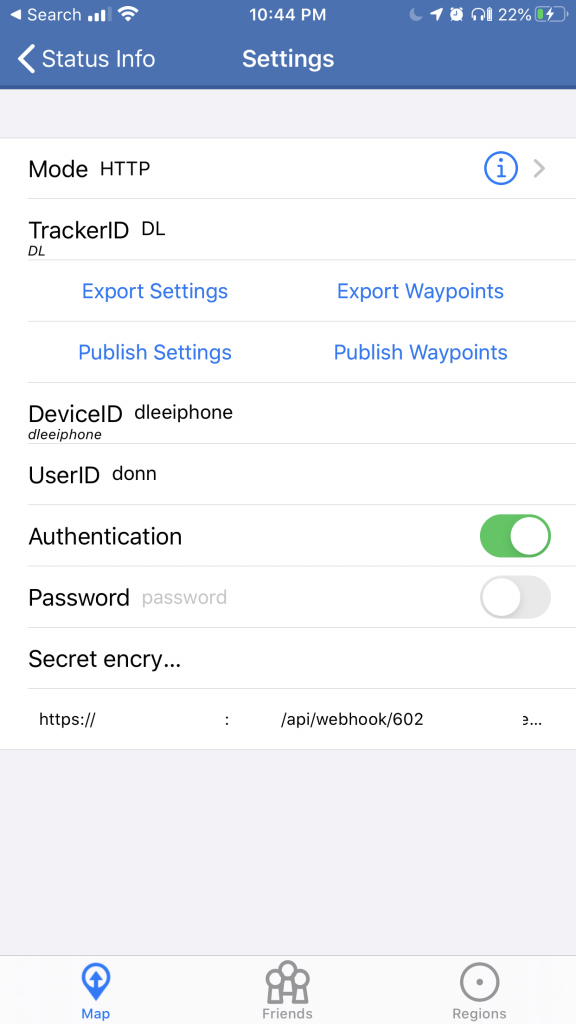
In the OwnTracks iOS app, follow the instructions just given by the Home Assistant OwnTracks integration to configure the app’s settings:

  • Change the Mode to HTTP
  • Create a TrackerID (two letters, like initials for your first & last name)
  • Create a DeviceID that will appear in the entity-id
  • For UserID, enter your first name, alias/username, or any name you want (it will also be part of the entity-id)
  • Enable Authentication
  • Leave Password empty, and enabled or disabled doesn’t matter
  • For Secret encryption key enter the long string of characters that the Home Assistant OwnTracks integration gave you as encryption key  . This must match the Home Assistant OwnTracks integration  and is the shared key the iOS app and your Home Assistant backend will use to securely communicate region enter/leave events.

Create a region assigned to the beacon

In the OwnTracks app, create a region represented by your iBeacon/beacon:

  • Tap “Regions” at the bottom of the main screen.
  • On the Regions screen, tap the “+” icon in the top-right to create a new region.

A region in OwnTracks maps to a zone in Home Assistant.

In the region settings, give the region a name and add your beacon’s details:

For beacon-based regions (rather than GPS-based regions), the radius should be set to 0 (zero) per the docs. Paste the beacon’s UUID.  If you are only tracking on UUID, leave major & minor numbers empty. Else, enter the beacon’s major & minor numbers.

You can also track on UUID and major number (no minor number). It all just depends on your application. For example, some people organize their beacons by a single UUID for the whole museum, major number for a wing in the museum, and a minor number for an exhibit within a wing.

You can also have multiple beacons with the same UUID and major/minor numbers, and spread them around the house. This would be something like a super-region that covers the whole house. But then, why not use wifi-based presence?

NOTE: Some docs out there haven’t been updated and tell you to ensure share is enabled in the region’s settings. This setting has been removed in the latest version of OwnTracks iOS (May 2020). All regions are shared by default now.

Create a new zone for the region

Create a zone that matches the OwnTracks region to your Home Assistant configuration.yaml file:

zone:
  - name: Mailbox
    latitude: 47.4
    longitude: -100.1
    radius: 5

Optionally, configure the OwnTracks integration to process region enter/leave events only (ignore location/GPS updates):

owntracks:
  events_only: true

And restart Home Assistant.

Tracking when your iPhone enters the beacon’s region

In Home Assistant, the entity-id has the format:

device_tracker.<UserID>_<DeviceID>

I created a beacon named Mailbox and a Home Assistant zone also called Mailbox. The settings I used in the OwnTracks iOS app were donn for the UserID and dleeiphone for the DeviceID.

So, when I am close to the beacon located inside my mailbox, the entity device_tracker.donn_dleeiphone changes to state Mailbox.

Notice that the source_type is bluetooth_le (BLE), which makes it easy to find all beacon-based entities.

Additionally, a Home Assistant logbook entry is created:

And when I walk away from my mailbox, device_tracker.donn_dleeiphone changes to state home because I am too far from the mailbox but still at home.

Now I can trigger automations in Node Red using the state of that entity-id.

But… when leaving the house?

When I leave the house, I pass by the mailbox and I don’t want this to be interpreted as an arrival home. So there’s simple logic in a Node Red flow to check that I was away from home (aka not_home state), according to other entity-id’s, for at least 20 minutes before entry into the Mailbox region is considered an arrival home.

Latency/Reaction time

In practice, I’m seeing the state change from not_home to Mailbox in less than 10 seconds (sometimes less than 5 seconds). The change from Mailbox to home usually takes longer: more like 20-30 seconds. There may be a timeout in the app that waits before declaring the iPhone has left the region assigned to the beacon.

Beacons that move

The beacon itself can move, so the beacon has its own entity-id with a state value that will change to reflect the last-known location Home Assistant has for the beacon. For example, you can put a beacon in your backpack and watch its state change from home to work. Where the state values are names of zones you have created.

So if you named a beacon backpack, the entity-id would be device_tracker.beacon_backpack and the state of that entity would change from home to work zones (example).

The beacon is dumb. This is possible because your smartphone is close to the backpack beacon and OwnTracks is telling Home Assistant that it’s close to backpack with a GPS coordinate of X,Y (lat, long).  You can track where you parked your car in the same way.

In the OwnTracks app, beacons that change location should have their region settings set to a radius of -1 . See the docs.

#

RadBeacon Dot setup (iBeacon)

The goal is to use beacons for room presence with Home Assistant smarthome automation. I always have my iPhone with me, so tracking the phone will quickly locate me in a room or at the front door when I come home.

iBeacon is the protocol (packet format) the beacon will emit. Eddystone and AltBeacon are other protocols. Even though Apple defined iBeacon, any device, eg. Android, can listen to iBeacon packets. Beacon packets are emitted using Bluetooth Low Energy (BLE).

I chose RadBeacon’s “Dot” beacon over their “Chip” beacon because the Dot has a replaceable coin battery, CR2032 (a popular coin battery size).

Radius Networks sells two versions of the Dot: Non-configurable ($11) and Configurable ($14). Get the Configurable model.

Get the RadBeacon Dot working

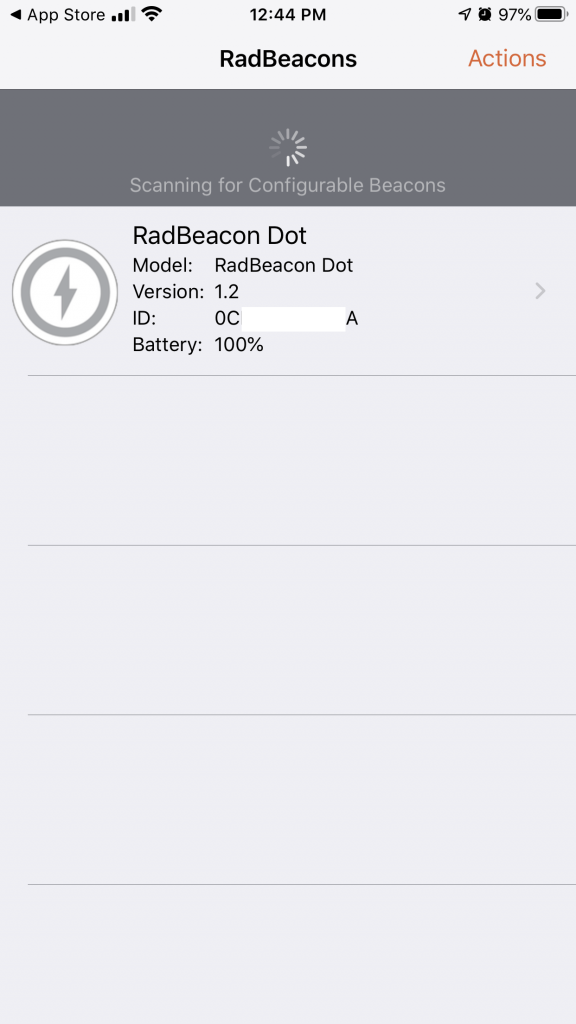
Download the RadBeacon app from the Apple app store. Launch the app. The first screen will be an empty list of beacons because you haven’t discovered any beacons yet.

Turn on the Dot by clicking the top of it (lighting bolt symbol button) once. The GREEN led will flash once, indicating the Dot is ON.  To turn off the Dot, click the button once and the RED led will flash, indicating the Dot is OFF.

With the Dot ON, press and hold the button for about 5 seconds until the GREEN led flashes twice. This indicates the Dot is in CONFIGURABLE mode (config mode, for short).

Swipe down (pull down) on the app’s first screen to scan for nearby beacons that are in config mode.

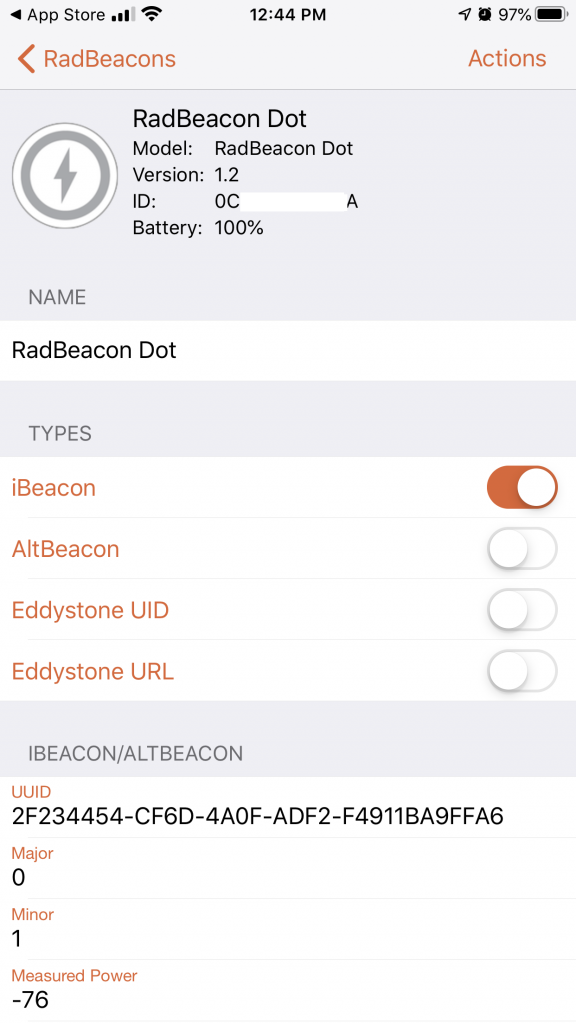
Your new beacon will appear in the list with its name, model, version, id, and battery status. Tap the row for the beacon to see detail and config options.

(I’m not using any of the UUIDs in this article)

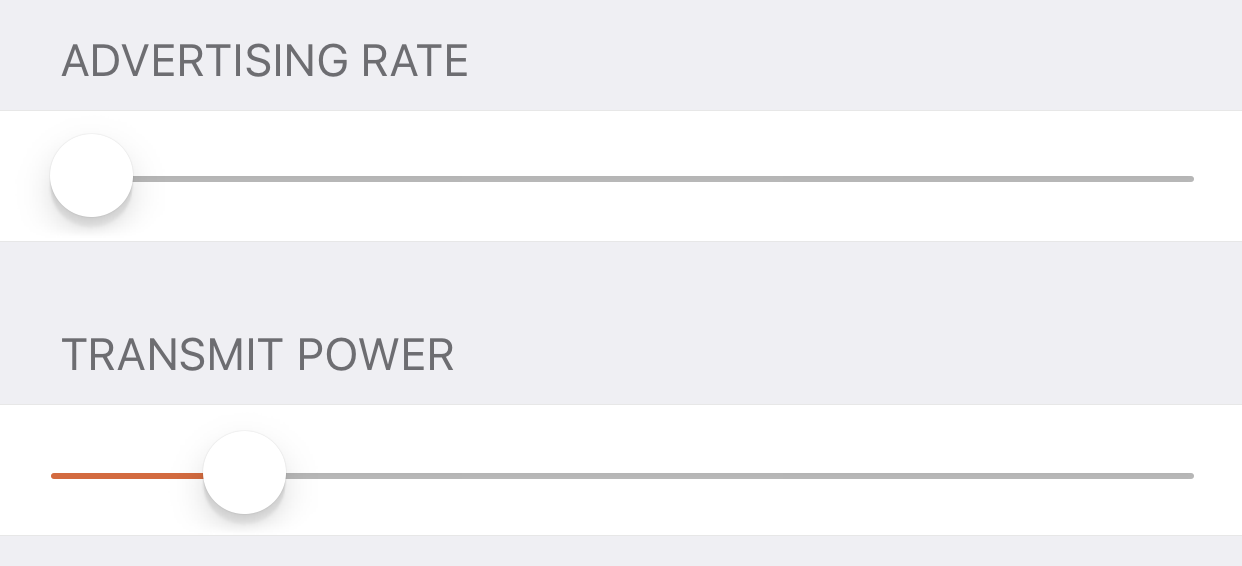
In the next screen, you can configure the beacon’s name, type/protocol (iBeacon, Eddystone, AltBeacon), UUID, major & minor numbers, advertising rate, and transmit power.

To extend battery life, I decided on an Advertising Rate of 1 time per second (1000ms, or 1Hz), the lowest setting. This should be quick enough for room presence applications. For Transmit Power, see below.

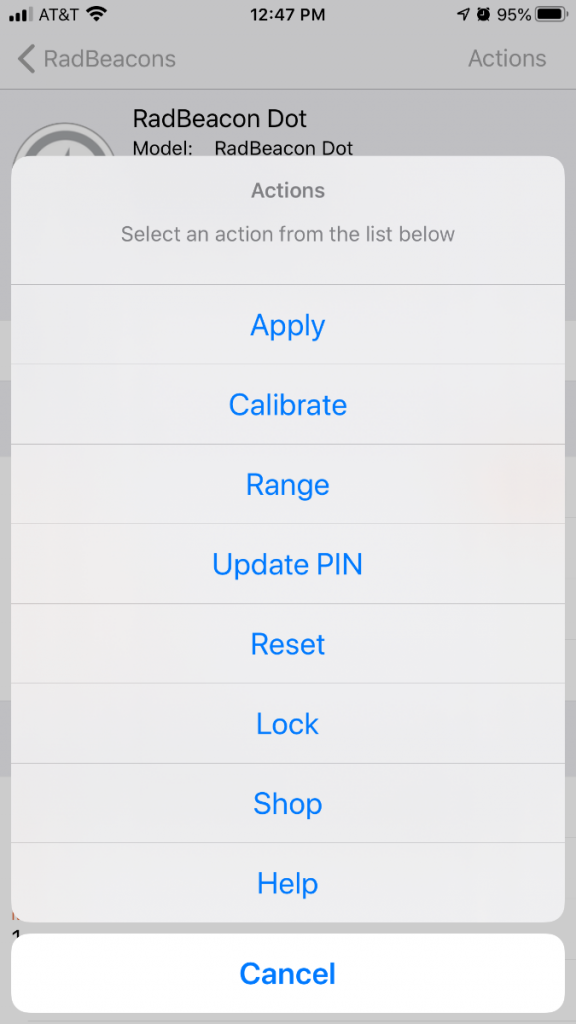
After you setup everything, tap “Actions” in the top-right of the screen and tap “Apply” in the actions menu.

If it asks to calibrate to the measured power, tap “Yes”. The app will ask for the Dot’s PIN, which by default is 00000000 (eight zeros).  Now the Dot is configured.

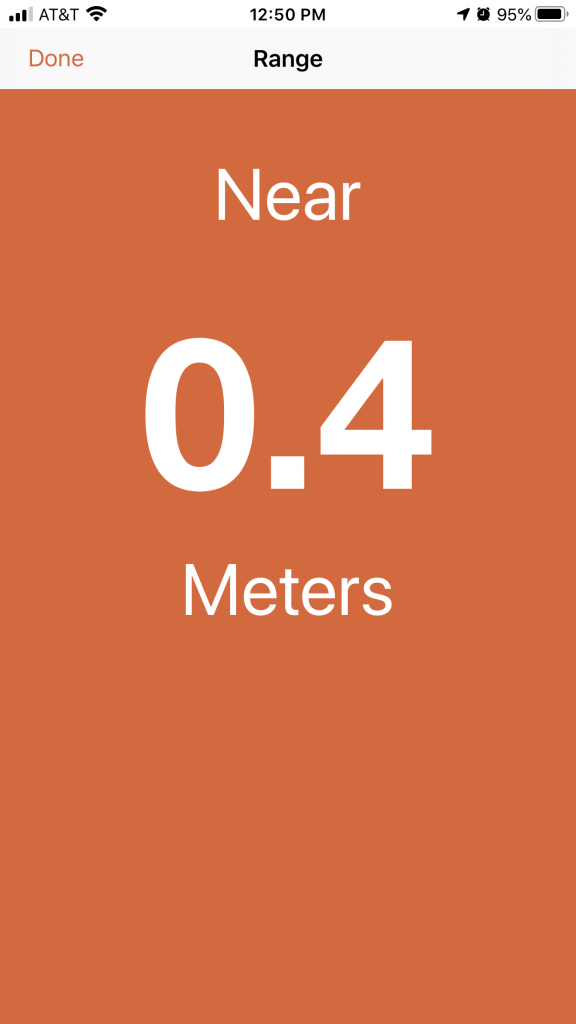
To determine a suitable Transmit Power, you can tap “Actions” in the top-right of the screen and then tap “Range” in the action menu.

This will run a utility that shows, in real-time, how close your iPhone is to the beacon in meters. “Immediate” means the phone is super-close to the beacon. “Unknown” means the phone doesn’t “see” the beacon and so is out-of-range. Play with different Transmit Power (measured in dBm) strengths and use the “Range” tool to tune the detection range to your liking.

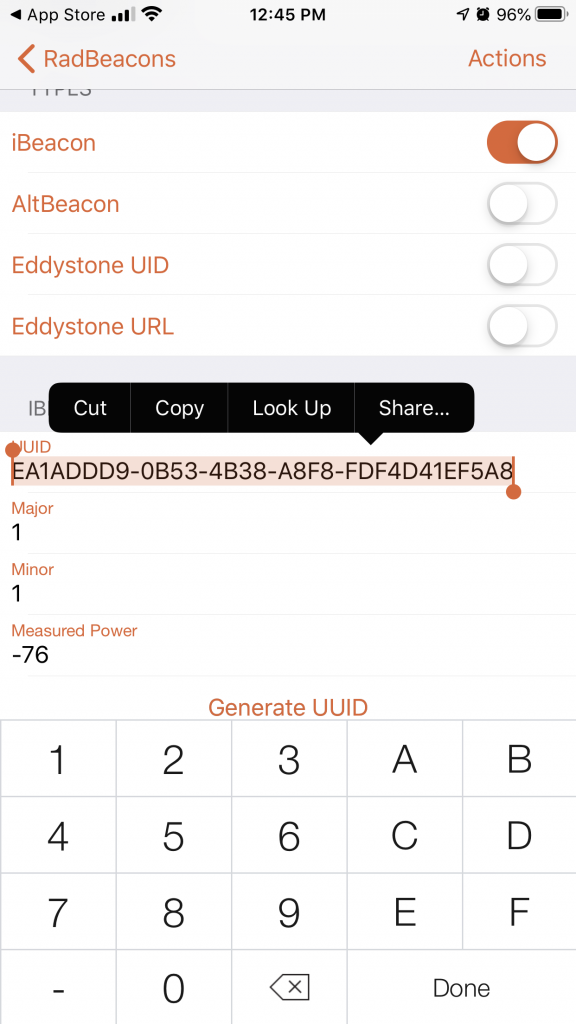
You can copy-paste your Dot’s UUID from here to another app like OwnTracks:

If the Dot will be in an area where people could reconfig it: Tap “Actions” and then “Update PIN” to change the Dot’s default PIN, 00000000 (eight zeros), to a custom PIN. Save the PIN in your password manager, eg. LastPass. In reality, few will know what a beacon is and even fewer will want to reconfigure it. Most likely, someone will just steal it and play with it later, so maybe mount it high off the ground if you’re worried.

Click the Dot’s button to exit config mode (green led flashes once).  Config mode consumes a lot of battery, so exit config mode as soon as possible after you are done configuring your Dot. The Dot should automatically exit config mode after 30 minutes (not tested).

There was an academic project that estimated the battery life of the Dot. Title of the paper is “ARCTIC: An IoT-based System for Child Tracking in Day Care”.

#

Karabiner & Goku: Next step is Hyper mode (Mac)

In a earlier post, I setup Karabiner with Goku to map Cmd-Ctrl-w to a series of custom keystrokes.

Why not make this even easier?

Enter “hyper” mode, which is the idea of making ANY key on your keyboard act like the Ctrl key. Basically, this is making a regular key like the “a” key a modifier key (a key to be held-down), but a regular “a” when the key is typed normally.

Based on @nikitavoloboev’s karabiner.edn file, I started with a very small config and now slowly adding more keyboard shortcuts/macros.

Here’s a simple ~/.config/karabiner.edn that makes the ‘a’ key behave like a SHIFT key, but only for the letter ‘y’. And, if you hold-down ‘a’ and tap ‘h’, it types out “Hi”:

{
  :simlayers {
    :a-mode {:key :a}
  }
  :main [{:des "a-key (launch apps, for example)"
    :rules [:a-mode
      [:y :!Sy]
      [:h [:!Sh :i]]
    ]
  }]
}

Don’t forget, to make it active (update karabiner.json) by running Goku. Or use ‘gokuw’, which will always watch for changes to your karabiner.edn:
$ goku

This means, the “a” key, used as a modifier key, can be mapped to another 40+ other keys to do 40 more custom keystrokes.
Then the “b” key in the same way, can give you another 40 more custom keystrokes.
Then the “c” key… and so on.
Even the SPACEBAR can be turned into a modifier key!

That’s a lot of new keyboard shortcuts.

When you want to add another modifier to karabiner.edn (a new “layer”), do something like this:

{
  :simlayers {
    :a-mode {:key :a}
    :d-mode {:key :d}
  }
  :main [
    {:des "a-key (stuff for vim)"
      :rules [:a-mode
          ;; complete a ctag
          [:y [:!Tx :!Tclose_bracket]]

          ;; c-x, c-p complete prev word
          [:u [:!Tx :!Tp]]

          ;; c-x, c-l complete whole line
          [:i [:!Tx :!Tl]]
      ]
    }
    {:des "d-key (dpkg)"
      :rules [:d-mode
        [:y :!Sy]
        [:p [:d :p :k :g :spacebar :hyphen :l]]
      ]
    }
  ]
}

Refs:
https://medium.com/@nikitavoloboev/karabiner-god-mode-7407a5ddc8f6

Simplify keystrokes with Karabiner and Goku (Mac keyboard macros)

Keyboard macros using Karabiner and goku

Good for making hard key sequences like ctrl-x, ctrl-] (vim completion mode) easier.

Karabiner can control almost everything keyboard-related at a low-level.
But Karabiner “Complex modifications” / “rules” are hard to configure in json, so use goku (a DSL) to write the rules in shorthand and generate the karabiner rules.

Look at your current karabiner config. Maybe save a backup:
less ~/.config/karabiner/karabiner.json

Install goku:
brew install yqrashawn/goku/goku
brew services start goku

Create the default goku .edn file, write your rules in goku format:

vi ~/.config/karabiner.edn

File contents:

donn-mbp:~ donn$ cat ~/.config/karabiner.edn
{:main [{:des "vim completion mode"
  :rules [
    ;; c-x, c-] complete tag
    [:!QWt [:!Tx :!Tclose_bracket]]

    ;; c-x, c-p complete prev word
    [:!QWw [:!Tx :!Tp]]

    ;; c-x, c-l complete whole line
    [:!QWe [:!Tx :!Tl]]
  ]
}]}

in the above, when Cmd-Ctrl-t is pressed: The app sees Ctrl-x Ctrl-]
which is vim completion-mode (ctrl-x) to complete a ctag (ctrl-])
!QW means right-cmd and right-ctrl keys are required.

Cmd-Ctrl was chosen because it works well with my Kinesis Advantage2 keyboard

How to find more symbols for special keys like ‘close_bracket’?
Search the goku source code for: grave_accent_and_tilde
(which was used in the official goku tutorial)

Run goku to translate the rules in the .edn file to karabiner json (this will update karabiner.json):
$ goku

No need to restart Karabiner to pick-up the new rule 🙂

Now from vim insert-mode, type cmd-ctrl-w to autocomplete previous word(s), which is easier than ctrl-x, ctrl-p, at least on a Kinesis keyboard.

Goku (has a tutorial with a reference of modifiers “left ctrl” to goku character-code “T”):

https://github.com/yqrashawn/GokuRakuJoudo

Next step: For something more advanced and more powerful, see my post about Karabiner “hyper” mode